
Van's Air Force
You are using an out of date browser. It may not display this or other websites correctly.
You should upgrade or use an alternative browser.
You should upgrade or use an alternative browser.
Scott's RV14A: N52XL
- Thread starter rockitdoc
- Start date


Started back in to completing the QB wings. I have to close up the bottoms and install one access panel on the port side. I'll do the access panel first because it's pretty easy and I'm not sure how to reach all the rivets on the bottom skins, so something to think about.


On June 6 the wash primer was completed and the urethane primer was applied to the top of the wing. On June 7 the urethane primer was applied to the bottom of the wing. Harriet and I competed in the Glenwood Rally in the MGB over the weekend, then on June 11 I sanded the urethane down in preparation for painting.


I decided to paint the wingtips where the landing and position lights go silver to match the fuse. I did this yesterday, June 26. 4 hours. Today, June 27, I assembled the wingtips landing and position lights and attached the wingtips to the starboard wing. Harriet helped me put the flap on yesterday. 3 hours.


Cowl Bodywork Completed
Got all the bodywork done on the cowls with the side pins hidden under the RV14A plaque. Everything fits well and the pins and Skybolts all go in with no issues.
View attachment 31681
I used the same pin hinge covers as these on my RV7. What did you do with the ends of the hinge pins behind the covers? Thanks Kloot
Attached the baffles.
View attachment 31685
View attachment 31684
Started fitting the snorkel. It was too wide by 3/4". So, I cut it in half and took a section out in the middle and epoxied/floxed it back together. After some bodywork, it looks pretty good. Primed it today and will paint it tomorrow.
View attachment 31683
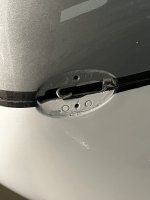
I decided to add an extra access port in the bottom of the port wing. Two reasons: 1) obtain better access to the pitot and AOA hoses and wiring of the pitot heater and, 2) obtain better access to rivets for riveting the pitot tube and the forward-most skin rivets which otherwise can't be reached (at least by me).
Thanks to Wirejock for the hole cutter. It did the trick.


Thanks to Wirejock for the hole cutter. It did the trick.
Thank you Scott. That’s what I’m going to do. Didn’t know if there was a better mousetrap.Kloot,
I bent the pin around to form a loop. This allows pulling it out easier.
Scott
Glad it worked. I never purchased, but this thing is supposed to be the "bee's knees."

 www.malcotools.com
“Gold Standard” Sheet Metal Hole Cutters and Cutter Bits - Malco Tools
Distinctive gold Bits, Bearings and Pivot Pin signify the longest lasting, fastest cutting, easiest adjusting solution for cutting holes in sheet metal. Up to 20-gauge (1.02 mm) capacity in galvanized steel.
www.malcotools.com
Here's what mine looks like with the trick cover removed.Thank you Scott. That’s what I’m going to do. Didn’t know if there was a better mousetrap.
Attachments
I'm back! Not much to report in past month or so. Just cutting and buffing paint and moving everything except fuse to the hangar. There is a LOT of real estate to cut and buff! Not much like a car.
Anyway, working on bleeding brakes which is way a lot of fun. Needed a break. So, I installed the Aircraft Specialty alternate air door. Very nice piece, as usual from these guys. Way better than the OEM door. It took a little trimming to make it fit but it works very slick.

Anyway, working on bleeding brakes which is way a lot of fun. Needed a break. So, I installed the Aircraft Specialty alternate air door. Very nice piece, as usual from these guys. Way better than the OEM door. It took a little trimming to make it fit but it works very slick.
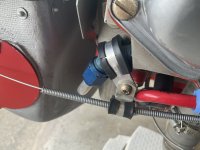
I presume you mean the 90 degree coming off the head? I agree. I never liked the clamp on the nut, either. Thanks. SDuring a review by my bud who is an A&P, he suggested I move the Adel clamp off the flare nut to the fitting. Reason was the fitting is less likely to turn than the nut.
I have no idea how that nut could spun off.. the adel clamp works like a wire safety to my perception... it is tight and the alternate air cable wont just let the assembly spin. But do what the A&P says.During a review by my bud who is an A&P, he suggested I move the Adel clamp off the flare nut to the fitting. Reason was the fitting is less likely to turn than the nut.
The nut doesn’t have to spin off, just get loose for a leak to occur. Probably would never loosen the nut but not a good practice. And if I get a DAR like Mel, one less thing for him to find.I have no idea how that nut could spun off.. the adel clamp works like a wire safety to my perception... it is tight and the alternate air cable wont just let the assembly spin. But do what the A&P says.
I wasn't happy with the paintwork I did on the lower cowl after cutting and buffing it. So, rather than wish I had redone it when it was in the shop, I sanded it all down and repainted it. This time, I got the lighting so I could see what I was painting (important) and it turned out much better. A little cutting and buffing will make this part look like the upper bits. Almost there........!

How did you go about painting the rest of the fuselage? I'm thinking about how to tackle it. Seems like it is going to be a challenge to paint the underside and have enough space to get in with a creeper. Also to be able to paint a complete "lap" around the fuselage before the paint flashes off and makes it difficult to avoid overspray settling on. Where on the fuse did you start and end spraying to meet up with the "wet edge"?I wasn't happy with the paintwork I did on the lower cowl after cutting and buffing it. So, rather than wish I had redone it when it was in the shop, I sanded it all down and repainted it. This time, I got the lighting so I could see what I was painting (important) and it turned out much better. A little cutting and buffing will make this part look like the upper bits. Almost there........!
View attachment 69656
Cheers
Paul
Paul,How did you go about painting the rest of the fuselage? I'm thinking about how to tackle it. Seems like it is going to be a challenge to paint the underside and have enough space to get in with a creeper. Also to be able to paint a complete "lap" around the fuselage before the paint flashes off and makes it difficult to avoid overspray settling on. Where on the fuse did you start and end spraying to meet up with the "wet edge"?
Cheers
Paul
Painting the belly was not as difficult as it might seem, although it is a lot of real estate. The fuse is pretty high up, so a creeper is all that is needed, although I just sat on the floor of my shop and slid around. I adjusted my paint with slow flashing reducer and painted at an average temperature of 65F, so by continually moving, overspray was kept at a minimum. I use an Anest Iwata LPH400 gun and orange air cap for colors and silver cap for clears. I painted the centerline of the belly and worked outward. That way, the overlap orange peel is at the very center, underneath, and less noticeable. It's no different than the way you would shoot a large car. Some cutting and buffing is inevitable, though, to get a perfectly flat finish if that is the goal.
Paul,
Painting the belly was not as difficult as it might seem, although it is a lot of real estate. The fuse is pretty high up, so a creeper is all that is needed, although I just sat on the floor of my shop and slid around. I adjusted my paint with slow flashing reducer and painted at an average temperature of 65F, so by continually moving, overspray was kept at a minimum. I use an Anest Iwata LPH400 gun and orange air cap for colors and silver cap for clears. I painted the centerline of the belly and worked outward. That way, the overlap orange peel is at the very center, underneath, and less noticeable. It's no different than the way you would shoot a large car. Some cutting and buffing is inevitable, though, to get a perfectly flat finish if that is the goal.
Thanks Scott
The LPH400 looks like a nice gun and the HTE should help with overspray reduction I expect.
The belly is a big expanse especially under the cockpit and baggage area. I can't really visualize how to work underneath and then come out and up the sides while spraying as it seems there would be a bit of scrambling to get out from underneath to spray up the sides. I'm thinking of maybe spraying the belly first and then masking it off when it is dry (along the natural seam lines) before spraying the fusealage sides and top.
p.s. if I can paint early in the day the temps will be cooler so it doesn't flash off too fast, I will also try slow reducer and activator, the down side of that will be more potential for runs and dust getting in...
Last edited:
That's a good plan. In fact, unless you have a 44 oz cup on your gun, you'll need to change cups halfway through. I used two 22 oz cups to cover the belly and halfway up the sides of mine. Two cups works well, but if you are using Sherwin Williams, like me, the paint needs to react with the activator for 15 mins before spraying. Logistics gets tricky. Shoot the belly. Then shoot the sides and roof. The overspray along the underside can be cut and buffed and out of view unless observed from below. So, unless you're planning on inverted flying with spectators flying above you, looking down, it won't be visible.Thanks Scott
The LPH400 looks like a nice gun and the HTE should help with overspray reduction I expect.
The belly is a big expanse especially under the cockpit and baggage area. I can't really visualize how to work underneath and then come out and up the sides while spraying as it seems there would be a bit of scrambling to get out from underneath to spray up the sides. I'm thinking of maybe spraying the belly first and then masking it off when it is dry (along the natural seam lines) before spraying the fusealage sides and top.
p.s. if I can paint early in the day the temps will be cooler so it doesn't flash off too fast, I will also try slow reducer and activator, the down side of that will be more potential for runs and dust getting in...
I've got the 3M PPS cups, 600 ml, the paint is Valspar (Sherwin Williams) single stage polyurethane that doesn't require any induction time. Still, I've been caught out on some smaller parts when I had to stop and mix more paint and by then the previous coat was already flashed off and it was difficult to get a good finish. The standard reducer flashes off quickly at 25 C but there is a slower speed activator and reducer that will hopefully work out better on the bigger parts. This paint seems to lay down and flow out better when it is warmer, even though it flashes off a bit too fast before the next coat.That's a good plan. In fact, unless you have a 44 oz cup on your gun, you'll need to change cups halfway through. I used two 22 oz cups to cover the belly and halfway up the sides of mine. Two cups works well, but if you are using Sherwin Williams, like me, the paint needs to react with the activator for 15 mins before spraying. Logistics gets tricky. Shoot the belly. Then shoot the sides and roof. The overspray along the underside can be cut and buffed and out of view unless observed from below. So, unless you're planning on inverted flying with spectators flying above you, looking down, it won't be visible.
Milestone!
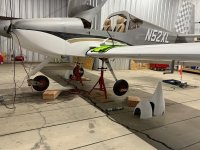
Finished bleeding the Beringer brakes today. My buddy Larry and his wife did the lion's share a week ago and we were still getting air after 1.5 hrs. I left it sit for the past 6-7 days and finished the job today with my girlfriend. After eight pumps of the left then the right pedals we got no more air and very firm pedals. Whew! Glad that's over!
Onward to de-oiling the engine of preservative oil and moving the fuse to the hangar!
Painted the steps with Wing Walk Compound yesterday and unmasked them today. Came out nice. The color is called black, but it's really very dark gray (charcoal). Anyway, it works well with the rest of the livery, I think. The stuff is basically paint with lots of sand in it. Takes a lot of stirring to get the sand up from the bottom of the can, but not bad. Put it on with a disposable brush from Ace. It takes about 4 hours to cure. I used about two brushes semi full for the steps. The wings will take a bit more, but I will have lots left over for touch ups, if needed. The smallest quantity from Spruce is 2 qts for $32, so if anyone wants some, I'll be glad to share a quart for $16 plus shipping.


Color sanded the lower cowl that I repainted a few days ago. Did a little comparison. Lower left is sanded with 1500 Trizac wet with my rotary air polisher. The rest of lower cowl is sanded with 1500 wet or dry by hand with a flexible pad. I sanded it until virtually all of any orange peel present was eliminated flat except for the aft portion between the exhausts which I left as painted with whatever peel was there after painting. We'll see which way polishes out the best.

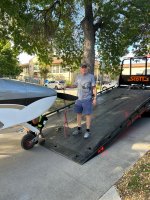
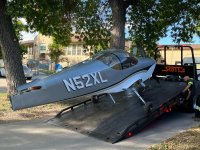
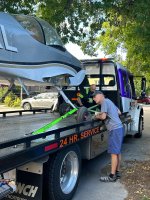
It's been awhile since my last post, so here I go to catch up. Lots has happened since last year. Mostly, I moved the whole assembly operation from my home shop to my hangar at KFNL. This happened in September '24. Here's how we moved her.
Attachments
-
 Moving to Hangar-Loading.jpg5.4 MB · Views: 56
 -
 Moving to Hangar-Happy Me.jpg5.6 MB · Views: 47
 -
 MOving to HAngar-Almost Loaded.jpg4.1 MB · Views: 40
 -
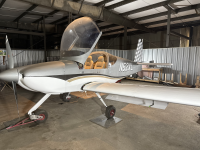
 Moving to Hangar-Tied Down.jpg3.7 MB · Views: 42
 -
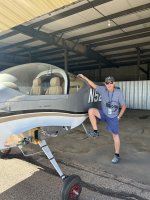 Moving to Hangar-Me and 52XL.jpg3.9 MB · Views: 39
 -
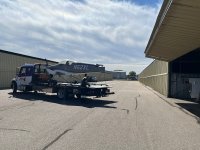 Moving to Hangar-At KFNL.jpg3.6 MB · Views: 54
June 3, 2025. Got her up on jacks to level so fuel flow could be measured in this attitude. At the same time, measured the distances from the centerlines of the wheels to the CG datum 72" forward of the wing leading edge. This information, along with the empty weight will be used to calculate the weight and balance data. Fuel flows came out to about 60 gph for both pumps in the level configuration and when the tail was lowered to the ground (about 15 degrees from horizontal) to simulate the maximum takeoff angle. Since 20 gph is maximum fuel burn on takeoff, we are easily within the 125% of max fuel burn required.
Next up. Engine start.
Next up. Engine start.
Attachments
June 14, 2025. First engine start. Everything went very well. Only issue was that rpms seem high. At full idle and engine sounding like it was running at about 500 rpm the PFD reading was 1400. And, when readings were 2750 rpms on the PFD, the throttle was still an inch from the panel. So, something is amiss. But, oil pressure was in the green. Fuel pressure read in the yellow, though. CHT's were 245 to 260F after 5 mins. Forgot the look at EGTs.
Attachments
Probably a case of you needing to set your engine monitor at two (2) pulses per revolution.June 14, 2025. First engine start. Everything went very well. Only issue was that rpms seem high. At full idle and engine sounding like it was running at about 500 rpm the PFD reading was 1400. And, when readings were 2750 rpms on the PFD, the throttle was still an inch from the panel. So, something is amiss. But, oil pressure was in the green. Fuel pressure read in the yellow, though. CHT's were 245 to 260F after 5 mins. Forgot the look at EGTs.
I didn't check but what ignition are you running? If PMags, I am pretty sure you need to set that.
Also, what engine monitor?
Of course, I could be wrong.
PMags. Dynon EMS.Probably a case of you needing to set your engine monitor at two (2) pulses per revolution.
I didn't check but what ignition are you running? If PMags, I am pretty sure you need to set that.
Also, what engine monitor?
Of course, I could be wrong.
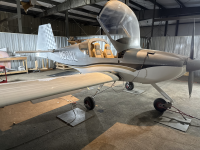
I haven't posted in a while, and a lot has happened. Got my AWC. Did transition training in both an RV7A (with a CFI) and an RV14A (for comparison). Since then, I have been putting the ship back together after being apart for the DAR inspection. The interior took some time. MANY machine screws!
I have taxied around my hangar area a couple of times and noticed a rough idle, or tendency to die, if a pulled the throttle all the way back. So, I adjusted the idle to about 800 rpm and got a relative rough idle. And I noticed that the mixture control in the cockpit had a huge effect on running. So, I embarked on adjusting the mixture at idle since rpms are supposed to increase 50 rpm on leaning from idle and mine was increasing 300 rpm! A little out of wack. The process is one of trial and error and takes a while. The good news is I got really good at hot starts. Anyway, after fiddling with the idle adjustment and mixture turnbuckle, she idles at 800 now with a 50 rpm increase on leaning. This is what my idle adjustment turnbuckle looks like at my field in my plane. The turnbuckle is really sensitive. turning it one flat changes a lot. This is in contrast to the idle adjustment. 3 turns gets me 100 rpm. For my ship, idle is about 1.5threads showing on the idle adjuster and about 5 threads showing beyond the jam nuts on the mixture turnbuckle. For those of you playing with this, these positions should get you in the ballpark. From the factory, mine was way rich for me at 5280 MSL.

I have taxied around my hangar area a couple of times and noticed a rough idle, or tendency to die, if a pulled the throttle all the way back. So, I adjusted the idle to about 800 rpm and got a relative rough idle. And I noticed that the mixture control in the cockpit had a huge effect on running. So, I embarked on adjusting the mixture at idle since rpms are supposed to increase 50 rpm on leaning from idle and mine was increasing 300 rpm! A little out of wack. The process is one of trial and error and takes a while. The good news is I got really good at hot starts. Anyway, after fiddling with the idle adjustment and mixture turnbuckle, she idles at 800 now with a 50 rpm increase on leaning. This is what my idle adjustment turnbuckle looks like at my field in my plane. The turnbuckle is really sensitive. turning it one flat changes a lot. This is in contrast to the idle adjustment. 3 turns gets me 100 rpm. For my ship, idle is about 1.5threads showing on the idle adjuster and about 5 threads showing beyond the jam nuts on the mixture turnbuckle. For those of you playing with this, these positions should get you in the ballpark. From the factory, mine was way rich for me at 5280 MSL.


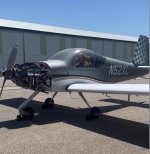
Beautiful design!First Flight! All going well, so far. Yesterday was fourth flight. Working onn Card 4 of the Phase 1 book today if conditions warrant.
View attachment 99563
Congratulations!
Out here in the lee of the Rockies, virtually any wind aloft above low single-digits will give you up and down air motion, up to 400 miles east. It's very hard to get still air. Fortunately you don't need to complete that card all on one flight.
Also I'd recommend waiting a couple minutes or longer after turning to let things settle down.
Dave
