Van's Air Force

The definitive Van's Aircraft support community! Buying, building or flying an RV? Join our exclusive family of mentors and enthusiasts!

Modifications that you have Made to your RV-12 after Certification? E-LSA Only!

Thanks! I knew the reason was that they though it should emulate a manual flap handle. But that's bunk! Every pilot I've flown with in the -12 repeatedly moves the switch the wrong way. When you see a switch, you don't think "flap handle". That just doesn't jibe.

If I could, I'd either reorient the switch, or move it to the panel where it would be a lot handier to find and to operate. The way it is just doesn't compute in my mind (or the minds of everyone I fly with).
I learned on a plane with a Johnson bar and like the original 12‘s bar means pulling up deploys the flaps… it makes perfect sense to me and the workflow is similar allowing me to transition between classic and iS easily. I typically put in two seconds of flaps at each leg before landing with wings level adjustIng for the slight nose drop when the flaps are deployed. Having the button near the power lever makes it easy for me. Another thought is if the majority of the installs have the button operated up to deploy flaps … a new person to the plane could be surprised by the non factory layout. And would the insurance folks indemnify if something happened?

I do see the reasoning of reversing the button if one is use to other flap buttons from something like a Cessna, Vans (non 12) and many others. Down deploys the flaps and vice versa. I guess it depends on the pilot’s background.

Also, the standard placards for the switch would need to be updated to reflect the change obviously.

The big take away from this is to always know the plane and how the controls work before flying and enjoy flying a really cool airplane.
 
Installed a trim wheel (my design) eliminating the trim switch. I wanted something proportional in the same way a mechanical trim system works. No messing with hi/lo speed controllers or setting up trim speed. Just spin the wheel.
 
I like it!
Got pics?
I'm not much of a pic guy, but here is a sole snapshot of the initial install I did last year. There is a control module in the avionics bay. This attaches to it via a CAT 5 cable. It seems like it evolves every couple months when I get enthusiastic! My next plan is to make a bracket and hang it below the throttle. I left the original switch intact so that if/when I ever sell the airplane, I can strip it all back out and easily reconnect the original system.
 

Attachments

  • TrimWheelInitialInstall.jpg
    TrimWheelInitialInstall.jpg
    1.3 MB · Views: 216
Whow - Have done a few

1. Closed window, and installed Moeller Marine Fuel Gauge.
2. Installed Thermostasis Oil Thermostat.
3. Installed Heater Damper Door for colder climates.
4. Installed Reiff Pre-Heat System.
5. Put nutplates on filler neck to make removal easier.
6. Designed tapered steel pin to help install wings after seals installed.
7. Made Jack System for easy lifting.

Those are the main ones I can remember !

John Bender
JB, can you say more about the Jack System?
 
Most recent modification is the Garmin GHA 15.

This was more of a "fun factor" addition for me; sort of a novelty having AGL call outs on final. However it has actually come in handy at busy towered airports where they keep slower traffic off to the side of runway centerline then weave us into an opening. Coming in from the side for a tight close-in base to final we really don't have a view of a PAPI or VASI until the last minute. Having a call out of 300' in addition to the G3X 500' call out has been helpful for estimating a glide slope before turning short final.
 
I added a spring to the canopy latch handle that prevents the handle from rotating to the partially latched position upon closing the canopy.

Yes, I had squeezed the tube as per the KAI to add friction to the handle operation, but after about 25 hours of use the latch handle was swinging closed enough to require me to get up on the step to open the canopy.

I used about 1 foot of .035 Music Wire and wound it around a 1/2" diameter bar about 5 times to coil it up. I added a little hook to each end to keep it in place during operation. Be sure to dress each end on the scotchbrite wheel before installation so you don't draw any blood.

Drop the handle down and install the coil over the tube and reinstall. It will take a little trial fitting to get the leg length and positioning just right. The tension is light enough to not be noticeable during use but it keeps the handle against the open position stop very well.

PXL_20251006_155457538.jpg PXL_20251006_155633894.jpg
 
I added a spring to the canopy latch handle that prevents the handle from rotating to the partially latched position upon closing the canopy.

Yes, I had squeezed the tube as per the KAI to add friction to the handle operation, but after about 25 hours of use the latch handle was swinging closed enough to require me to get up on the step to open the canopy.

I used about 1 foot of .035 Music Wire and wound it around a 1/2" diameter bar about 5 times to coil it up. I added a little hook to each end to keep it in place during operation. Be sure to dress each end on the scotchbrite wheel before installation so you don't draw any blood.

Drop the handle down and install the coil over the tube and reinstall. It will take a little trial fitting to get the leg length and positioning just right. The tension is light enough to not be noticeable during use but it keeps the handle against the open position stop very well.

View attachment 98920 View attachment 98921

A very nice and easy to duplicate modification.

Many thanks.

Brett H
Columbus, IN N4BH

IMG_3680.jpegIMG_3682.jpeg
 
I've been wanting an IFR GPS navigator since I bought my classic RV-12 three years ago. As it turns out it was a much bigger job than I thought at first blush. The problem is that there just isn't much avionics panel space in a classic RV-12. That meant moving some stuff around. First, here is the panel I started with...

rv12_panel_orig_2.jpg rv12_panel_orig_1.jpg

To make space for the GPS it was clear the SL-40 radio had to go. The Garmin GNC 355 with both GPS and Comm would have been a terrific choice here. Terrific except it is about 1/2" too long to fit in my panel. So that meant using the much shorter GPS 175 and a separate radio. The separate radio I selected was the remote mounted Dynon radio.

With the SL-40 removed there still isn't enough panel space for the GPS 175 so that meant getting rid of the fuse / switch module. I replaced the fuses with a VP-X ECB to free up that space. With the VP-X I can use any switch I want but it isn't an RV-12 unless it has the Otto K1 / K2 rocker switches so that is what I stuck with. I did replace the trim rocker switch with the equivalent K2 paddle switch. I like the paddle switch a whole lot more than the rocker switch for trim. The fuse / switch module also included a current sensing shunt (using a PCB trace, which I don't care for) and a large filter capacitor, both of which also needed to be installed. I also had to provide for an overall 30 amp circuit breaker for alternator output. I was happy to get rid of that troublesome 30 amp car fuse.

With those things done there is plenty of room for the GPS 175.

rv12_panel_upgrade_2.jpg rv12_panel_upgrade_1.jpg

I had the replacement panels made by Front Panel Express. They did the cutting and the engraving. I was pleased with how they turned out. Vans doesn't provide a CAD version of their RV-12 panel so the shape and hole locations were all from measurements. I triple checked my measurements and the hole locations were pretty much spot on.

rv_12_avionics_bay.jpg

Things are getting a little crowded under the hood but not too bad. The wiring I inherited when I bought this plane was a rat's nest. Believe it or not what you see here is a big improvement.

So far I like this setup a lot. The Dynon radio is a big improvement over the old SL-40. The efficacy of the VP-X is controversial here but I personally like it a lot. The GPS 175 integrates nicely with the Dynon avionics. For me entering flight plan info is easier on the GPS 175 than on the Dynon display.

Still to be done are some redundancy items like backup AHRS and/or backup AI. I have already installed a second Dynon backup battery for the right hand display. Even though the GPS 175 doesn't draw much power, the remaining power available is limited. I've got a few ideas for a heated pitot that may get me there without adding an extra alternator. The VP-X gives me great insight into my power budget. Now I need to get a full IFR pitot / static system check, get an ICC, and go play (lightly) in the NAS.
 
Last edited:
What about an intercom to manage the various audio ? How’d you do that?
I only have one radio in the panel. The panel Dynon radio will monitor the standby frequency. That works great for picking up ATIS. For a backup radio I carry a handheld. So far that has worked well for me.
 
I installed a Dynon Pocket Panel D3 under the PFD. No interference at all with the stick or my legs. Not even close. I also installed a Blue Sea double USB port (same as Van's supplies for center console by cup holder) under the panel. The D3 is mounted using a RAM mount with the ball bolted to the underside of the panel and a short RAM arm (2 inches I think) connected from there to the RAM mount supplied with the D3). The D3 works well and alleviates single points of failure with the PFD/MFD display of attitude. I'm flying some IMC in the aircraft and considered this a major shortcoming of the RV-12iS IFR avionics package.

At some point I would like to build a small housing for mounting a Garmin G5 in the same location. That would give me backup that can be supplied to the G3 Touch displays and the autopilot. I did need to use the remote antenna for the D3 as GPS reception is spotty in this location. I ran the antenna cable under the left side armrest and the antenna is attached to the carpet on the fuel tank cover with velcro.

The second USB power port is very convenient for my kneeboard iPad mini.

Henry
 

Attachments

  • D3_under_panel.jpg
    D3_under_panel.jpg
    2.7 MB · Views: 56
Last edited:
I managed to get my lap belt wrapped around the flap handle locking area a couple of times, preventing deployment of the flaps. I came up with a 3D printed cover to fix that problem. Attaches to the F-1228 Seat Floor Cover with a couple of screws into nut plates. Print file is available at: https://www.printables.com/model/1697954-rv12-flap-handle-cover

View attachment 115873View attachment 115874
Thank you 12viator. 🙏
Your clever design works a treat! 👏 
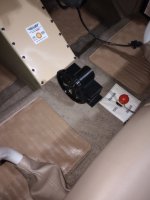
I used velcro to easily attach it to the carpet flooring.
20260516_144210.jpg
 
Back
Top