Van's Air Force

The definitive Van's Aircraft support community! Buying, building or flying an RV? Join our exclusive family of mentors and enthusiasts!

Unexpected RV-7A elevator differential movement

Just an FYI -- the corresponding close-tolerance bolt designation for an AN3-14A is AN173-14A, assuming the RV-7A uses the AN3-14A. Cost is $0.86 per bolt at Aircraft Spruce and Specially. If it were me and my airplane, I would fix this before flying again -- from one engineer to another. (y):cool:(y)

In my limited experience, a close tolerance bolt may help, but holes with excess wear rarely wear round. Hence, it won’t keep the joint from continuing to wear. You never know though, it’s a cheap fix if it works.
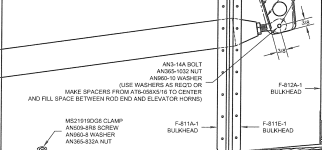
A known repair is welding up the holes and drilling again per the build manual. This has been done many times to fix poorly aligned horns.
Not saying other suggestions won’t work, or be even better, but welding the horns and putting this back to plans we know works.
 
Thanks to everyone for the input. Based on all of this and some insight help from mechanical engineer wife (NASA) I went ahead and added a single AN960-10 washer, a new AN365-1032 nut and torqued it to 24in-lbs and the elevators are solidly connected—no differential movement. I torque-striped the nut and will pay close attention between now and my upcoming ACI, where I’ll have a subject matter expert review the elevator and all other control systems etc. Again I appreciate all of the help.
I like the solution but is 24 in-lbs is too low as the torque?

Shouldn't this be more like 34+ due to the drag of the AN365? I've not had any AN365s that were less then 10 new and I just use the 14 from section 5, so I do my AN3s to ~40 in-lbs.
 
In my limited experience, a close tolerance bolt may help, but holes with excess wear rarely wear round. Hence, it won’t keep the joint from continuing to wear. You never know though, it’s a cheap fix if it works.
From my observation -- it looks like the original builder over-drilled one side during the match-drilling process while it remained relatively round. The opposite side looks much better, so it's probably not from wear. Easy to do when not using a drill- guide-block between the two horns as suggested by the assembly instructions. Starting with a pilot-hole is also a advisable. Here's a side-by-side showing this.

1767754033504.png 1767754321421.png
 
Last edited:
From my observation -- it looks like the original builder over-drilled one side during the match-drilling process while it remained relatively round. The opposite side looks much better, so it's probably not from wear. Easy to do when not using a drill- guide-block between the two horns as suggested by the assembly instructions. Starting with a pilot-hole is also a advisable. Here's a side-by-side showing this.

View attachment 106655 View attachment 106659
Good thoughts here. What I can’t seem to find in my drawings is the Vans note for the proper size of the hole. They talk about drilling the pilot holes but don’t mention the size of the final, at least that I can see. I’m contacting Vans support today.
 
I put a window in the inspection covers back there just so I could look at that mechanism during preflights.
Desert Rat,
Me too.
I had a nut fall off from the bottom elevator horn, leaving just the bolt extending through. I had been particularly aggressive in my acrobatic practice, and decided to open it up post-flight. It shocked me.
I determined the likely cause was a bolt that was -1 length too short and squeezed into place using a nylon inserted nut.
I then created a plexiglass window to view it during pre-flight.
Phew.
Daddyman58
 
From my observation -- it looks like the original builder over-drilled one side during the match-drilling process while it remained relatively round. The opposite side looks much better, so it's probably not from wear. Easy to do when not using a drill- guide-block between the two horns as suggested by the assembly instructions. Starting with a pilot-hole is also a advisable. Here's a side-by-side showing this.

View attachment 106655 View attachment 106659
I can’t tell from pictures but if it’s been flopping around for a while, it isn’t round anymore.
 
Last edited:
All factory Pitts from the S1S to the S2B have a !/2" thick aluminum block between the horns and two additional AN3 bolts thru the spacers and horns. The Pitts rode end bearing is not a tight fit between the horns. That photo is very different than Pitts plans for S1S.
Around 2010 when I was building project #3 there were discussions on some forum (maybe this one, can’t remember) of putting a spacer block between the horns similar to description above. I did this to #3 & #4. Also did that mod to a few others since.
No fear of an ill fitting bushing rounding out on those planes!
 
Good thoughts here. What I can’t seem to find in my drawings is the Vans note for the proper size of the hole. They talk about drilling the pilot holes but don’t mention the size of the final, at least that I can see. I’m contacting Vans support today.
In practice, for a close tolerance 10-32 AN173 bolt, drill with a #12 bit (0.189") for a very close fit, then maybe a slight ream only if necessary. Always ensure the bolt can go in with light pressure. If it's too tight, ream slightly, but avoid removing too much material. I would test fit the AN173 bolt through the larger hole first. Then check the smaller hole for proper fit and ream slowly only if necessary. In general, an AN3 bolt takes a #12 drill bit.

FYI -- Vans discusses this in their "standards" section near the front of each builder's manuals.
 
I can’t tell from pictures but if it’s been flopping around for a while, it isn’t round anymore.
From what I can see below (zoomed-up even more), it's not perfectly round but not badly ovaled either, and since the horns are made of steel (not aluminum), if a close tolerance bolt fits more snuggly, you're in much better shape than with a standard AN3 bolt. This side looks like it was drilled poorly and probably without a drill-guide while being match drilled.

1767805784687.png
 
Respectfully, a close tolerance -3 bolt does nothing for the fundamental issues here.

As designed, the application is two single shears on one bolt.

As applied, there was no bolt tension.
 
Respectfully, a close tolerance -3 bolt does nothing for the fundamental issues here.

As designed, the application is two single shears on one bolt.

As applied, there was no bolt tension.
Vague statement -- please explain in more detail why?

Several times, but not many, while building my RV-9A between 2000-2004, I found using a close tolerance bolt made the fit noticeably tighter when I wanted that. Also, several guys on the forum have also found by using a close tolerance bolt on their nose gear, it removed nose gear play entirely. It might not be an idea fix, but the alternatives are much more involved, requiring removal of the elevators and repair or replacement of the elevator horns.
 
Last edited:
Vague statement -- please explain in more detail why?

Even with a close tolerance bolt, it remains a pair of single shears. Neither a standard or a close tolerance bolt will work if the installer fails to tighten it. Neither would a pin, because it can't be tightened.

Also, several guys on the forum have also found by using a close tolerance bolt on their nose gear, it removed nose gear play entirely.

Double shear application, with minimal clamp due to bolt tension. The nut just keeps it from falling out. Good application for a close tolerance bolt.

It might not be an idea fix, but the alternatives are much more involved, requiring removal of the elevators and repair or replacement of the elevator horns.

If the horn holes are badly out of round? Screw in an MD4616M, drill and ream the horn holes to 0.250", install an AN4. Better than new.

Alternate; install a block spacer between the horns, with a clamp bolt, to turn it into something approximating a double shear joint. With that done you could put a clevis pin the rod end bore and the little slop wouldn't make any practical difference.
 
If the horn holes are badly out of round? Screw in an MD4616M, drill and ream the horn holes to 0.250", install an AN4. Better than new.
Now see -- this is what I really like to see on the VAF forum!

Instead of going on about how someone else's idea won't work (in your opinion), provide another good solution -- nice job on doing that! (y):cool:(y)
 
All - I posed my issue to Van’s builder support and the answer is attached. I will likely use a close-fit bolt when I change it out. This has been a fascinating discussion and I’m glad I brought this to the forum first. Much knowledge gained. jcIMG_8190.jpeg
 
I checked my elevators after reading this thread and found that I had a small amount of movement. Inspection found that the an3-14a bolt was too long and the nut was maxed out on the shoulder. The holes were not oversized or ovaled. Replaced the bolt with a new an3-13a and all is good. The -13 has the shoulder just outside the arm and only needed one washer and a new nut. Glad I found this thread. Checked a RV-6 on the field and it had the same issue. Go shake your tail feathers!
 
I checked my elevators after reading this thread and found that I had a small amount of movement. Inspection found that the an3-14a bolt was too long and the nut was maxed out on the shoulder. The holes were not oversized or ovaled. Replaced the bolt with a new an3-13a and all is good. The -13 has the shoulder just outside the arm and only needed one washer and a new nut. Glad I found this thread. Checked a RV-6 on the field and it had the same issue. Go shake your tail feathers
 
Great! I’m curious if the build instructions for this particular joint are unclear, and if so, might be amended based on my query to Vans
 
Great! I’m curious if the build instructions for this particular joint are unclear, and if so, might be amended based on my query to Vans
Nope, they are quite clear that an AN3-14A bolt should be used. However, as always, you should check your hardware actually fits. These are hand built aircraft, and things change.

Vans won't change the plans. There are far more glaring errors than this in them.
 

Attachments

  • Screenshot 2026-01-13 at 08.28.41.png
    Screenshot 2026-01-13 at 08.28.41.png
    551.9 KB · Views: 54
Around 2010 when I was building project #3 there were discussions on some forum (maybe this one, can’t remember) of putting a spacer block between the horns similar to description above. I did this to #3 & #4. Also did that mod to a few others since.
No fear of an ill fitting bushing rounding out on those planes!
Any details on this? Seems like a worthwhile mod.
 
Around 2010 when I was building project #3 there were discussions on some forum (maybe this one, can’t remember) of putting a spacer block between the horns similar to description above. I did this to #3 & #4. Also did that mod to a few others since.
No fear of an ill fitting bushing rounding out on those planes!
If i remember correctly and I do have a short memory i used a piece of hardwood for a spacer block between the horns to keep the drill straight back in the late 90's on an RV 6
 
After reading this thread, I'm amazed that so many have never thought to do the elevator differential push/pull test as part of preflight. I've been doing it since Day 1, almost 19 years ago. And when I give new people a ride, I always point that joint out when doing preflight with them in tow.

Maybe it's because I built mine and know that that joint is critical just from its design; plus, it's so easy to test via differential pulling. Just don't pull against the trim tab! That gets its own wiggle test.

And I have to laugh at the clear windows on the fus to look at that joint. All that tells you is IF the bolt is still there. Doesn't tell you anything about its torque.
 
And I have to laugh at the clear windows on the fus to look at that joint. All that tells you is IF the bolt is still there. Doesn't tell you anything about its torque.

But you might see the grey/silver ooze around the nut/bolt head, and think "...that ain't right..."
 
If i remember correctly and I do have a short memory i used a piece of hardwood for a spacer block between the horns to keep the drill straight back in the late 90's on an RV 6
I milled an aluminum block that was captured in one of the lightning holes, 2 bolts & large washers to lock it to the horns. I was sure to size the block so it didn’t interfere with the rod end bearing, or introduce side loads to any hinge bearings.
 
Most builders don't understand how crude AN bolts are. The last 1/16" to 1/8" at the base of the threads will be significantly smaller in diameter than the rest of the shank. In critical areas such as primary controls it is better to use a bolt that is one dash number longer than technically necessary. In the case of the elevator horns this means that both horns will be bearing on the full bolt diameter.
Please use the best all metal lock nut and not elastic stop nut. Torque the bolt to the upper limit for torque. This connection is working optimally when the bearing inner race is tight and square to the horns.
Avoidance of thread relief in bearing is nothing new and can be critical long term. You don’t have to be a builder to deviate changing +\- one bolt length or adding one or two washers to remedy tolerance stack up.

Research the reasoning behind fastener system ranges and application within such.
 
Most builders don't understand how crude AN bolts are. The last 1/16" to 1/8" at the base of the threads will be significantly smaller in diameter than the rest of the shank. In critical areas such as primary controls it is better to use a bolt that is one dash number longer than technically necessary. In the case of the elevator horns this means that both horns will be bearing on the full bolt diameter.
Please use the best all metal lock nut and not elastic stop nut. Torque the bolt to the upper limit for torque. This connection is working optimally when the bearing inner race is tight and square to the horns.
Of course another problem as we see in this thread is people not feeling the difference between the nut bottoming out on the shank and then torquing (or while torquing), vs the nut bottoming on the stack of material to be fastened.

A good final check on a joint like this is to put torque on the bolt head only to see how easily it rotates, after you've torqued the nut. That check would have saved the gray ooze guy.
If there is only a couple of threads showing it hasn't bottomed out.
 
If i remember correctly and I do have a short memory i used a piece of hardwood for a spacer block between the horns to keep the drill straight back in the late 90's on an RV 6
I’ve just done this job, and that’s correct. Although I used an aluminium block.
I think others are talking about a permanent spacer block between the 2 weldments.
 
I’m pretty sure this joint, as designed, has proven itself over time. Not one incident over thousand of aircraft and tens of thousands of hours.
The OP, new to the airplane, discovered the issue and fixed it with little fuss.
I am also surprised folks preflights wouldn’t catch even a small amount of play here, let alone the CI’s that were obviously missed.
 
Yesterday, I checked my RV-9A elevators for any differential movement, but found none. However, when I removed the two tail inspection plates, I found the pushrod bolt was not very tight (i.e. snug but would rotate without much effort using a small box wrench). Everything was built properly with washers filling between the horns and one AN960-10 washer on the AN365-1032 nut side. So, I re-torqued the nut, making the bolt tight again. Unlike the RV-7, the RV-9 models specify an AN3-10A bolt, but the shank was properly protruding just enough that only one AN960-10 washer was needed for overall tightness while not bottoming-out the nut. I did noticed that my drawing (original RV-9A release back in 2000) didn't show installing washers in-between the horns to fill-in that space. However, I had done this anyway as I did with other similar assemblies. I also found something similar at the last condition inspection on one of the control sick mounting bearing bolts, which I retorqued during that CI.

Is this possibility from lubricating the bearings at condition inspections, causing the nylock nuts to back-off slightly over time (over 21-years in my case). A visual inspection would make these nuts and bolts look completely normal and tight!
 
Last edited:
Back
Top