I’ve started to to work on the fuel lines and have reread related Vans manuals. I understand the procedure for tightening AN fittings is finger tight then 1.5 to 2 turns. I could barely turn this T fitting 1 turn with quite some force and slipped my wrench and damaged the surface. I suppose a 6-point flare nut wrench would work better. Just wondering whether it’s usual that such fittings are tight and do require some good force to turn into position. Thanks!

Van's Air Force
You are using an out of date browser. It may not display this or other websites correctly.
You should upgrade or use an alternative browser.
You should upgrade or use an alternative browser.
Tightening fuel line fittings
- Thread starter ymc9
- Start date

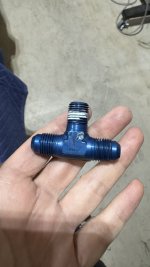
That Tee has only two Flare fittings, the other is NPT and is tapered. If you are trying to get 1.5-2 turns on the NPT side, probably won’t happen.I’ve started to to work on the fuel lines and have reread related Vans manuals. I understand the procedure for tightening AN fittings is finger tight then 1.5 to 2 turns. I could barely turn this T fitting 1 turn with quite some force and slipped my wrench and damaged the surface. I suppose a 6-point flare nut wrench would work better. Just wondering whether it’s usual that such fittings are tight and do require some good force to turn into position. Thanks!
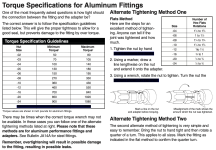
For the flare fittings, you want to go finger tight plus 1.5 to 2 flats on the nut. Don't go 1-2 full turns with those. With the NPT side, it is not uncommon to tighten an NPT fitting according to a particular acceptable orientation as opposed to a specific torque value (like if you have an elbow fitting that has to face a specific direction). The sealant is fundamentally what is keeping it sealed, not the tightness alone, so you need to be in the ballpark of "good and tight", and have sealant for NPT. NPT fittings can be a little bit less of an exact science than other kinds of hardware.
briand
Well Known Member
AN Plumbing Fitting Torque and Tightening Methods - Pegasus Auto Racing Supplies
Looking for information on AN Plumbing Fitting Torque and Tightening Methods? Then come read about it at Pegasus Auto Racing Supplies!
Thanks for the explanation, guys. I guess I’m confused about the description in manual section 5 which seems to be talking about tapered threaded fittings:
—-
Because we cannot always fully tighten tapered thread fittings, and because even after fully tightening
the fitting a small spiral leak path remains along the full length of threads, a thread sealant must be
used during assembly. Sealants appropriate for use on aircraft NPT fittings areTite-seal, Permatex #2
and Locktite 565. Do not use RTV, Teflon tape or Fuel Lube on NPT fittings .
When installing the fitting, be sure the threads on both parts are clean and dry since most sealants will
not tolerate any oil contamination. First determine the clocking position by installing it
finger tight and marking the desired clocking. Remove the fitting and apply a small amount of sealant to
2 - 3 threads of the male fitting. Leave the first 2 bare to prevent contamination inside the fluid path.
Remember, this is an interference fit so not much sealant is required.
Thread the fitting in with your fingers until you just begin to feel resistance and then an additional 1.5 - 2
turns. This is a general guideline… you must still use judgment to not over tighten and damage the
threads, but a properly installed fitting is quite tight. If the installation requires a specific clocking, when
approaching the correct position you must determine whether you will be able to make another full
rotation and still be within the 1.5 - 2 turns stopping range.
—-
So I think Vans is talking about 1.5-2 turns for NPT here, though I understand for fittings that need to point specific direction this can’t always happen. But for straight fittings, 1.5 - 2 turns should be the goal - although I feel that takes quite some force too.
For nuts over flared fitting, my understanding is torque wrench should be used.
Do I have some fundamental misunderstanding here?
—-
Because we cannot always fully tighten tapered thread fittings, and because even after fully tightening
the fitting a small spiral leak path remains along the full length of threads, a thread sealant must be
used during assembly. Sealants appropriate for use on aircraft NPT fittings areTite-seal, Permatex #2
and Locktite 565. Do not use RTV, Teflon tape or Fuel Lube on NPT fittings .
When installing the fitting, be sure the threads on both parts are clean and dry since most sealants will
not tolerate any oil contamination. First determine the clocking position by installing it
finger tight and marking the desired clocking. Remove the fitting and apply a small amount of sealant to
2 - 3 threads of the male fitting. Leave the first 2 bare to prevent contamination inside the fluid path.
Remember, this is an interference fit so not much sealant is required.
Thread the fitting in with your fingers until you just begin to feel resistance and then an additional 1.5 - 2
turns. This is a general guideline… you must still use judgment to not over tighten and damage the
threads, but a properly installed fitting is quite tight. If the installation requires a specific clocking, when
approaching the correct position you must determine whether you will be able to make another full
rotation and still be within the 1.5 - 2 turns stopping range.
—-
So I think Vans is talking about 1.5-2 turns for NPT here, though I understand for fittings that need to point specific direction this can’t always happen. But for straight fittings, 1.5 - 2 turns should be the goal - although I feel that takes quite some force too.
For nuts over flared fitting, my understanding is torque wrench should be used.
Do I have some fundamental misunderstanding here?
I’ve always hand tightened and then snugged up with a wrench. Most the time it’s not much more than a flat. Just did this on the 14 the other day…. Will be a bit before I know if it leaks. On the 10 I think I had a few leaky ones by the pump, but easy to tighten up a bit.
No. 1.5-2 turns after finger tight only for NPT threads. Straight threads are nowhere near that much. How much can’t be generalized. Soft al tubing will be much different than an tube end fittings, etc.Thanks for the explanation, guys. I guess I’m confused about the description in manual section 5 which seems to be talking about tapered threaded fittings:
—-
Because we cannot always fully tighten tapered thread fittings, and because even after fully tightening
the fitting a small spiral leak path remains along the full length of threads, a thread sealant must be
used during assembly. Sealants appropriate for use on aircraft NPT fittings areTite-seal, Permatex #2
and Locktite 565. Do not use RTV, Teflon tape or Fuel Lube on NPT fittings .
When installing the fitting, be sure the threads on both parts are clean and dry since most sealants will
not tolerate any oil contamination. First determine the clocking position by installing it
finger tight and marking the desired clocking. Remove the fitting and apply a small amount of sealant to
2 - 3 threads of the male fitting. Leave the first 2 bare to prevent contamination inside the fluid path.
Remember, this is an interference fit so not much sealant is required.
Thread the fitting in with your fingers until you just begin to feel resistance and then an additional 1.5 - 2
turns. This is a general guideline… you must still use judgment to not over tighten and damage the
threads, but a properly installed fitting is quite tight. If the installation requires a specific clocking, when
approaching the correct position you must determine whether you will be able to make another full
rotation and still be within the 1.5 - 2 turns stopping range.
—-
So I think Vans is talking about 1.5-2 turns for NPT here, though I understand for fittings that need to point specific direction this can’t always happen. But for straight fittings, 1.5 - 2 turns should be the goal - although I feel that takes quite some force too.
For nuts over flared fitting, my understanding is torque wrench should be used.
Do I have some fundamental misunderstanding here?
Also realize that with a tapered fitting, the structural integrity of the fittings can be compromised if you tighten an NPT fitting too much…Thanks for the explanation, guys. I guess I’m confused about the description in manual section 5 which seems to be talking about tapered threaded fittings:
—-
Because we cannot always fully tighten tapered thread fittings, and because even after fully tightening
the fitting a small spiral leak path remains along the full length of threads, a thread sealant must be
used during assembly. Sealants appropriate for use on aircraft NPT fittings areTite-seal, Permatex #2
and Locktite 565. Do not use RTV, Teflon tape or Fuel Lube on NPT fittings .
When installing the fitting, be sure the threads on both parts are clean and dry since most sealants will
not tolerate any oil contamination. First determine the clocking position by installing it
finger tight and marking the desired clocking. Remove the fitting and apply a small amount of sealant to
2 - 3 threads of the male fitting. Leave the first 2 bare to prevent contamination inside the fluid path.
Remember, this is an interference fit so not much sealant is required.
Thread the fitting in with your fingers until you just begin to feel resistance and then an additional 1.5 - 2
turns. This is a general guideline… you must still use judgment to not over tighten and damage the
threads, but a properly installed fitting is quite tight. If the installation requires a specific clocking, when
approaching the correct position you must determine whether you will be able to make another full
rotation and still be within the 1.5 - 2 turns stopping range.
—-
So I think Vans is talking about 1.5-2 turns for NPT here, though I understand for fittings that need to point specific direction this can’t always happen. But for straight fittings, 1.5 - 2 turns should be the goal - although I feel that takes quite some force too.
For nuts over flared fitting, my understanding is torque wrench should be used.
Do I have some fundamental misunderstanding here?
Oh, sorry about the terminology confusion. By “straight fitting” I meant NPT without an angle.No. 1.5-2 turns after finger tight only for NPT threads. Straight threads are nowhere near that much. How much can’t be generalized. Soft al tubing will be much different than a tube end fittings, etc.
FyiOh, sorry about the terminology confusion. By “straight fitting” I meant NPT without an angle.
The t in npt is tapered. The s in nps is straight. Most all threaded fittings that are not npt are straight threads
Yes, I have the book and have read the sections about fluid fitting. Sometimes information is a bit contradictory from different sources, and what book says with intuitionHave you considered getting an aircraft standards handbook? It would give you description, materials, torques and more on most any hardware used on your plane. Next best thing to VAF opinions.
Just saying...
danny
 .
.The great fitting torque debate, probably one of the most discussed topics on VAF. This will sound really crazy, but for Yiming's situation, I typically use a cressent wrench. Yeah I know, BUT the jaws are typically longer than a standard wrench, and you can tighten the jaws so the wrench fits without play against the fitting flats. For NPT, after sealing the threads, I mark wher the fitting should be oriented, go snug and 1 full turn to that marked point. NOW---you do have to understand the materials being used. Because the NPT ports are tapered, you can actually deform the female port but wayyyy overtightening the fitting. OR worst case, if the thread to edge distance is thin, lik in a Flow Scan, you can actually crack the unit. (FT60s are MUCH thicker an its not an issue). The other thing, is know the material of the fitting, steel fitting yo probably will never break, but alumimum, especially some import versions, yes you can break them.Have you considered getting an aircraft standards handbook? It would give you description, materials, torques and more on most any hardware used on your plane. Next best thing to VAF opinions.
Just saying...
danny
I was also confused by the manual and ruined one of the fuel lines I created by over tightening the AN fitting. After researching how to properly tighten a fittings I came across this wrench from Summit racing. https://www.summitracing.com/parts/sum-900103 It is a short wrench that they use on race cars that borrow our AN fittings. You can only torque up the fitting so much. Takes out the guess work.I’ve started to to work on the fuel lines and have reread related Vans manuals. I understand the procedure for tightening AN fittings is finger tight then 1.5 to 2 turns. I could barely turn this T fitting 1 turn with quite some force and slipped my wrench and damaged the surface. I suppose a 6-point flare nut wrench would work better. Just wondering whether it’s usual that such fittings are tight and do require some good force to turn into position. Thanks!
I had the pleasure of working for a certain aircraft manufacturer here in the NW and we had a process for EVERYTHING. Now I'm just a lowly mechanic but I still use my reference books.The great fitting torque debate, probably one of the most discussed topics on VAF. This will sound really crazy, but for Yiming's situation, I typically use a cressent wrench. Yeah I know, BUT the jaws are typically longer than a standard wrench, and you can tighten the jaws so the wrench fits without play against the fitting flats. For NPT, after sealing the threads, I mark wher the fitting should be oriented, go snug and 1 full turn to that marked point. NOW---you do have to understand the materials being used. Because the NPT ports are tapered, you can actually deform the female port but wayyyy overtightening the fitting. OR worst case, if the thread to edge distance is thin, lik in a Flow Scan, you can actually crack the unit. (FT60s are MUCH thicker an its not an issue). The other thing, is know the material of the fitting, steel fitting yo probably will never break, but alumimum, especially some import versions, yes you can break them.
danny
The failures in tube connections that I see, are typically from over torque. The flare gets deformed by extrusion and then develops either a radial crack up in the flare or a linear crack in the flare edge. Outside of specific guidance from a manufacture, use table 9.2 from AC 43-13-1B.... The numbers in the table from Pegasus are way high for the tube sizes and Aeroquip's numbers are for their style fittings, which are only compatible with AN8 series fittings.
Steel, titanium and aluminum, singly and in combinations, all have different torque charts,as does oxygen service.
Steel, titanium and aluminum, singly and in combinations, all have different torque charts,as does oxygen service.
I just went through this and ruined the bypass block and now on my 3rd tee fitting. Vans directions are total crap. I've plumbed plenty of houses in my time but first for aluminum so I trusted them. I believe my fitting was also threaded poorly but in typical Vans fashion you spend a hundred K with them and they tell ya to pound sand when they screw up.
I'd say mine cracked at about 3/4 turn from hand tight.
The tee cracked but being cheap I bought another tee since the block looked good. I knew better but went for it anyway. Found out the block was junk too. Didn't want to chance that second tee after I threaded it into the junk block, so I decided new block and another new tee.......
Once I get my new fitting in I'm just going to snug it where I feel it is satisfactory and I'll be pressure testing everything.
Last edited:
The point here is that these fittings don't seal from tight, thread profile to profile seating...they seal from having sealant properly applied to the fittings before torquing, which is pretty low value. I usually use a small crescent wrench and seldom more than finger tight, plus a quarter turn...let the joint sit and cure a couple days before use and virtually never end up with a leak.
This is starting to get confusing whether folks are referring to AN flare fittings or NPT fittings - both are used in the fuel system. Sealant is used on NPT, but never on flared fittings. An option for extra insurance on flare fittings is to use Del seals (available from Spruce), which can compensate for some not-so-perfect flares. Over tightening NPT fittings can result in cracking; over tightening flare fittings will deform the flare on the tubing. Both typically result in leaks.
My reference to broken fitting was the NPT port. My understanding is we torque 6an to roughly 110 in lbs. The npt is more of voodoo science on tightness. What grinds my gear is that the Vans instructions are grossly lacking and deceptive. Normally I'd use my brain but when using new materials and building something I trust my life with, I want to yield to the experts when possible.
Are you referring to NPT here? Many sealants have lubricants in them and do not set and therefore do nothing to hold the fittings together, though they are capable of sealing a loose fitting. 1/4 turn past snug is way under for an NPT thread and you run the risk of these backing out over time. Agree with many here that you must be cautious with material type and going too far, but you can't leave it loose either.The point here is that these fittings don't seal from tight, thread profile to profile seating...they seal from having sealant properly applied to the fittings before torquing, which is pretty low value. I usually use a small crescent wrench and seldom more than finger tight, plus a quarter turn...let the joint sit and cure a couple days before use and virtually never end up with a leak.
My research says that NPT threads seal by slight deformation of the threads as you tighten them. However, that seal is somewhat compromised because the threads seal at the tips and leave a tiny clearance at the root, requiring a sealant to fill it.
Yes, a quarter turn is likely not enough but 1.5-2 turns is too much.Are you referring to NPT here? Many sealants have lubricants in them and do not set and therefore do nothing to hold the fittings together, though they are capable of sealing a loose fitting. 1/4 turn past snug is way under for an NPT thread and you run the risk of these backing out over time. Agree with many here that you must be cautious with material type and going too far, but you can't leave it loose either.
My research says that NPT threads seal by slight deformation of the threads as you tighten them. However, that seal is somewhat compromised because the threads seal at the tips and leave a tiny clearance at the root, requiring a sealant to fill it.
Loctite 567 or 565 is a great sealant.
Also, once you tighten and clock an NPT fitting, you will not be able to reinstall it to the same clock position if you remove it; it will need to be tighter, and that messes the clocking up…
As I said...quarter turn with Pro-Seal, AFTER fully tightening by hand, pretty much as tight as you can, then another quarter to a half has worked very well for me for the last 35 years of homebuilding...I'll let you know if one backs out...but so far all is well. The Pro-Seal actually does a pretty good job of attenuating any backing off tendencies, once cured.
This is a feel thing. And if you have an alignment issue, I've found looser is better than over-tightening, such as with a Tee or Elbow that needs to align... As I also said...let the Pro-Seal cure before use.
And yes, I was referring to the thread profiles, not being the primary seal, though the thread forms will deform, doing so will render them close to useless, beyond single use.
I agree with Bob above, you may be able to over tighten slightly and re-use, if your installation allows.
This method, has also proven itself over many years, in hydraulic applications with 3-10,000+psi pressurized use.
When messing with these AN fittings, I always put the "b-nut" on any exposed tapers to protect them from dinging or scratching. Or use one of the protective plastic covers. https://de.aliexpress.com/item/1005008937801259.html
I had a few leaking NPT fittings and the advice Vans gave me was clock them to the position you want them as you tighten them. Don't go past where you want them and back off as they will break the seal. Following this advice seemed to fix the leak issues I was having.
Another item in the npt art category. With npt, you can NEVER go counter clockwise. Almost guaranteed leak. See my post above about thread deformation. Once you start turning, you are making your own custom seal and due to the taper, it opens up when backing off.I had a few leaking NPT fittings and the advice Vans gave me was clock them to the position you want them as you tighten them. Don't go past where you want them and back off as they will break the seal. Following this advice seemed to fix the leak issues I was having.
To Larry's point, thats why I use a sharpie to mark the orientation point. If you creep up on the mark ( thightening of course) then you shouldnt have to back off counterclockwise. BUT, yes, if you do, then remove the fitting, clean the sealer from the threads, and redo.Another item in the npt art category. With npt, you can NEVER go counter clockwise. Almost guaranteed leak. See my post above about thread deformation. Once you start turning, you are making your own custom seal and due to the taper, it opens up when backing off.
