My experience is that sealing the little cracks does not help much.
Hmmm maybe, but if you calculate out a gap 1/16 inch over that 40 inches that could be a pretty good sized leak.


My experience is that sealing the little cracks does not help much.
Yes, I agree the area of the gap seems big, but my experience - which may not match yours, is that even without all the silicone I have great cooling.Hmmm maybe, but if you calculate out a gap 1/16 inch over that 40 inches that could be a pretty good sized leak.
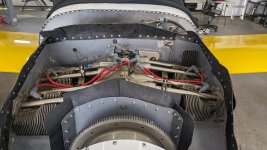
The “ramps” that you’re referring to were put there to direct more air towards cylinders 3&4. Say what you want but they seem to be working because the CHT difference between 1&2 and 3&4 is now around 10+ degrees which is much better than what I experienced before adding the “ramps.” Before the re-baffling my temps were reaching 415-420+ in the climb and 400+ cruise. After rebaffling and adding the ramps I’m seeing 370-380 in the climb (Oklahoma spring/summer temperatures) and around 330-335 cruise. I consider this a win!Nice looking baffling seals! BUT: what is with the ramps on the front cylinders? Blocking for cold weather.....?
I was admiring them; just wondering what they were for! I am impressed something so simple could make such a difference!The “ramps” that you’re referring to were put there to direct more air towards cylinders 3&4. Say what you want but they seem to be working because the CHT difference between 1&2 and 3&4 is now around 10+ degrees which is much better than what I experienced before adding the “ramps.” Before the re-baffling my temps were reaching 415-420+ in the climb and 400+ cruise. After rebaffling and adding the ramps I’m seeing 370-380 in the climb (Oklahoma spring/summer temperatures) and around 330-335 cruise. I consider this a win!
Nice job! How did you determine placement? Was it trial-and-error? Yes: I would definitely consider that a WIN! Better temps on climb and cruise: how can you beat THAT?? 
Can’t claim anything like intelligent design or engineering. Just made them based upon a picture I saw that Walt had posted on a thread a while back discussing my CHT issue . I kinda copied his picture and put them where I thought his were. All I can say is I try to imitate smarter people than myself.I was admiring them; just wondering what they were for! I am impressed something so simple could make such a difference!
airplane up-skirt pervert
My perspective of Baffle Seals is one of no experience, with curiosity and questions. My q's are one issue. The second I'll mention as one installing these right now, is I wish we had photos of the earlier posts. Today that database of photos is not available to us. Unfortunate. Do the moderators have a fix going forward for that?
My Q's:
Q1: Every overlap of baffle material creates a small air leak. I can prevent overlaps between seals by careful attention to detail when I fit them together. Was this an acceptable factory practice to improve productivity? Why is the leak creating overlap the industry best practice? Does silicone baffle material blow out unless its overlapped? Does the superior McFarlane Cowl Saver material that has a stiff UHMW coating allow us skillfully mate two pieces edge to edge to prevent these air leaks? Or will my seals contract when its 70F colder outside and leak then?
Q2: Why dont we stitch this juction of two mating seals with a needle and lacing cord (basball stich) and a leather hole punching tool to prep the material for each stitch?
I dont know if I am on to something or misunderstanding. Help me understand.
This is exactly what I did. There were gaps I was not happy with. I got out my leather sewing awl and put stitches in multiple places on the baffling which REALLY helped with holding the baffling in place. I put several 'helper' tabs behind places I thought might want to move. End result: the black pattern on my upper cowl made by the baffling shows very good sealing. Engine/CHT temperatures are actually sometimes lower than I would like. Oil cooler inlet needs to be blocked to let the oil heat up more than if it is left completely open. I'll see if I can send some picture. Busy with OOT guests right now.....Q2: Why dont we stitch this juction of two mating seals with a needle and lacing cord (basball stich) and a leather hole punching tool to prep the material for each stitch?
Q4: I suspect a seamstress or upholstry professional could give us good criticism. Is anyone here have background in that area?
I dont know if I am on to something or misunderstanding. Help me understand.
Q1 The overlaps (on RV's at least) are typically done for two different reasons.My perspective of Baffle Seals is one of no experience, with curiosity and questions. My q's are one issue. The second I'll mention as one installing these right now, is I wish we had photos of the earlier posts. Today that database of photos is not available to us. Unfortunate. Do the moderators have a fix going forward for that?
My Q's:
Q1: Every overlap of baffle material creates a small air leak. I can prevent overlaps between seals by careful attention to detail when I fit them together. Was this an acceptable factory practice to improve productivity? Why is the leak creating overlap the industry best practice? Does silicone baffle material blow out unless its overlapped? Does the superior McFarlane Cowl Saver material that has a stiff UHMW coating allow us skillfully mate two pieces edge to edge to prevent these air leaks? Or will my seals contract when its 70F colder outside and leak then?
Q2: Why dont we stitch this juction of two mating seals with a needle and lacing cord (basball stich) and a leather hole punching tool to prep the material for each stitch?
Q3: I tested seal material to determine an optimal length that should rise above the cowl. 1.25" to 1.5" allows it to curl over when the cowl is installed and maximizes pressure between its edge and the cowl surface. When I see excess seal material bending around and beyond 90 degrees I cant envision and I have tested in my shop the pressure placed on this seal to cowl interface is weaker. Am I discovering something or missing something?
Q4: I suspect a seamstress or upholstry professional could give us good criticism. Is anyone here have background in that area?
I dont know if I am on to something or misunderstanding. Help me understand.


Dan,Considering all RV fabrication tasks, the thing I most often see done badly is baffle sealing rubber. Flap seals arranged so they blow open, seals that seal against nothing, puckers, gaps, overlaps, you name it...the list of sins appears to be endless.
However, I have seen some installations that were beautiful. Believe me, I look; I'm the nut case who walks around fly-ins while peering into cowl openings like some kind of airplane up-skirt pervert
Builders need to see some really good seals. Who has pictures? Who can show us how it's done? Post those photos please. You'll help a whole generation of RV builders enjoy lower CHT and oil temperature, while going faster due to reduced cooling drag.
Just asking - has anyone done a comparison with measurements of cooling and performance (drag) between a properly installed baffle systems and a plenum? Asking because I installed the baffles just like Van's designed, using a slightly different rubber material, and it just works fantastically, was easy to install, and is easy to inspect and maintain. Plenums look cool, gotta give them that.Dan,
What are your thoughts on plenums? It seems you could create one with some well designed curves to optimize airflow while solving the problems you get with baffles.
WN
Dan,
What are your thoughts on plenums? It seems you could create one with some well designed curves to optimize airflow while solving the problems you get with baffles.
WN


Just asking - has anyone done a comparison with measurements of cooling and performance (drag) between a properly installed baffle systems and a plenum? Asking because I installed the baffles just like Van's designed, using a slightly different rubber material, and it just works fantastically, was easy to install, and is easy to inspect and maintain. Plenums look cool, gotta give them that.