If it makes you feel better, I had an issue in the same place, fortunately discovered before installing the wiring. I dropped the rudder pedals and managed to get a crow’s foot on it - needed about 2 flats to seal it. When building again, I would definitely pressure test. I don't understand why you are looking at replacing the line vs just tightening the fitting as the flair looks good ? I would love to put an inspection hatch in the floor skin under this area - but I'm sure the structure guys will say no way.

Van's Air Force
You are using an out of date browser. It may not display this or other websites correctly.
You should upgrade or use an alternative browser.
You should upgrade or use an alternative browser.
Failure to start
- Thread starter LettersFromFlyoverCountry
- Start date

I was originally looking at replacing, or at least inspecting, the line because the video did not appear to show the amount of fuel leaking out of the fitting that was pooling on the floorIf it makes you feel better, I had an issue in the same place, fortunately discovered before installing the wiring. I dropped the rudder pedals and managed to get a crow’s foot on it - needed about 2 flats to seal it. When building again, I would definitely pressure test. I don't understand why you are looking at replacing the line vs just tightening the fitting as the flair looks good ? I would love to put an inspection hatch in the floor skin under this area - but I'm sure the structure guys will say no way.
If you use the Del fitting here, is there any change to the 75-125 "/lb torque?Search: Del Fitting Seal… they work!
ACS link: https://www.aircraftspruce.com/catalog/hapages/del37fittings.php?clickkey=296765
I recall Scott McDaniels recently mentioning that Van’s routinely uses them on the factory builds.
Didn't work. Went through a whole box of the seals. They're all sitting on the bottom of the tunnel floorBob - if you decide to use the Del seals, I found the easiest way to install them is to very slightly pinch-squeeze them to make them just a little oval shaped. They will then stay in place on the upside-down male fitting. They are such soft metal that they’ll hold their shape but not fall off the fitting (usually!).
I am beside myself
Bob,Didn't work. Went through a whole box of the seals. They're all sitting on the bottom of the tunnel floor
I am beside myself
One speck of EZ Turn would hold it most likely. That stuff is sticky! Use just enough to get it to stick.
I was able to get the del shield on the firewall fitting and tighten it. It does not appear to be leaking
I put one in the bypass fitting connection and torqued and it's tight. I have a very big leak there
And there's blood everywhere. It looks like I tore an artery
I'm feeling so incredibly defeated
I put one in the bypass fitting connection and torqued and it's tight. I have a very big leak there
And there's blood everywhere. It looks like I tore an artery
I'm feeling so incredibly defeated
Attachments
Bob - Major progress! Sounds like you fixed the hardest-to-get-at leak. At least the bypass fitting should be a little easier to work on. Any chance the flare got damaged or contaminated when you removed it there? I’d try again with a fresh Del seal. Hang in there.
P.S. I’ve got dried blood on the same rudder parts!
P.S. I’ve got dried blood on the same rudder parts!
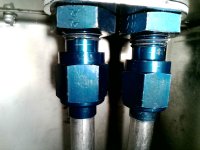
I have no idea but the B Nut threaded fairly nicely with fingers before employing the 30/60 wrench. The image is slightly from the left so it's possible what you're seeing is the line coming away from the firewall from the Adel clamp.Looking at the picture of those blue fittings, it looks like the one on the right is cross threaded and is at an angle.
Or is that an optical illusion?
As there's no access to the fitting I'm inclined to leave well enough alone for now .
The line comes from the left side of the tunnel
I have no idea why Vans puts a crossover here
Nothing about the design of this area makes a lot of sense .
Last edited:
Heard back from tech support. Basically, people are screwed if the line develops a significant problem. I would venture a guess that replacement once everything is in place has never been done.
Hello Robert,
Unfortunately, there is no easy way to get in to replace that fuel line. It is something that is not done very often.
Thanks!
Tom Durkee
Builder Support
Van's Aircraft
Hello Robert,
Unfortunately, there is no easy way to get in to replace that fuel line. It is something that is not done very often.
Thanks!
Tom Durkee
Builder Support
Van's Aircraft
+1Looking at the picture of those blue fittings, it looks like the one on the right is cross threaded and is at an angle.
Or is that an optical illusion?
You can see the tube and an ferrule is at least 10* offset from the fitting. No way that can not be leaking.
Thanks for that. This, and Van's acknowledgement that this part can't be replaced, has pretty much sealed my belief that the project needs to go to the salvage yard.+1
You can see the tube and an ferrule is at least 10* offset from the fitting. No way that can not be leaking.
No salvage yard- we have a few recovering engineers here locally that can help figure this out. Let me know when you will be out there and we will work on it.Thanks for that. This, and Van's acknowledgement that this part can't be replaced, has pretty much sealed my belief that the project needs to go to the salvage yard.
You just put it on wrong. I can see from the first pic that it was straight. That can likely be fixed with a bit of creative bending.Thanks for that. This, and Van's acknowledgement that this part can't be replaced, has pretty much sealed my belief that the project needs to go to the salvage yard.
No need to give up here. While replacing that line may be too much, I still think it can be addressed. Even if that flare is now too far gone, there are still options. You can make a 2 or 3 part tube that can be used as a replacement and can be snaked in there. You can also likely get a hose or a 2 piece hose in there to replace the tube. Can also be a combo of tube & hose. Many options to address this without scraping the plane.
Let Pete help you. I am sure he will get you squared away.
It looks like you have gone about this in every way you can, but would it be possible to cut an access panel to be able to get to it?
Not in that space you can't. Can't see anything. And you can only fit one hand in there. And you pay the price for thatYou just put it on wrong. I can see from the first pic that it was straight. That can likely be fixed with a bit of creative bending.
No need to give up here. While replacing that line may be too much, I still think it can be addressed. Even if that flare is now too far gone, there are still options. You can make a 2 or 3 part tube that can be used as a replacement and can be snaked in there. You can also likely get a hose or a 2 piece hose in there to replace the tube. Can also be a combo of tube & hose. Many options to address this without scraping the plane.
Let Pete help you. I am sure he will get you squared away.
Unfortunately that structure is a major support for the engine mount.It looks like you have gone about this in every way you can, but would it be possible to cut an access panel to be able to get to it?
New supports can ALWAYS be made that are stronger than the original, so cutting out some panels does NOT make this impossible. Not yet suggesting that is necessary, only that it wouldn't be the death of the project if it were required. I can all but insure that there is a way to resolve this, so stick with it here; You just need some experienced assistance.Unfortunately that structure is a major support for the engine mount.
Bob -Thanks for that. This, and Van's acknowledgement that this part can't be replaced, has pretty much sealed my belief that the project needs to go to the salvage yard.
We’ve known each other casually for many, many years….and your signature (EAA Chapter MVP, Tech Counselor, FAAST Team….) tells us how involved you have been - and have stayed in - experimental aviation. So you know that there are high points and low points - sometimes VERY low points - in homebuilding. In fact, I just wrote a segment of a series I am running devoted to the very problem of “the insurmountable problem”. Everyone runs into them at some point - no one gets through the build of something as complex as an airplane without at least one. You’ve been there before with your -7….and you triumphed over it with the help of friends in teh community.
Van’s didn’t tell you that the part couldn’t be replaced, they said:
Unfortunately, there is no easy way to get in to replace that fuel line. It is something that is not done very often.
They said it would be hard…..
“We choose to go to the moon not because it is easy, but because it is hard!” … remember that old gem?
Everything is fixable - sometimes it’s just a bit (or a lot) harder than other times. I have seen all sorts of repairs to airplane primary structure that non-engineers wouldn’t believe. The Apollo 13 crew was effectively doomed by their oxygen tank explosion - but a whole bunch of guys figured out how to bring them home anyways.
OK - so let’s say that you personally have run out of gas on this at your age. I get that - I really do. In that case, if you are truly ready to write the whole thing off (salvage isn’t worth much) then donate it to a cause like an EAA chapter kids project, or an A&P school. Have a good lawyer write up a contract if you’re worried about the liability (although since it is not registered, and is just a pile of parts, I seriously doubt there is much based on history). Fixing a problem in a metal airplane project isn’t rocket science (I don’t actually write that phrase very often….) - its just drilling hole sand riveting in doublers.
Or….get a bunch of those Minnesota friends over, make some coffee and “a little lunch”, and get them to fix it so that you can move on. It’s inspirational to the next generation not to give up on it, and yes - anything can be fixed. It’s just sometimes harder.
It’s OK to “retire from the field” at some point - everyone has to, eventually. But do it because you’re ready - not because you’re frustrated.
Just thoughts from this morning’s cup of coffee…..
Paul
Ive been following Bob's issues for a bit now. Obviously something is amiss here. I think the biggest issue is the inaccessiblilty to work on things. Is fairly obvious that with all the interior parts installed, doing the repair inside the cabin would be quite difficult. Im not that familiar with the 12IS structure, but I'll offer this---what about pulling the lower skin to get access? I know it would be a major pain the $$$ but you would have access to the entire tunnel area, albeit from below. Or what about making an inspection plate over that area, so during conditionals, things can be inspected an/or repaired?New supports can ALWAYS be made that are stronger than the original, so cutting out some panels does NOT make this impossible. Not yet suggesting that is necessary, only that it wouldn't be the death of the project if it were required. I can all but insure that there is a way to resolve this, so stick with it here; You just need some experienced assistance.
For us non-RV-12 builders, here are links from the Van's website for some of the relevant plans sections, which helped me visualize this a little better:
Section 27 - Fuel System
Section 28 - Rudder Pedals & Brakes
Section 29 - Upper Forward Fuselage
It's definitely an ugly area to access, but I bet there's a way!

For instance, is there enough room to cut a hole in the firewall from the forward side? I don't have a sense of how close the engine and systems are to the lower "underbite" area of the firewall, but if you can get your tools in there, making a stainless patch later on would be super easy.

Section 27 - Fuel System
Section 28 - Rudder Pedals & Brakes
Section 29 - Upper Forward Fuselage
It's definitely an ugly area to access, but I bet there's a way!
For instance, is there enough room to cut a hole in the firewall from the forward side? I don't have a sense of how close the engine and systems are to the lower "underbite" area of the firewall, but if you can get your tools in there, making a stainless patch later on would be super easy.
Last edited:
Hey Matt - Bob is building the 12iS, which has a different fuel system from the ULS that you linked (Section 27). Here's the iS version:For us non-RV-12 builders, here are links from the Van's website for some of the relevant plans sections, which helped me visualize this a little better:
Section 27 - Fuel System
Section 28 - Rudder Pedals & Brakes
Section 29 - Upper Forward Fuselage
It's definitely an ugly area to access, but I bet there's a way!
Section 27iS - https://store.vansaircraft.com/aircraft/download/kitplans/?file=27iS_12iS.pdf&kit=RV-12iS
Hey Matt - Bob is building the 12iS, which has a different fuel system from the ULS that you linked (Section 27). Here's the iS version:
Section 27iS - https://store.vansaircraft.com/aircraft/download/kitplans/?file=27iS_12iS.pdf&kit=RV-12iS
Oops! Shows you what I know about RV-12s. I fixed the link in my post, thanks.
Here is an idea. Remove the failed tube and the bulkhead fitting. Drill out the hole, if required, to accomodate a snap bushing. Snake some bulk PTFE hose down from the top untill the end is exposed somewhere and terminate it with a hose end and attach where it belongs, so you can cut where approprite on the engine side. Then disconnect and pull some hose out of the top to work with. With the other end now exposed from the top, terminate it and slid it back down and connect the cabin side fitting. Re-do the engine side hose / tubing to accomodate the new location of the hose end. then secure the hose. no access issues or structural work, nor working in tight spaces.
PTFE hose ends are easy to install.
PTFE hose ends are easy to install.
Last edited:
Another thought. Looking at Section 22 of the KAI, why not remove the right side of the tunnel (F-01217-R), which would give you access to all of the fuel line that needs to be replaced. Wouldn't be easy, and would require unbolting and moving the engine mount a couple of inches, but all of the other rivets should be accessible to drill out. Not sure about the four on the aft flange - would need a 90 degree drill, but looks doable. Would also maintain ELSA, if that's important to you.
Sam Buchanan
been here awhile
As I understand the situation Bob is building his plane to E-LSA specs which means it can't deviate from the Vans design in any way. This means most of the methods suggested aren't an option if he wants to maintain E-LSA certification. Us E-AB builders aren't accustomed to thinking in regard to design restrictions......makes me appreciate E-AB even more.Here is an idea. Remove the failed tube and the bulkhead fitting. Drill out the hole, if required, to accomodate a snap bushing. Snake some bulk PTFE hose down from the top untill the end is exposed somewhere and terminate it with a hose end and attach where it belongs, so you can cut where approprite on the engine side. Then disconnect and pull some hose out of the top to work with. With the other end now exposed from the top, terminate it and slid it back down and connect the cabin side fitting. Re-do the engine side hose / tubing to accomodate the new location of the hose end. then secure the hose. no access issues or structural work, nor working in tight spaces.
PTFE hose ends are easy to install.
I suspect disassembly and remediation will not take nearly as long as Bob is thinking, frustration is reigning at the moment.......
Not to be a jerk, but this is a great opportunity for Vans to get some positive builder press.
Bob is a great member of the Vans Community. Why not send someone out there and help him fix this before Airventure. Then a few builders may have more positive things to say and share.
Delete this comment if inappropriate.
Bob is a great member of the Vans Community. Why not send someone out there and help him fix this before Airventure. Then a few builders may have more positive things to say and share.
Delete this comment if inappropriate.
I accept that i know nothing about the regulated stuff. However, even in the certified world, I thought mechanics are allowed to repair things, like cutting out a chunk of bent or corroded skin and graft in a repair patch, doubler, etc. that said, i defer to the judgement of those with more knowledge.As I understand the situation Bob is building his plane to E-LSA specs which means it can't deviate from the Vans design in any way. This means most of the methods suggested aren't an option if he wants to maintain E-LSA certification. Us E-AB builders aren't accustomed to thinking in regard to design restrictions......makes me appreciate E-AB even more.
I suspect disassembly and remediation will not take nearly as long as Bob is thinking, frustration is reigning at the moment.......
In the light sport world it's just different and the repair paths are generally much more limited and require some kind of authorization from the manufacturer. Some manufacturers are more liberal than others, publishing alternatives and repair methods. Van's has been pretty conservative about this. It's worth an appeal, but I would not expect them to authorize the kinds of repairs to this that would otherwise be acceptable under AC 43.13.I accept that i know nothing about the regulated stuff. However, even in the certified world, I thought mechanics are allowed to repair things, like cutting out a chunk of bent or corroded skin and graft in a repair patch, doubler, etc. that said, i defer to the judgement of those with more knowledge.
Isn't that only true for the initial construction? I thought that once it has an airworthiness certificate you can start making changes to an E-LSA same as an E-AB as long as it doesn't disqualify the aircraft as an LSA.In the light sport world it's just different and the repair paths are generally much more limited and require some kind of authorization from the manufacturer. Some manufacturers are more liberal than others, publishing alternatives and repair methods. Van's has been pretty conservative about this. It's worth an appeal, but I would not expect them to authorize the kinds of repairs to this that would otherwise be acceptable under AC 43.13.
To avoid a cross-post on this subject see this post.
https://vansairforce.net/threads/dismantling-a-project.235738/post-1851099
https://vansairforce.net/threads/dismantling-a-project.235738/post-1851099
This is true for an SLSA and would be true for ELSA that is being presented for inspection. You are correct about repair methods for an already airworthy ELSA. The context of this thread is an aircraft being presented for inspection for the ELSA AW Cert. Bob would be presenting a signed affidavit that the aircraft is built exactly to Van's specifications, which could include *authorized* alternatives or repair methods.Isn't that only true for the initial construction? I thought that once it has an airworthiness certificate you can start making changes to an E-LSA same as an E-AB as long as it doesn't disqualify the aircraft as an LSA.
I'm a little less confident because we are in edge-case territory, but the problem is that authorizing a repair method requires engineering and documentation that conforms to the ASTM standards and process. That's not trivial. Some manufacturers seem to be more casual about this than others. Not casting any judgement here, but Van's very much acts like a big-boy airplane manufacturer in this regard.
bshawco
Active Member
In the interest of helping future builders avoid this and associated issues, I'd encourage Van's to modify the KAI.
This situation could be prevented if Van's changed the KAI to encourage (or mandate) pressure testing the fuel lines prior to installing the rudder pedals.
If I recall correctly, there is no mention of pressure testing the fuel lines while there are specific steps for pressure testing the fuel tank (Steps 1-4 on KAI Page 26iS/U-08). Van's even includes a "Fuel Tank Pressure Test Kit" with the hardware required for testing the tank.
I'd suggest that the KAI be modified to include specific steps for pressure testing the fuel lines on Page 27iS-08 and that a "Fuel Line Pressure Testing Kit" of the required hardware be included with the kit.
Ideally, another pressure test would be specified after completing the various short fuel lines for the fuel pump assembly that's included in the Power Plant Kit.
I don't lack for expertise. This place is thick with Hall of famers. Its just a matter of coming up with a plan for getting access to the area that minimizes disassembly. Also Tony Kirk has been in touch though we haven't huddled yetNot to be a jerk, but this is a great opportunity for Vans to get some positive builder press.
Bob is a great member of the Vans Community. Why not send someone out there and help him fix this before Airventure. Then a few builders may have more positive things to say and share.
Delete this comment if inappropriate.
This project is in no-man's land. It is registered but does not have an airworthiness certificate. The builder is Van's as the paperwork attested, there's no going backIsn't that only true for the initial construction? I thought that once it has an airworthiness certificate you can start making changes to an E-LSA same as an E-AB as long as it doesn't disqualify the aircraft as an LSA.
Last edited:
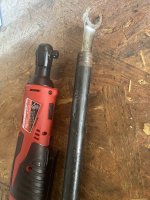
I agree wholeheartedly. Bob, I too had leaks in the EXACT areas you did, so I too blamed Van’s for not recommending a pressure test, especially for us first-time builders. I was at the hangar today and took this photo of the tools I ended up using to fix my leaks at the firewall.In the interest of helping future builders avoid this and associated issues, I'd encourage Van's to modify the KAI.
This situation could be prevented if Van's changed the KAI to encourage (or mandate) pressure testing the fuel lines prior to installing the rudder pedals.
If I recall correctly, there is no mention of pressure testing the fuel lines while there are specific steps for pressure testing the fuel tank (Steps 1-4 on KAI Page 26iS/U-08). Van's even includes a "Fuel Tank Pressure Test Kit" with the hardware required for testing the tank.
I'd suggest that the KAI be modified to include specific steps for pressure testing the fuel lines on Page 27iS-08 and that a "Fuel Line Pressure Testing Kit" of the required hardware be included with the kit.
Ideally, another pressure test would be specified after completing the various short fuel lines for the fuel pump assembly that's included in the Power Plant Kit.
The modified 11/16” box wrench at the end of the 1/2” pipe allowed me to reach the nuts and make small turns to tighten them. The cordless ratchet was helpful in removing and replacing the bolts that hold the rudder peddles in place. I too was sweating bullets figuring how to tighten them, but these worked for me.
Attachments
No salvage yard- we have a few recovering engineers here locally that can help figure this out. Let me know when you will be out there and we will work on it.
Gonna huddle up with Tony Kirk tomorrow and see what needs to come out before a new line can be made in place (and how). I've got St. Paul Saints games through Friday so I'll only be out there in the mornings, basically making lists (and Steve Wentworth wants pictures so I'll do that). I barely have use of my hands with all the cuts and I look like a leper so no actual work for a week or so.
But I'll be up at the RV picnic on Saturday.
Didn't Mel say in the other thread that you *can* change the registration?This project is in no-man's land. It is registered but does not have an airworthiness certificate. The builder is Van's as the paperwork attested, there's no going back
I feel your pain but please know you are not alone in suffering this frustration. I agree this fuel line routing, installation, and maintenance needs a formal rework from Van's. I too think the KAI's need to be modified to include a pressure test right after lines are installed. The problematic line has a bend in it too close to the fitting and is almost impossible to fabricate by hand, then a relatively tight routing to an adel clamp on the firewall stresses the connection after its made. Its just a bad place for those fittings. Personally I think a flexible line solution would be possible, easier to install and maintain. Or at least use straight AN bulkhead fittings that can be installed from the forward side of the firewall. Meanwhile that doesn't solve the current problem which is a full tunnel with the fuel lines in the bottom. As you have figured out it is mandatory to drop the rudder pedals to get to these fittings. Avionics cabling and throttle cable may have to come out. Eat an elephant one bite at a time, you have the skill to fix this and the know how with friends to help. Don't give up the ship you have too much blood (literally),, guts and tears invested already.This project is in no-man's land. It is registered but does not have an airworthiness certificate. The builder is Van's as the paperwork attested, there's no going back
TS flight lines has this line available pre bent with ends, not expensive save some frustration....it can be worked into place top forward to bottom back, cut and flared at crossover manifold. If you need to, undo the fuel tank line and the fuel pump line and the manifold will scoot aft a couple inches. Not suggesting easy but doable. Enjoy your break from it all and give it a mind rest!Gonna huddle up with Tony Kirk tomorrow and see what needs to come out before a new line can be made in place (and how). I've got St. Paul Saints games through Friday so I'll only be out there in the mornings, basically making lists (and Steve Wentworth wants pictures so I'll do that). I barely have use of my hands with all the cuts and I look like a leper so no actual work for a week or so.
But I'll be up at the RV picnic on Saturday.
He says it can be unregistered as an abandoned project and basically you start over again.Didn't Mel say in the other thread that you *can* change the registration?
Separately, I would have to prove the 51 percent which sounds like a lot of research. I'd also have to get more paperwork from Van's etc.
I don't think I'm going in that direction partly because many of the options to do so require a level of surgery far beyond my expertise to do it perfectly.
Should be no problem Bob - the RV-12iS is already on the approved list: https://www.faa.gov/aircraft/gen_av/ultralights/amateur_built/kits/amateur_built_kit_listingSeparately, I would have to prove the 51 percent which sounds like a lot of research.
So just a paperwork exercise to get it registered as EAB. Unless I had an overwhelming need to go E-LSA (and I know nothing about the rules or advantages of this), I'd be really tempted to do that, then I could make a proper fix to whatever is going on here.Should be no problem Bob - the RV-12iS is already on the approved list: https://www.faa.gov/aircraft/gen_av/ultralights/amateur_built/kits/amateur_built_kit_listing
Ahh. I misread that originally and thought you had your AWC.This project is in no-man's land. It is registered but does not have an airworthiness certificate. The builder is Van's as the paperwork attested, there's no going back
Sounds like you're well on your way to getting this fixed! Best of luck.
To me the best part of E-LSA is a 5 hour Phase 1, particularly since I'm at an airport that won't let a first flight return until the experimental is out of phase 1.So just a paperwork exercise to get it registered as EAB. Unless I had an overwhelming need to go E-LSA (and I know nothing about the rules or advantages of this), I'd be really tempted to do that, then I could make a proper fix to whatever is going on here.
Because of a medical condition, it was unlikely I would fly it and it was presumed I would sell after phase 1. The 5 hour Phase 1 made things far less complicated than paying a test pilot for 40 hours and renting a hangar in some far off land, particularly since I'm a by-the-book builder.
A very valid consideration!To me the best part of E-LSA is a 5 hour Phase 1, particularly since I'm at an airport that went let a first flight return until the experimental is out of phase 1.
Because of a medical condition, it was unlikely I would fly it and it was presumed I would sell after phase 1. The 5 hour Phase 1 made things far less complicated than paying a test pilot for 40 hours and renting a hangar in some far off land, particularly since I'm a by-the-book builder.
John---yes we do BUT under the provision that the lower skin hasnt been riveted on. That leaves more access. In Bobs case, he has all the brake hydraulics, pedals, etc in the way, and lest we forget, the 12 isnt a big cabin plane. Even with things out of the way, there isnt alot of room to fabricate and install a new line. Our line is flared and finished on the firewall side. The open end, that needs to pass through the snap bushing in the bulkhead, it has to be flared after the tube passes through the bulkhead. If the lower skin is not installed, then the tube can pass through the bulkhead snap bushing and extend beneath the fuselage, so you can make a better quality flare. Anyway you look at it, getting access is the big issue.TS flight lines has this line available pre bent with ends, not expensive save some frustration....it can be worked into place top forward to bottom back, cut and flared at crossover manifold. If you need to, undo the fuel tank line and the fuel pump line and the manifold will scoot aft a couple inches. Not suggesting easy but doable. Enjoy your break from it all and give it a mind rest!
Yes ,I agree, but with a bit of judicious handling and bending in place your line can slide in and be flared, ask how I know... just trying to reduce the frustration factor by not having to make a line from scratch that has a bend very close to the end that interferes with the B Nut sleeve. No doubt that the tunnel is narrow and deep and with engine and avionics installed very full of stuff on top of the fuel line.John---yes we do BUT under the provision that the lower skin hasnt been riveted on. That leaves more access. In Bobs case, he has all the brake hydraulics, pedals, etc in the way, and lest we forget, the 12 isnt a big cabin plane. Even with things out of the way, there isnt alot of room to fabricate and install a new line. Our line is flared and finished on the firewall side. The open end, that needs to pass through the snap bushing in the bulkhead, it has to be flared after the tube passes through the bulkhead. If the lower skin is not installed, then the tube can pass through the bulkhead snap bushing and extend beneath the fuselage, so you can make a better quality flare. Anyway you look at it, getting access is the big issue.
Yes, and only one of the lines goes through a snap bushing (the right side) as it goes forward to the firewall. The left side (the offender in this case), goes through a wider (and I think shorter) hole that has a mylar-like bushing riveted on. You'd have drill out that plastic piece (pretty impossible if you put the rivet head on the front) and get a good sized drill in under the throttle quadrant to create a new hole for snap bushing there. I do not know why there are two separate passthroughs in that bulkhead but I bet there's a reason (perhaps having to do with the fact the flare is made in place?).John---yes we do BUT under the provision that the lower skin hasnt been riveted on. That leaves more access. In Bobs case, he has all the brake hydraulics, pedals, etc in the way, and lest we forget, the 12 isnt a big cabin plane. Even with things out of the way, there isnt alot of room to fabricate and install a new line. Our line is flared and finished on the firewall side. The open end, that needs to pass through the snap bushing in the bulkhead, it has to be flared after the tube passes through the bulkhead. If the lower skin is not installed, then the tube can pass through the bulkhead snap bushing and extend beneath the fuselage, so you can make a better quality flare. Anyway you look at it, getting access is the big issue.
And you have to do all of this under the throttle quadrant .
Tony and I went over several possible option today but the favored one (mostly because the others have their own brand of horrible) is remaking the line in place. Remove the heater cables and rudder pedals/brakes but leaving the power module in place.
We thought about removing one of the tunnel walls but that requires removing the engine, which could only be moved a little bit because the Rotax harness is like a short leash on a dog. And you still don't end up with much room to work.
Last edited:
Yes, and only one of the lines goes through a snap bushing (the right side) as it goes forward to the firewall. The left side (the offender in this case), goes through a wider (and I think shorter) hole that has a mylar-like bushing riveted on. You'd have drill out that plastic piece (pretty impossible if you put the rivet head on the front) and get a good sized drill in under the throttle quadrant to create a new hole for snap bushing there. I do not know why there are two separate passthroughs in that bulkhead but I bet there's a reason (perhaps having to do with the fact the flare is made in place?).
And you have to do all of this under the throttle quadrant .
Tony and I went over several possible option today but the favored one (mostly because the others have their own brand of horrible) is remaking the line in place. Remove the heater cables and rudder pedals/brakes but leaving the power module in place.
We thought about removing one of the tunnel walls but that requires removing the engine, which could only be moved a little bit because the Rotax harness is like a short leash on a dog. And you still don't end up with much room to work.
I would get it inspected as it is by DAR as an E-LSA and then before you fly it run a flexible hose in it's place ;-)
This tunnel is a nightmare - next to impossible to attach the rudder cables, nightmare to service the fuel lines and even get to the transponder antenna to tighten the nut. Can we put an inspection hatch in the floor under the tunnel ?
