Probably not an option. Most any inspector is going to want evidence that the engine has been run on the airframe without any leaks.I would get it inspected as it is by DAR as an E-LSA and then before you fly it run a flexible hose in it's place ;-)

Van's Air Force
You are using an out of date browser. It may not display this or other websites correctly.
You should upgrade or use an alternative browser.
You should upgrade or use an alternative browser.
Failure to start
- Thread starter LettersFromFlyoverCountry
- Start date

So you want me to put a new line in and then put back everything, get it inspecting, then take everything out again?I would get it inspected as it is by DAR as an E-LSA and then before you fly it run a flexible hose in it's place ;-)
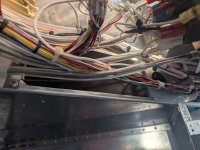
This tunnel is a nightmare - next to impossible to attach the rudder cables, nightmare to service the fuel lines and even get to the transponder antenna to tighten the nut. Can we put an inspection hatch in the floor under the tunnel ?
Yeah, no. :*)
Perhaps you missed the ;-). But my serious point is you may be able to make something just work now and after inspection make it even better. I spent hours getting the fitting at the bottom of the gear to not leak brake fluid. Once it was inspected I switched to the TS Flightlines brake loops vs the aluminum tube in the kit. Better braking and easier to fit as you don't have to take off the axle assembly to fit it. In hindsight I could have done in during the build as the DAR didn't care. Also you could ask Vans to approve a mod so it remains E-LSA.So you want me to put a new line in and then put back everything, get it inspecting, then take everything out again?
Yeah, no. :*)
I have done two inspections with Fsdo personnel. Each looked a the plane for maybe 5 minutes and never asked if the engine had been run. Definitely did not ask me about leaks or anything airworthy related. They spent most time on why I didn’t have a compass. They did ask a few oddball questions about how things went together, but believe that was to prove knowledge for the repairman cert.I agree with Mel. My DAR concentrated more on paperwork than inspecting. But even he wanted to hear the engine run.
I researched the idea of a mod and the inside information is Van's wouldn't approve any mod and would take a considerable amount of time in not approving it. They're extremely conservative about mods.Perhaps you missed the ;-). But my serious point is you may be able to make something just work now and after inspection make it even better. I spent hours getting the fitting at the bottom of the gear to not leak brake fluid. Once it was inspected I switched to the TS Flightlines brake loops vs the aluminum tube in the kit. Better braking and easier to fit as you don't have to take off the axle assembly to fit it. In hindsight I could have done in during the build as the DAR didn't care. Also you could ask Vans to approve a mod so it remains E-LSA.
Especially fuel system mods!I researched the idea of a mod and the inside information is Van's wouldn't approve any mod and would take a considerable amount of time in not approving it. They're extremely conservative about mods.
There aren't going to be any secrets between me and the DAR. Tony Kirk is going to be the DAR.I agree with Mel. My DAR concentrated more on paperwork than inspecting. But even he wanted to hear the engine run.
After the leak problem is fixed - if it is fixed - there still is the problem encountered on the engine start and getting that fixed.
Sam Buchanan
been here awhile
And that is as it should be considering how many Phase 1 flights have ended badly after "builder engineering" of fuel systems..........Especially fuel system mods!
That's all I needed to hear.After the leak problem is fixed . . .
Thank-you and I am glad you are working to get it fixed. Look for a DM.In the unlikely event that some other bonehead finds him/herself in the same predicament, I'm documenting each step of the ATTEMPTED rebuild on the builder log starting with this page.
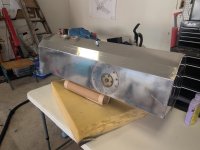
I was able to fabricate a new line over the holiday weekend, then rebent it to fit into the forward tunnel. It helped A LOT to drill out the tunnel brace. Once I was able to pull tubing through the bulkhead, I straightened as much of it as I could with a spring bender, and then flared the aft end, pushed tubing back through the bulkhead and attached it to the bypass fitting, then worked on what was in the tunnel and got it positioned appropriately and tightened the B nut on the firewall fitting. If I can find about a two-foot screwdriver, I should be able to get the Adel Clamp mounted, which I already have closed enough with safety wire to allow a screw to pass through.
What I'd like to find out now is what kind of setup and plumbing is used to close the fuel system and pressurize it in order to test for leaks .
If it passes I can start the process of putting things back together.
What I'd like to find out now is what kind of setup and plumbing is used to close the fuel system and pressurize it in order to test for leaks .
If it passes I can start the process of putting things back together.
Attachments
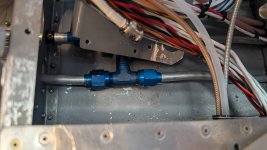
Bob,I was able to fabricate a new line over the holiday weekend, then rebent it to fit into the forward tunnel. It helped A LOT to drill out the tunnel brace. Once I was able to pull tubing through the bulkhead, I straightened as much of it as I could with a spring bender, and then flared the aft end, pushed tubing back through the bulkhead and attached it to the bypass fitting, then worked on what was in the tunnel and got it positioned appropriately and tightened the B nut on the firewall fitting. If I can find about a two-foot screwdriver, I should be able to get the Adel Clamp mounted, which I already have closed enough with safety wire to allow a screw to pass through.
What I'd like to find out now is what kind of setup and plumbing is used to close the fuel system and pressurize it in order to test for leaks .
If it passes I can start the process of putting things back together.
I have the fittings Bill used to close off and test his system. You are welcome to use them. Heck, we will stop down and help you. Bill has a monster screwdriver he can bring too.
Let's do that. I'll have to disconnect the tank, so two fittings there. And then I'll have to disconnect the fuel lines firewall forward . This week is problematic as I have Saints games Tues-Friday noghtsBob,
I have the fittings Bill used to close off and test his system. You are welcome to use them. Heck, we will stop down and help you. Bill has a monster screwdriver he can bring too.
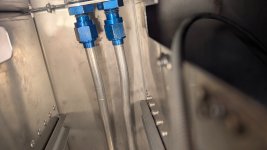
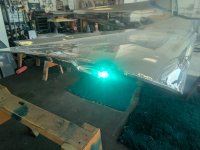
Happy to report the pressure testing on the new fuel line was successful. I was a little surprised that when I loosened the union fitting connecting the two fuel lines up front I got a spray of fuel. I assume the check valves in the system have something to do with that.
I'm about ready to start putting things back together but I blew out my knees a few weeks ago and they don't bend well anymore so getting into that area is going to be problematic.
In the meantime, since the fuel tank was out of the plane for the pressure testing, I installed the fuel pickup inspection port and polished it up.
Attachments
Great new Bob! When will you get back to the matter of the test run?Update.
Done.
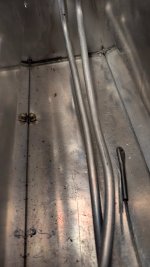
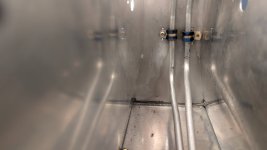
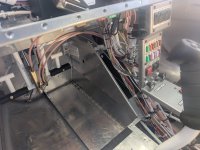
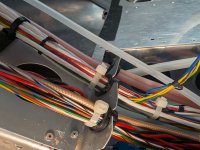
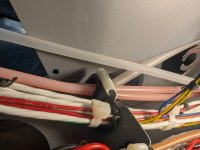
The middle block on the rudder/brake assembly went back in easier than I expected (and certainly easier than it came out) thanks to the powered nut driver. One good thing about taking everything apart is it made it easier to reorganize everything, specifically the three "holders" in the top bracket. So the one on the right now holds the brake lines and heater cable. The one on the left holds just the heater cable, and the one in the middle doesn't hold much of anything. I also zip tied and bundled all wires as I had to remove the nice SteinAir lacing.
One conundrum is the route of the pitot line. I think the plans were changed somewhere along the line because the depiction of the lower bracket (which I had to drill out and is now reinstalled) is different throughout the KAI and with the version of the lower bracket I have (three snap bushings), there's no place for the pitot line and I'm concerned about it chafing on the edge of the lower bracket. The instructions say to zip tie it to the zip tie holders but there aren't any. I'm thinking of loosely zip tying it to the brake lines and putting a big blob of RTV there.
I reconnected all the connectors and fired up the avionics and everything is fine.
I still have to reinstall the fuel tank. After that, I'll start over with the PAP and then try the engine start again. We don't think this fuel leak had anything to do with the lack of power and the very troubling stall of the engine when the second fuel pump was brought online. I looked at the pump wiring to be sure the wires were consistent throughout and they were (and both pumps had developed acceptable fuel pressure during the first go-through of the PAP). So we'll have to see what that's all about.
I do have some concern about stress on the brake lines as the rudder pedals move but I guess I'll just monitor that situation.
This completes all the work in the tunnel, which remains a really crappy design feature of the 12iS. I wouldn't wish this maintenance on anybody.
Attachments

AZSteve053
Well Known Member
So HAPPY to see that you have navigated around this ugly pot hole in your project, you'll look back with "memories" of how you over came yet another challenge in your pursuit of a wonderful flying machine.This completes all the work in the tunnel, which remains a really crappy design feature of the 12iS. I wouldn't wish this maintenance on anybody.
One conundrum is the route of the pitot line. I think the plans were changed somewhere along the line because the depiction of the lower bracket (which I had to drill out and is now reinstalled) is different throughout the KAI and with the version of the lower bracket I have (three snap bushings), there's no place for the pitot line and I'm concerned about it chafing on the edge of the lower bracket. The instructions say to zip tie it to the zip tie holders but there aren't any. I'm thinking of loosely zip tying it to the brake lines and putting a big blob of RTV there.
If you have a spare piece of static line tubing, you could cut one to the length of the exposed flange, slit it lengthwise, and slide it on the edge of the bracket as a protector.
There also may be enough material on one of those exposed flanges to drill a hole and pop-rivet a bracket extension in place, that you could fold over to create a flat surface to attach to.
Excellent idea
That worked out pretty well. I'm also unimpressed with mixing metal cables with electrical wires so I added a plastic tube sheathing to both the heater cables and the throttle as the pass over the tunnel.
Attachments
It's great to see you moving forward on the project, Bob!
I'm curious about something...as mentioned in Post #24, did you end up putting Del seals on the two AN837-6D fittings on the firewall?
Thanks!
I'm curious about something...as mentioned in Post #24, did you end up putting Del seals on the two AN837-6D fittings on the firewall?
Thanks!
I have some left (and ordered a second set after butchering the first ones I ordered) but decided not to because of the difficulty in getting access. I had put one on the (failed) attempt at the connection at the bypass and it wasn't seated quite right, I guess, and it leaked like a sieve. So I was uncomfortable with the idea of possibly installing them not quite right on a fitting that I can't really access well and can't get a good look at easily and decided I would just make sure the B-nut was on properly to begin with.It's great to see you moving forward on the project, Bob!
I'm curious about something...as mentioned in Post #24, did you end up putting Del seals on the two AN837-6D fittings on the firewall?
Thanks!
Meanwhile, I reinstalled the fuel tank yesterday (and again was surprised to find fuel squirting out from one of the lines when I took the cap off I'd installed for pressure testing. Where is all this fuel coming from???)) and no matter how hard I worked at it, could not get the B fitting on one of the lines to properly engage the threads on the tank fitting so put out the Bat Signal to Pete Howell who plans on stopping by today.
Typically when you are struggling to start the threads on an AN fitting there is a poor alignment of the tube to the fitting. Get the end of the tube perfectly parallel to the fitting and should have no issue getting the threads started.I have some left (and ordered a second set after butchering the first ones I ordered) but decided not to because of the difficulty in getting access. I had put one on the (failed) attempt at the connection at the bypass and it wasn't seated quite right, I guess, and it leaked like a sieve. So I was uncomfortable with the idea of possibly installing them not quite right on a fitting that I can't really access well and can't get a good look at easily and decided I would just make sure the B-nut was on properly to begin with.
Meanwhile, I reinstalled the fuel tank yesterday (and again was surprised to find fuel squirting out from one of the lines when I took the cap off I'd installed for pressure testing. Where is all this fuel coming from???)) and no matter how hard I worked at it, could not get the B fitting on one of the lines to properly engage the threads on the tank fitting so put out the Bat Signal to Pete Howell who plans on stopping by today.
rcarsey
Well Known Member
those metal cables can be a real problem. My heater cables eventually digged into (i dont know the part number).. where they leave the center channel and come out near the pilot's right foot (and copilot's left foot). I think theres an adel clamp on them near that area. The cables were touching that aluminum part.That worked out pretty well. I'm also unimpressed with mixing metal cables with electrical wires so I added a plastic tube sheathing to both the heater cables and the throttle as the pass over the tunnel.
What we found - and this is probably what I did with the original installation - is taking the Adel clamp off of the line near where the autopilot servo is, gives you enough "slack" in the line to move it into a more aligned position, tighten, restore Adel clamp.Typically when you are struggling to start the threads on an AN fitting there is a poor alignment of the tube to the fitting. Get the end of the tube perfectly parallel to the fitting and should have no issue getting the threads started.
The other thing I learned - although I learned this years ago - is Pete Howell is a god walking (or flying) among mere mortals.
There is, indeed, an Adel clamp there. I put the plastic tube all the way up to it.those metal cables can be a real problem. My heater cables eventually digged into (i dont know the part number).. where they leave the center channel and come out near the pilot's right foot (and copilot's left foot). I think theres an adel clamp on them near that area. The cables were touching that aluminum part.
glad you got it done. Hooray for Pete. Must be that cyclone educationWhat we found - and this is probably what I did with the original installation - is taking the Adel clamp off of the line near where the autopilot servo is, gives you enough "slack" in the line to move it into a more aligned position, tighten, restore Adel clamp.
The other thing I learned - although I learned this years ago - is Pete Howell is a god walking (or flying) among mere mortals.
")
Dwillows
Member
Hey Bob,
One of our School Built planes had a loose fitting as you described .
I was successful with a combination of 30/60 deg wrench, and crow feet.
30/60 wrenches
It was an un paid for session in aircraft pilates to do the job , but doable.
I now inspect these fittings carefully on all school builds.
Best of luck
Dwillows
Member
Hi Dustyone, I just finished an RV12iS and encountered the same leak inside the cockpit from the same firewall fitting and saw your response to Bob. Would you mind describing in a bit more detail how you approached that B-nut and tightened it. What parts did you have to remove out of the way to gain access? I have crows feet and have ordered the 60-90 wrench you mentioned.Hey Bob,
One of our School Built planes had a loose fitting as you described .
I was successful with a combination of 30/60 deg wrench, and crow feet.
30/60 wrenches
It was an un paid for session in aircraft pilates to do the job , but doable.
I now inspect these fittings carefully on all school builds.
Best of luck
Thank you so much in advance.
Re: tightening firewall fuel lines.Hi Dustyone, I just finished an RV12iS and encountered the same leak inside the cockpit from the same firewall fitting and saw your response to Bob. Would you mind describing in a bit more detail how you approached that B-nut and tightened it. What parts did you have to remove out of the way to gain access? I have crows feet and have ordered the 60-90 wrench you mentioned.
Thank you so much in advance.
It was not a fun job,
Most of the centre console was removed and loosened so I could get my hand up to the firewall. It involves working in a very confined space.
All seats were removed for more room to move around. Once I could reach the fittings, the tools below made short work of tightening the loose fittings.
Be patient and take your time.
My favourite tools for close quarter, pipe action, is the combination of 3 x Snap-On Tools.
1 x FZ1 3/8Dve x 3/8Dve
1 x AN850811B. 11/16" Crowfoot 12 point
1 x 3/8Dve Extension ( any brand, various sizes )
With these tools, you can make up many combinations at many angles and off-sets.
If You use extensions with wobble drive, you can get an addition 15 degree offset for obstructions.
It was with the above tools that I was able to successfully re-torque the fuel lines at the firewall on the RV-12iS
( it did involve a fair amount of "aircraft Pilates" )


