For those that are thinking about doing their own paint work, I'd suggest hitting the local auto salvage and buying the cheapest metal fender and hood or trunk lid you can get and use it for practice. Do the prep work and paint it white and experiment. Then sand it all down or strip it and then repeat with high gloss black. Between both colors, it's a good way to learn and figure out the skill set needed to do at least a reasonable job of it. It will also give you a chance to learn about mixing, thinning and using additives to adjust the curing and time to see if you really want to do it yourself. Better to learn on the 100$ junkyard parts than mess something up on your fresh built airplane.

Van's Air Force
You are using an out of date browser. It may not display this or other websites correctly.
You should upgrade or use an alternative browser.
You should upgrade or use an alternative browser.
Ball-park estimate for paint job?
- Thread starter Duncannon
- Start date

Just an opinion, but I would spray it with Kirker White EnduroPrime. Wet sand 400-800 then shoot Kirker White Single Stage UltraGlo. Cut & buff. Add vinyl accents or graphics. I think you may be suprised how it looks.That's all I'm interested in. I didn't build a showplane...
Roll and tip with maybe a bit of buffing is sounding more and more appealing now that the airplane is flying and I'm taking a $30k pay cut...
Easiest method is to paint as many parts as possible separately.
And then -- you spend $27K on a paint job and become Cameron Frye's father... ")
(For those of you who don't remember
Cameron: Ferris, my father loves this car more than life itself.
Ferris: A man with priorities so far out of whack doesn't deserve such a fine automobile.[Ferris walks around the car]
Cameron: No. No. Apparently, you don't understand.
Ferris: Wow.
Cameron: Ferris, he never drives it. He just rubs it with a diaper.
2 part epoxy-polymide used to be the standard military aircraft primer as I recall. I have no idea what it is now. it came in two colors: yellow or olive drab. Which color you got depended on what they had on hand and whether you were getting camo green or Navy gray for a top coat.Not sure what they used but it is green underneath.
I'm gonna spray paint it flat gull (think "low-IR") gray when and where I have time. I'll stencil "Rattle Can" on the nose, then I'll fly it till I can't fly anymore. Fancy paint jobs are just too much down time and not worth the price IMHO.
Last edited:
Had a guy come to the shop one time asking about painting his own airplane. We told him we would be here to answer any questions that he had. He even would hang out a little and watch us work. When he was ready we bought the paint for him since we could get a discount being a business. About two weeks later he came by and said “can I get on your schedule?” It turned out that paint wasn’t as easy as he thought it was. That’s not to say everyone will find it hard but I thought it was funny at the time.For those that are thinking about doing their own paint work, I'd suggest hitting the local auto salvage and buying the cheapest metal fender and hood or trunk lid you can get and use it for practice. Do the prep work and paint it white and experiment. Then sand it all down or strip it and then repeat with high gloss black. Between both colors, it's a good way to learn and figure out the skill set needed to do at least a reasonable job of it. It will also give you a chance to learn about mixing, thinning and using additives to adjust the curing and time to see if you really want to do it yourself. Better to learn on the 100$ junkyard parts than mess something up on your fresh built airplane.
I’m still in process. 2 part epoxy primer followed by high build primer 4 hours later last weekend. This weekend is all final sanding for the finish coats.I'm interested to hear how this turns out. I don't have a lot of budget for paint and at this point I would be fine with just a single color (white or dark blue) all over. Assuming I don't just go buy some PSX-700 and do a roll-and-tip...
My painter is currently looking very hard at purchasing an hangar at Peach State GA2 for painting. I had been talking with one of my hangar mates and he was saying he hired a DELTA aircraft painter for $500 to just shoot the paint. The owners of the 172 did EVERYTHING else.
90% of the paint job is the prep work.


N10KE
Well Known Member
There are very few of us builders (assemblers if you insist) that have the skills from years of paint and prep experience like the teams at Evoke, Cascade, Fulltron, etc. While I get the satisfaction of being able to say "I did everything myself, including the paint", personally I'm glad there are experts out there that bring out the best from the thousands of hours of our time "assembling". Painting to the level of an Evoke Signature Series is hard and not something most of us can or will ever be able to do.Had a guy come to the shop one time asking about painting his own airplane. We told him we would be here to answer any questions that he had. He even would hang out a little and watch us work. When he was ready we bought the paint for him since we could get a discount being a business. About two weeks later he came by and said “can I get on your schedule?” It turned out that paint wasn’t as easy as he thought it was. That’s not to say everyone will find it hard but I thought it was funny at the time.
I have a lake neighbor that painted his house with these colors and style. Neon green was a bit much. Looks like a Dr Seus house. For this plane, "I can fly, I can fly, yes I can fly Thing 1 and Thing 2"


N10KE
Well Known Member
Beautiful scheme and execution! Evoke does amazing work.And then -- you spend $27K on a paint job and become Cameron Frye's father...
(For those of you who don't remember
Cameron: Ferris, my father loves this car more than life itself.
Ferris: A man with priorities so far out of whack doesn't deserve such a fine automobile.[Ferris walks around the car]
Cameron: No. No. Apparently, you don't understand.
Ferris: Wow.
Cameron: Ferris, he never drives it. He just rubs it with a diaper.
View attachment 98760
And I get the reference and resemble the remark a bit too closely
")
briand
Well Known Member
I am building a RV-12is and would love to learn how to do a vinyl covering. I would also like to read the article you wrote
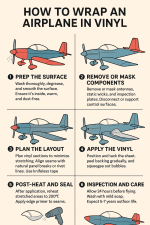
Wrapping an airplane in vinyl is similar to wrapping a car — but on a much larger, more delicate, and regulated scale. It’s common for homebuilt or experimental aircraft (like an RV-8) to be vinyl wrapped instead of painted because it’s lighter, cheaper, and reversible.
Here’s a practical step-by-step guide to doing it right:

- Aircraft-grade cast vinyl wrap (e.g., 3M 2080, Avery Dennison, or Oracal 970RA)
- Surface cleaner (isopropyl alcohol, aviation-approved degreaser)
- Plastic squeegees with felt edge
- Heat gun (not hair dryer — use one with precise temp control)
- Infrared thermometer
- Razor blades and knifeless tape
- Soft gloves
- Ladder or work platform
- Optional: Wrap magnets, rivet roller, and 3M Primer 94 (for edges)

- Wash thoroughly — remove dirt, bugs, oil, and wax.
- Degrease with alcohol or approved solvent; residue will cause lift.
- Smooth the surface — vinyl doesn’t hide dents or rivet heads.
- For bare aluminum: scuff lightly with Scotch-Brite, then clean again.
- Ensure the aircraft is inside, warm (70–80°F), and dust-free.

- Remove antennas, static wicks, and inspection plates if practical.
- Mask off gaps or seams you don’t want wrapped.
- If wrapping around control surfaces, disconnect or support them carefully to avoid stress on hinges or trim tabs.

- Aircraft panels curve in multiple directions — plan vinyl sections to minimize stretching.
- Align seams with natural panel breaks or rivet lines.
- Use knifeless tape where cuts must be made near the surface (don’t use razor blades directly on aluminum or composite!).

- Position the sheet — tack one edge in place with magnets or masking tape.
- Peel backing gradually and squeegee from center out to remove bubbles.
- Use heat (around 180–200°F) to conform over compound curves like wingtips or cowling.
- For rivet lines: warm the area, then use a rivet brush or roller to press vinyl around each head.
- Avoid overstretching — more than ~10% can cause lift later.

- After application, reheat stretched areas to ~200°F (“post-heating”) to set the memory of the vinyl.
- Apply edge primer (3M 94) to leading edges and seams for durability.
- Press all edges firmly with a felt squeegee or glove.

- Don’t fly for 24 hours after wrapping to allow adhesive to settle.
- Wash with mild soap; avoid power washers or harsh solvents.
- Expect lifespan: 5–7 years outdoors (often longer if hangared).

- Regulations: For certificated aircraft, check with your FSDO or mechanic — wraps may count as a “temporary marking,” not a finish, and could affect airworthiness or registration visibility.
- Balance: Avoid wrapping individual control surfaces unless balanced afterward.
- Fuel exposure: Keep vinyl clear of fuel drains and access ports.
Attachments
I believe it was roughly 6-12 months and it was in the paint shop for a month and a half.Very nice!! How long was the waiting list to get in and how long was it in the paint shop for?
The RV-15’s fuse had a wrap on it at Osh. It looked great!Beautiful aircraft!! Just curious how vinyl would do on an RV-12 with pull rivets?
I built and painted my 8 ( recently sold after 10 years of flying) . It was Axalta Base / Clear . Probably spent 700-800 hours of prep to final buff . If I were doing it again with today’s prices I’d spray Enamel with gloss catalyst from Tractor Supply ! A True 1 gallon kit for $125 . Maybe go a singe color with some vinyl strips . Somewhere along the way RV’s no longer became a inexpensive way into aircraft ownership…


The RV-15’s fuse had a wrap on it at Osh. It looked great!
It did look great. But I examined the wrap closely and noticed that it did not adhere to the contour of the pop rivets. There was a 'gap' if you will between the skin and the rivet where the vinyl was not attached to anything, just stretched between the skin and the top of the rivet in such a way that it created a small tent shape. Most every rivet I looked at was like this.
--Ron
I apologize for probably what is a stupid question: Does a typical wrap require pretty much a solid base paint color and then the wrap are just the accents? Or can you wrap an existing multi color paint scheme to make it something completely different than the existing paint colors?
I am assuming the first scenario. But wasn't sure if you could just cover up the existing colors and change the entire scheme completely.
I am assuming the first scenario. But wasn't sure if you could just cover up the existing colors and change the entire scheme completely.
Thank you! That helps.I believe it was roughly 6-12 months and it was in the paint shop for a month and a half.
Everyone has their own threshold for what they "need" vs what they want. And of course there is no right or wrong. But in defense of fancy paint jobs - there is something intangible in a sense of pride as well as a sense of joy when others admire your shiny toy.I'm gonna spray paint it flat gull (think "low-IR") gray when and where I have time. I'll stencil "Rattle Can" on the nose, then I'll fly it till I can't fly anymore. Fancy paint jobs are just too much down time and not worth the price IMHO.
For example, my previous RV-8 had a really nice warbird theme with a beautiful "30 ft" paint job. i.e. it looked great from 30+feet away but it was showing its age when up close. But despite that, whenever I would pull up to a gas pump on a XC - people from all over the field would come out of the woodwork to come over to oogle over the plane. My current RV-8 has an immaculate paint job and looks like it literally came out of the Evoke paint shop yesterday. But being yellow and white and kind of a standard GA paint scheme - while nice - its kinda Meh. It certainly doesn't evoke (pun intended) the sort of buzz that the worn out warbird paint scheme of the previous RV did. And while I'm not trying to win followers on Instagram or any of that nonsense, it was always a nice feeling that people would come up to look at the airplane wherever I went. So sometimes the price IS worth it to some.
