Van's Air Force

The definitive Van's Aircraft support community! Buying, building or flying an RV? Join our exclusive family of mentors and enthusiasts!

Failure to start

LettersFromFlyoverCountry

Well Known Member
Sponsor
I was cranking the 912iS for first engine start today (which failed), and Lane A & B both faulted in the middle of it after checking out fine during the initial process. The engine gauges on the G3X immediately went Red X's.

That doesn't strike me as normal.
 
I was cranking the 912iS for first engine start today (which failed), and Lane A & B both faulted in the middle of it after checking out fine during the initial process. The engine gauges on the G3X immediately went Red X's.

That doesn't strike me as normal.
Was this the very first start of the engine, like as part of the PAP? or have you started successfully before?
 
Yes, I was operating
Did you have only one fuel pump on and the throttle set to about 50% as indicated on the EFIS Throttle Position %?

See this post. https://vansairforce.net/threads/power-lever-percentage-indication-g3x.234797/post-1840613

Did you follow the steps in the POH?

View attachment 89598
Off the POH procedure. Felt like it wasn't getting spark so if I can find someone to crank it while I hold the plug to the case this week I can see if that's true and go from there. I'll probably clean all the plugs up and wait for my heat compound order from AS in the meantime
 
Last edited:
This is first start
I had a similar issue when I attempted to start my engine. She would fire up for maybe 1 Second and then shut off with red X's everywhere. The Garmin error codes didn't help. I didn't have nor had access to a BUDS dongle.

After speaking on the phone with every single Rotax expert I could get to return my calls, the general thought was that my fuel injectors were clogged with old gummed up fuel or moisture from the factory. They suggested to just keep trying to start the engine normally or to remove and meticulously clean each injector. I was terrified of disassembling any part of the engine at that point and instead chose to just keep attempting starts. Recharging the battery when needed so as not to kill it completely.

If it didn't start by 15 attempts I was prepared to trailer the entire plane to an expert in the southeast US for diagnosis.

She finally started up and ran per the PAP on the 11th start attempt.

I have no idea if this was damaging to the engine or bad for the cylinders, but the engine as run flawlessly ever since.

So my suggestion would be to either get a BUDS dongle for certain diagnosis, clean the fuel injectors, keep attempting starts, or try posting on the RotaxOwner forums for advice.

Good Luck!
 
Yes, I was operating

Off the POH procedure. Felt like it was t getting spark so if I can find someone to crank it while I hold the plug to the case this week I can see if that's true and go from there. I'll probably clean all the plugs up and wait for me heat compound order from AS in the meantime
Check with someone knowledgeable about Rotax engines before testing for spark this way. Unlike Lycoming or Continental engines, if the spark plugs are ungrounded, the ignition coils can be damaged.
 
I had a similar issue when I attempted to start my engine. She would fire up for maybe 1 Second and then shut off with red X's everywhere. The Garmin error codes didn't help. I didn't have nor had access to a BUDS dongle.

After speaking on the phone with every single Rotax expert I could get to return my calls, the general thought was that my fuel injectors were clogged with old gummed up fuel or moisture from the factory. They suggested to just keep trying to start the engine normally or to remove and meticulously clean each injector. I was terrified of disassembling any part of the engine at that point and instead chose to just keep attempting starts. Recharging the battery when needed so as not to kill it completely.

If it didn't start by 15 attempts I was prepared to trailer the entire plane to an expert in the southeast US for diagnosis.

She finally started up and ran per the PAP on the 11th start attempt.

I have no idea if this was damaging to the engine or bad for the cylinders, but the engine as run flawlessly ever since.

So my suggestion would be to either get a BUDS dongle for certain diagnosis, clean the fuel injectors, keep attempting starts, or try posting on the RotaxOwner forums for advice.

Good Luck!
Seems fuel is getting to the cylinders. I'm smelling plenty of gas. I'll try some more attempts
 
Last edited:
Well, this went South in a hurry. I cleaned all the spark plugs and reinstalled, did the usual prep and started the engine, and it fired. Not great. But it fired. Curiously, the G3X dimmed prior to start when I turned on the boost pump 1 but I'll deal with that later. Upon start I kept the key in to 1500 and then brought on Pump 2 which resulted in a precipitous drop in RPM and the engine died. I was able to replicate that twice and decided that was enough for today. There was one moment when it purred but it was fleeting.

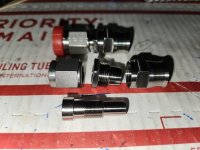
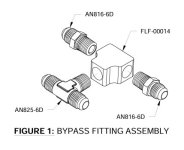
Upon exiting the plane, fuel was dripping...from the step. Not good. Pushed it into the hangar and started taking everything apart and noticed the trail on one side of the plane in the forward area and I assumed that it was coming from aft but the trail went cold. I removed the center covers and thought it's coming from the bypass fitting area; it sort of looked like it might be damp. I cleaned the area up and slipped a piece of paper under to see if I could spot a drip and if so, which of the six possible areas could it be coming from. It wasn't coming from any of them

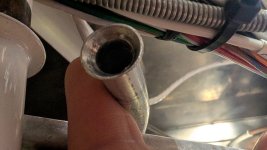
And yet, the smell of fuel was pervasive but I can see anything. Then I felt dripping on my sneakers, which were positioned under the opposite step. Now, I'm thinking I know where it's coming from. Here.

Screenshot_8-6-2025_143713_.jpeg

So I started taking stuff off...lots of covers and stuff. Now that area might look accessible, but here's what it looks like in real life:


PXL_20250608_190023295.jpg

This fitting is in the tunnel so it's block by the rudder and brake pedals, which will have to come out. So will most of the wiring, and probably the throttle cables and that's just the start.

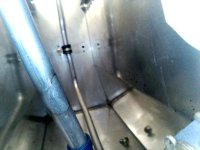
I never could make a visual confirmation of leaking at the fitting because without a scope there's no way to see. It could be a split in the line somewhere. But at least the pool of fuel in the tunnel floor confirmed that this is the problem. It's worst possible spot to have a fuel leak to fix. Blood will most certainly be shed.

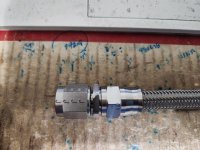
Shoving the camera up in there for a "guess shot" appeared to show fluid around one of the fittings.


PXL_20250608_190057082.jpg

This plane ain't gonna fly this year.
 
My worst fear when I first fuel up and turn on the pumps. Did you do a leak check on those fittings at some point?
 
Bob,

Have you tied putting a crows foot on a long extension and reaching from under everything to get on the nut while someone helps hold the bulkhead fitting?
 
The area is blocked by the wiring and the power module has to be removed to get access.

Next step is to remove the rudder/brake mechanism and get a scope in there for a better look to see exactly what's hapoening.

After I move the wiring bundle, I should be able to get a crowafoot and 12 inch extension on there to disconnect the line from the fitting and evaluate the parts further
 
Bob, I recall that my local EAA chapter had a leak in the exact same area on a teen-built RV-12. It really is a nasty place that ought to have an access panel, but I assume they got it fixed, so you might consider reaching out to see if they have any clever suggestions.
 
Thanks. I will do that
Hey Bob,
One of our School Built planes had a loose fitting as you described .

I was successful with a combination of 30/60 deg wrench, and crow feet.
30/60 wrenches
It was an un paid for session in aircraft pilates to do the job , but doable.

I now inspect these fittings carefully on all school builds.

Best of luck
 
Last edited:
Sadly a common place for fuel leakage. Its a very tough spot to get to on initial install. Don't feel bad yours is the 3rd or fourth build I am aware of with the exact problem. Most have been settled by applying more wrench. One required reworking the fuel line and replacing the bulkhead fitting. Not fun but can be overcome. This has me awake at night even though I pressure tested the system way back when initially installed. I won't feel good about it until fuel pumps run. I even thought a better way would be to use a straight bulkhead fitting that could be installed on the line then passed through the bulkhead with the retaining nut on top of firewall then an engine fuel hose with 45 degree ends installed. Sure would be easier to install error free and maintain. I suspect most folks just ignore those fittings at condition inspection because they are so hard to get to and just assume no smell no leak.
 
Bob - Did it always happen the way you showed in your video? What if you didn’t turn on the 2nd fuel pump? Does it still run rough and die or do you need to turn the 2nd one on for that to happen?
 
It keeps getting worse.

Pete Howell and his friend, Bill, came by tonight to try to come up with a plan and take over after I bled out from trying to work in the combined space of the forward tunnel. It was clear we had to take the rudder pedals/brake cylinders down to be able to see the two connections. Try removing that back bolt on the pedal blocks in the tunnel sometime if you want to question your life choices.

We removed the connectors on the power module to help move that out of the way. Once that was done, we started the boost pumps and looked for the gusher.

All the video showed a clearly wet B-nut on the right side connector, we didn't see a big stream. But I did see fuel pooling in the aft end of the tunnel. Could it be a split in the line or was that just surface tension allowing the fuel a free ride down the outside of the fuel line? A scratch or a mark or something on the video suggested something nefarious afoot in that location.

I did not find the B-nut on the fitting to be particularly loose but I didn't try to tighten it either as my goal was to disconnect the line and inspect it as best I could.

The line would have to be removed. You may recall when you built this line that you had to flare the ends in the confined space because of the small passthrough. Because of that, you CAN'T remove this line for inspection.

I removed the nut at the bypass fitting and it took work to get the line to clear the bypass fitting in order to pull the line back a way (after removing the Adel clamp holding it to the firewall). That put marks on the flare but, I guess no matter; I no longer trust this line. But I did not see or feel a crack and when I put a thumb over one end and blew in the other, it did not suggest a split that would have put out as much fuel as we saw. So bottom line: there was clearly a leak at the firewall fitting but we couldn't rule out more.

So here's the thing. This line can't be rebuilt the way it was the first time because you have avionics, brake lines, throttle, heater cables and the side walls of the tunnel in the way as well as several other pieces that were riveted into place after the instructions have you build the line.

I will apparently have to remove the fuel cutoff cable all the way back from the tail, the throttle cable from the engine, most of the avionics wiring, the static system, the brake lines, rudder cables, drill out the throttle quadrant and the tunnel brace cover and even then I may not have room to construct a new line, which means I'd have to drill out one of the sides of the tunnel, which would have to be preceded by removing the engine (this is a big support area for the mount; not to mention the instrument bay).

That's pretty much undoing the last five years of work.

I don't know that I have enough time left to keep going. I've cancelled the remaining transition training as this plane won't be flying this year at all with the work ahead.
 
I was cranking the 912iS for first engine start today (which failed), and Lane A & B both faulted in the middle of it after checking out fine during the initial process. The engine gauges on the G3X immediately went Red X's.

That doesn't strike me as normal.
It ran rough when on Boost Pump 1 although , as I indicated, I though there was a moment when it smoothed out at 2000 rpm. But bringing boost pump 2 online was a killer.
 
It ke.

I did not find the B-nut on the fitting to be particularly loose but I didn't try to tighten it either as my goal was to disconnect the line and inspect it as best I could.
many times when the flare doesn’t align perfectly with the fitting, you need to tighten these pretty aggressively the first time, as it is pulling all the soft metal into position. Subsequent events don’t require as much muscle. You can also move the tube back and forth , bending it slightly, as you tighten the nut. You are basically manipulating the tube angles to get a better alignment between male and female flares. I would definitely try to tighten it further and test again before pulling everything out.
 
As it's not possible to remove the fuel line, one option it seems to me is replacing that plastic passthrough forward of the bypass fitting with a bulkhead fitting and have two lines, both of which could be made in the bench .

Of course how Id drill a hole for the fitting is a mystery
 
As it's not possible to remove the fuel line, one option it seems to me is replacing that plastic passthrough forward of the bypass fitting with a bulkhead fitting and have two lines, both of which could be made in the bench .

Of course how Id drill a hole for the fitting is a mystery
Bill and I were with Bob last night cursing the designers for lack of access. No room for standard hands to manipulate much in there. A box end wrench modified to be like a flare wrench helps get the fitting off, but no room to do much else.

A flex line might be an option with one end assembled after the line is routed thru the grommets/passthru and such. This is possible, just not fun.
 
Last edited:
Bill and I were with Bob last night cursing the designers for lack of access. No room for standard hands to manipulate much in there. A box end wrench modified to be like a flare wrench helps get the fitting off, but no room to do much else.

A flex line might be an option with one end assembled after the line is routed thru the grommets/passthru and such. This is possible, just not fun.
I'll have to go out and take a look but I think the run from the bypass fitting to the bulkhead might be too short. And there's that riveted passthrough to deal eith
 
Bill and I were with Bob last night cursing the designers for lack of access. No room for standard hands to manipulate much in there. A box end wrench modified to be like a flare wrench helps get the fitting off, but no room to do much else.

A flex line might be an option with one end assembled after the line is routed thru the grommets/passthru and such. This is possible, just not fun.
Got a picture to share of your Frankensteined wrench? Might be helpful for people if they have similar troubles
 
Very short run. I was able to inspect the flares and cleaned them up. There was interesting marks and discoloration near the bend but I think that's where the fuel pooled, suggesting that the fuel was following the tube, rather than a split in the line

When my cuts heel I'll try reattaching
 

Attachments

  • PXL_20250611_164056678.jpg
    PXL_20250611_164056678.jpg
    1.1 MB · Views: 164
  • 20250611115324702.jpg
    20250611115324702.jpg
    413 KB · Views: 164
Video of the leak. Image is upside down. You can clearly see that the fitting is not as tight as its neighbor and there apparently is more fuel leaking there than appears, judging by the pool on the floor.


Got a helpful message from Al Cleveland at EAA 232:

Hello Bob, My apologies for my late response, been crazy here.
Yes we had difficulty with that particular fitting as well.
Scenario A: Outside (engine side of firewall). "Worst case scenario". remove engine w/ motor mount attached and swing to passenger side disconnecting only necessary cables and hosed to accommodate the swing. We did this also to repair a leaking rear main seal as well. Time to disconnect and reconnect was about an hour plus time to make repairs.

Scenario B: a crows foot on a wobble extension can sometimes make it.

Scenario C: Inside (Cockpit side of firewall) Short wrench and small hands were able to tighten the B nut. The crows foot was also useful here as well.

If you need to replace the pass through fitting, I recommend scenario A and B.

I am sure you know already not to use teflon thread tape on fuel systems. However if needed pipe dope can be used sparingly just use extreme caution to insure nothing gets inside the lines.


Also ordered a 30/60 11/16" wrench to help get the B nut back on the bypass fitting.
 
Last edited:
Got a helpful message from Al Cleveland at EAA 232:

I am sure you know already not to use teflon thread tape on fuel systems. However if needed pipe dope can be used sparingly just use extreme caution to insure nothing gets inside the lines.
Pipe dope, teflon tape? Um, no. That is not how flare fittings (an AN837-6D in this case) work. It is not the threads that create the seal. Sealing is done at the flared parts. If you need pipe dope on the threads of a flare fitting to make a seal then you need to stop and fix whatever is wrong with the flare.
 
Very short run. I was able to inspect the flares and cleaned them up. There was interesting marks and discoloration near the bend but I think that's where the fuel pooled, suggesting that the fuel was following the tube, rather than a split in the line

When my cuts heel I'll try reattaching
In this pic, you can see that the fitting was not tightened adequately. I would still consider an attempt to better tightening them before ripping everything apart.
 
In this pic, you can see that the fitting was not tightened adequately. I would still consider an attempt to better tightening them before ripping everything apart.
I don't use anything on the fittings but even if I did it wouldn't matter in this case as it would be impossible to apply it properly to this fitting
 
I don't use anything on the fittings but even if I did it wouldn't matter in this case as it would be impossible to apply it properly to this fitting
Bob, Pete, and Bill----a flex hose is possible, with crimped hose ends on one side and a field installed hose end on the other. Yes you'd have to open up the hole in the bulkhead to allow the hose to pass through---if there is enough edge distance. Hose OD is about .445. Pictured is our version of this hose end. YES the ferulle (olive as others call it) is machined as part of our ferulle adapter (for some proprietary reasons). It is NOT to be mis interpreted as a 'resusable hose end ", like others in the market. When installed properly ( and yes we're finally getting assembly videos done), these assemblies pressure tested to 5000 psi. I could have gone higher, but for the use of these fittings, 5000 was wayyyyy beyond the working pressure they would see. ( Even in a SDS system, or a Rotax injection system at 45 psi, thats a huge safety margin.

There is some embedded aluminum in the flare, from the flare cone on the tool. Happens alot. In this case a Del Seal--as described above is really the only good way to get a good seal. And tighen the fitting--tight-..
Tom
 

Attachments

  • 6 FIELD INSTAALLED HOSE END.JPG
    6 FIELD INSTAALLED HOSE END.JPG
    82.8 KB · Views: 87
  • 6 field installed hose end assembled.jpg
    6 field installed hose end assembled.jpg
    114 KB · Views: 89
  • 5000 PSI PRESSURE TEST.jpg
    5000 PSI PRESSURE TEST.jpg
    173.9 KB · Views: 88
I don't use anything on the fittings but even if I did it wouldn't matter in this case as it would be impossible to apply it properly to this fitting
I was not referring to sealant or lack of it. I was referring to the brown staining on the inside of the flare. That is a witness mark for the leak. Because there is no visible deformation of the flare, this tells us that the likely cause of the leak was from not being tight enough. Hence the recommendation to try tighterning more as a first step.

Sorry if this is a distraction, as I don't mean to pile on to your challenges here. Just encouraging you that the simpler route of re torquing the fittings MAY solve your issues.
 
Bob - if you decide to use the Del seals, I found the easiest way to install them is to very slightly pinch-squeeze them to make them just a little oval shaped. They will then stay in place on the upside-down male fitting. They are such soft metal that they’ll hold their shape but not fall off the fitting (usually!).
 
Bob - if you decide to use the Del seals, I found the easiest way to install them is to very slightly pinch-squeeze them to make them just a little oval shaped. They will then stay in place on the upside-down male fitting. They are such soft metal that they’ll hold their shape but not fall off the fitting (usually!).
The challenge will be putting it on, holding it in place and bringing the nut up with just one hand. But I ordered a couple.
 
I was not referring to sealant or lack of it. I was referring to the brown staining on the inside of the flare. That is a witness mark for the leak. Because there is no visible deformation of the flare, this tells us that the likely cause of the leak was from not being tight enough. Hence the recommendation to try tighterning more as a first step.

Sorry if this is a distraction, as I don't mean to pile on to your challenges here. Just encouraging you that the simpler route of re torquing the fittings MAY solve your issues.
My original reply to you was actually intended for a previous poster. Sorry for the confusion . I am moving ahead with reinstalling the line but I am waiting for some tools to arrive and a new box of bullets.
 
Very short run. I was able to inspect the flares and cleaned them up. There was interesting marks and discoloration near the bend but I think that's where the fuel pooled, suggesting that the fuel was following the tube, rather than a split in the line

When my cuts heel I'll try reattaching
I'm sure this is a dumb question but are you using a 37 degree flare tool?
 
Im worried we're missing the forest for the trees here.

The engine ran rough at low rpm on 1 pump, and completely died on 2 pumps. I find it hard to believe that the small leak is enough to kill the engine completely. I mean maybe when you switch on the second pump, the 5psi increase is enough to "siphon air" through the leaking fitting and disrupt the fuel air mixture?

With such a small leak, it still seems strange that your engine not only had a hard time starting, but also would totally die with two pumps.

Is it possible youve got a check valve reversed somewhere? maybe the fuel return bypass fitting in the tunnel is reversed?

For example, when you turn on pump 2 it pushes against the flow vs flowing with pump 1?
 
A friend had the polarity on one of his pumps reversed from Steinair. Might want to check that too.
 
Im worried we're missing the forest for the trees here.

The engine ran rough at low rpm on 1 pump, and completely died on 2 pumps. I find it hard to believe that the small leak is enough to kill the engine completely. I mean maybe when you switch on the second pump, the 5psi increase is enough to "siphon air" through the leaking fitting and disrupt the fuel air mixture?

With such a small leak, it still seems strange that your engine not only had a hard time starting, but also would totally die with two pumps.

Is it possible youve got a check valve reversed somewhere? maybe the fuel return bypass fitting in the tunnel is reversed?

For example, when you turn on pump 2 it pushes against the flow vs flowing with pump 1?
The fuel bypass fitting is just a manifold. There's no check valve.


I'm not going to address the starting issue until I fix the leak issue. It's the logical progression. It seems plausible to me that air bubbles were being delivered to the cylinders. I don't know. The only way to solve a problem like this is to chase one thing at a time. Fix it, see the effect (if any), and then move on to the next thing.

I suspect the injectors also could use a good cleaning. We'll see on the next start attempt (if there is one). Then we'll take it from there with whatever evidence is presented.
 

Attachments

  • Screenshot_14-6-2025_17555_.jpeg
    Screenshot_14-6-2025_17555_.jpeg
    22.4 KB · Views: 24
  • Screenshot_14-6-2025_17833_.jpeg
    Screenshot_14-6-2025_17833_.jpeg
    115.8 KB · Views: 24
Last edited:
My friend recently passed away, and it’s been over 3.5 years now since his first engine start, so I don’t remember the symptoms he experienced. But I’d say that if you’re seeing normal pressure with either pump running that’s not likely the issue. I’ve seen one other post regarding reversed pump polarity, so it’s been more than one occurrence.
 
Back
Top