Van's Air Force

The definitive Van's Aircraft support community! Buying, building or flying an RV? Join our exclusive family of mentors and enthusiasts!

Vertical Stabiliser middle nose rib riveting

Hi All,

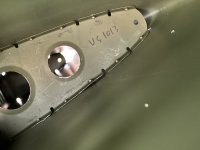
I’m now progressing my empennage kit and have had inspector sign off to rivet the skin in place on my vertical stab. I missed up 1 of the rivets so I drilled it out and put another in before moving on. Having now riveted the bottom nose rib in place I’ve noticed that the “redone” rivet is not quite sat right… it’s pushed the rib flange out (presumably when I tapped the first rivet out with a punch after drilling the head)

Does anyone have a suggestion on what I should do with this given the limited access I now have - or do I need to drill out every rivet I’ve set so far (43 of them!) plus the middle spar rivets (another 3) to take the skin off and straighten the nose rib?

I’m just a bit concerned that I could make things worse in the process of drilling out those 46 rivets!

Thanks in advance
Matt
 

Attachments

  • IMG_5327.jpeg
    IMG_5327.jpeg
    1.6 MB · Views: 116
First off: This is some of the most delicate/difficult riveting in the entire kit so don’t get too upset about your future. Thicker skins on the wings, for example, are much sturdier. I think many of us made 2 vertical stabilizers. Not too much more $$ for parts (I think a few hundred), and not too time consuming once you get the hang of it. Good learning.

That being said: I’d consider any reasonable way to get another try at that rivet. If you can drill it out, and somehow get the flange to lay down better when the next goes in. Maybe a Cherry Max would do it. Taking off the bottom flange to get at it, or using a lightening hole and a small hand ot tool to hold a bucking bar… maybe hard. And you could easily wreck your work with an unstable bucking bar in a too-small space for control (ask how I know) or also save the work with a bucking bar held to a stick or your finger with string and tape (saved one of my pieces, but beware).

This would be a great time to call Vans Builder Support during their limited hours of operation and get an expert opinion.
 
Thanks tldavis, the cherry max sounds like a viable solution, I’ve reached out to Vans by email to save the international call charges!
 
Van's may advise to just leave it as is.

Otherwise, if you need to replace the rivet I think it can be done without pulling everything apart, by removing enough rivets around the corner of the skin to be able to peel it up and reach inside. The bent flange could be straightened by careful tapping and then a new solid rivet set with a bucking bar. It will help to draw the parts together if a small piece of tube is placed over the rivet tail before bucking.
 
I’ve not personably done it but many speak of using a small rubber hose, like windshield washer fluid hose. Cut a little longer than the rivet rail and fit over the tail of rivet. Then buck it and the hose will hold the skin tight. Highly suggest partner for this so you can focus on the rivet tail while your partner runs the gun. If that fails, then yes a pull rivet would be fine.

Options for actually cherrymax -3 rivets are limited. Vans does typically allow replacement of -3s with a MK-319-BS. You do need to drill the hole up to 7/64”. You’ll get a ton of those in the wing kit, but I don’t think they give you any for the tail.
This trick works amazing. I used some silicone fuel tubing from a glow powered model airplane engine, but any reasonably soft tube will do. Cut a small length that is about the length of the rivet. Slip it over the tail of the rivet and put the bucking bar against it. The force of the bar will push on the tube first, which sets the flange down against the skin, and then the rivet stem hits the bar and sets the rivet. Usually you only "start" setting the rivet this way. Once the flange is secure, you can remove the tube and finish the rivet as normal.

All of this assumes you can get a small bucking bar in that lightening hole. Do you have one of the little tungsten bars?
 
I would find a way to get that rivet out and repaired. If it means removing a bunch of rivets that's OK. If it means a new skin, that's OK too. Due to the LCP fiasco I built two VSs, two rudders, and four elevators. In that process, I ruined one VS skin, one rudder skin, and one elevator skin and had to replace them. As has been said, the riveting gets a lot easier after you finish these more lightweight components.

It's also good to get practice drilling out rivets. It used to be that after drilling out a rivet, about half of the time I'd need to use an oops rivet to replace it. Now I'd be surprised if I had to use any oops rivets even if I drilled out 100 rivets. My method is to use a slightly smaller drill bit (for these -3 rivets I would use a #42 drill bit). Using the little hole already on the head of a flat rivet, slowly and carefully drill a hole in just the head of the rivet. I'm very near-sighted so I can slowly walk the drill bit around to make sure it stays centered. Then I get my #40 punch, insert in the hole, and pop the head of the rivet off. If the punch slips out, the hole isn't deep enough, and I drill a bit deeper and try again. Once the head is popped off, I continue to drill through the rest of the rivet using the same #42 drill bit. The tail will pop out, and you'll have zero damage on either surface that was previously riveted.

If I were you, I'd start drilling out rivets until I could repair that rivet. If you make big mistakes in the process, or find it isn't fixable, go ahead and order a new VS skin. While you wait, practice drilling out all of the other rivets, and get started on your rudder. Oh, the rudder is mostly back-rivets and pop rivets so that will be a nice break from the VS riveting.
 
The pictured rivet is a pinch tougher to drill out because the rivet shank has expanded in the space between the rib flange & skin, requires drilling a bit deeper than required to knock off the factory head. Once the head is off, grab the shop head of the rivet with a side cutter (small Electrical wire side cutter sips work great here), twist the shop head out.
Try tapping the rib flange outward with your bucking bar to lessen the flange gap, don't tap so hard to dint the skin!
Use one of the hose tricks (noted above) around the shank to push the rib flange outward while setting the replacement rivet, remove the hose & finish the rivet per normal.

Remember this process as it will come in handy many times later in your build.
 
I would find a way to get that rivet out and repaired. If it means removing a bunch of rivets that's OK. If it means a new skin, that's OK too. Due to the LCP fiasco I built two VSs, two rudders, and four elevators. In that process, I ruined one VS skin, one rudder skin, and one elevator skin and had to replace them. As has been said, the riveting gets a lot easier after you finish these more lightweight components.

It's also good to get practice drilling out rivets. It used to be that after drilling out a rivet, about half of the time I'd need to use an oops rivet to replace it. Now I'd be surprised if I had to use any oops rivets even if I drilled out 100 rivets. My method is to use a slightly smaller drill bit (for these -3 rivets I would use a #42 drill bit). Using the little hole already on the head of a flat rivet, slowly and carefully drill a hole in just the head of the rivet. I'm very near-sighted so I can slowly walk the drill bit around to make sure it stays centered. Then I get my #40 punch, insert in the hole, and pop the head of the rivet off. If the punch slips out, the hole isn't deep enough, and I drill a bit deeper and try again. Once the head is popped off, I continue to drill through the rest of the rivet using the same #42 drill bit. The tail will pop out, and you'll have zero damage on either surface that was previously riveted.

If I were you, I'd start drilling out rivets until I could repair that rivet. If you make big mistakes in the process, or find it isn't fixable, go ahead and order a new VS skin. While you wait, practice drilling out all of the other rivets, and get started on your rudder. Oh, the rudder is mostly back-rivets and pop rivets so that will be a nice break from the VS riveting.
Note that OOPS rivets are for the occasional mistake; you should not replace an entire row of rivets with them, as an example.

Also note that drilling out a substantial number of rivets substantially increases the likelihood of doing additional damage to the parts.

There is a nice engineering paper that describes the actual degradation of common riveting mistakes, and what you find is that a lot of the time, drilling the rivet out and replacing it is actually weaker than leaving it alone. This obviously doesn’t apply to the OPs example as the flange and skin are not tight.

I will see if I can find the paper from my files and post it…
 
Vans have replied to say that the rivet should be left alone as it will be inconsequential to the structure as long as I don’t damage anything further… If Vans are happy with that then so am I, and fingers crossed for no more mistakes on this part!

Thanks all for the input, some interesting tips which I’ll remember for future reference
 
Note that OOPS rivets are for the occasional mistake; you should not replace an entire row of rivets with them, as an example.

Agreed!

Also note that drilling out a substantial number of rivets substantially increases the likelihood of doing additional damage to the parts.

Also true -- especially when you are new with it. As a new builder, if you start drilling out a bunch of rivets to fix this, you should go into it assuming you will have to replace at least the skin when you are done.
 
This trick works amazing. I used some silicone fuel tubing from a glow powered model airplane engine, but any reasonably soft tube will do. Cut a small length that is about the length of the rivet. Slip it over the tail of the rivet and put the bucking bar against it. The force of the bar will push on the tube first, which sets the flange down against the skin, and then the rivet stem hits the bar and sets the rivet. Usually you only "start" setting the rivet this way. Once the flange is secure, you can remove the tube and finish the rivet as normal.

All of this assumes you can get a small bucking bar in that lightening hole. Do you have one of the little tungsten bars?
Glad
To hear this trick! I’ve used pieces of shipping foam (a dense black foam I have works best) with similar results. Fingers work great too if the positioning allows. I always like to press things together with my fingers sticking beyond the bucking bar. Probably damaging the nerves a little over time so be careful of vibrational damage to your parts.
 
Back
Top