Background: We've taken the EAA sheet metal class. I made a poorly made tool box (lost the directions) at home and have some aluminum to practice on. My plan is to trial new things on demo parts. First kit for an RV10 expected today.
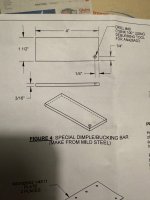
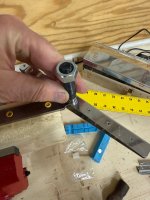
I am working on the wing kit provided by vans. There are some required dimples in tight spots that normal tools won't fit into. The kit directions say to make a steel plate with a relief whole cut and countersunk to use as a backing plate for dimpling. It looks like the dimple die has to be held in place, perhaps with long nose pliers, and then hammered? The directions are not clear on this and I don't recall any videos.
I don't recall seeing this kind of thing being required for an RV10. If this special plate is needed for a 10, I will find and make one. Is this needed?
If this special bucking bar/dimpling bar is not needed to build a 10, will I pick up any helpful experience above what I have done already before building?
What kinds of places sell metal like this?