Van's Air Force

The definitive Van's Aircraft support community! Buying, building or flying an RV? Join our exclusive family of mentors and enthusiasts!

Up sizing rivets for tank baffle?

Majorpayne317641

Well Known Member
Patron
Long story. I needed to pull my baffle for a nagging leak that didn’t get fixed the first time drilling holes in the baffle to seal from inside. The original proseal became very gummy. Possibly a bad mix.

Now that I’ve drilled out all the rivets I noticed the counter sinks sit a little deep. I’m also able to place a -4 rivet in 95% of the holes on the skin to baffle rivet line.

Should I use the AD3 (3/32) or cut a thousandth into the counter sink to place AD4 (1/8) rivets? Is the .032 skin thickness an issue for that size countersink?

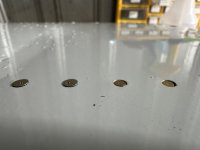
You can see two AD4 and two AD3 rivets in a row. As you can tell the 4s sit proud and the 3s sit low. I’m mainly concerned with the larger hole which I think happened during the original riveting.

I did the proper drill out procedure snapping each rivet head not to make the hole bigger.
 

Attachments

  • IMG_7763.jpeg
    IMG_7763.jpeg
    1.4 MB · Views: 20,245
I'm no expert, but I would be inclined to use the #4 and file or sand them down after. Probably the wrong answer.
 
I would purchase what you’d call thin skin rivets. I’m on vacation, so don’t have my trusty brain with me. But basically it’s a 4 shank in a 3 countersink.

The ProSeal should accommodate.

I would measure by volume your pro seal mix. To ensure it cures perfectly.

If you can… Alodine you joint, you will get a better bond.

I always let the pro seal partially cure before cleaning up. It’s a bit more work, but tends to allow capillary action to keep a better seal…

In my personal opinion

Steve
 
Along the lines of wireJock. MIL-R-47196A allows "shaving of the rivet heads" but before you do, check this measurement for maximum protrusion on a CS rivet -

3.3.6 Countersunk rivet head flushness. Unless otherwise specified on the engineering drawing or specification, flushness limits shall be 0.010 inch above to 0.005 inch belowthe material surface. Countersink diameters are provided in Table IV for reference.

if they exceed that 0.010" height after driving , then you can do this -

3.3.7 Shaving countersunk rivets. Rivets failing to meet flushness requirements may be shaved to new close tolerances. (see document for size and other info)

Here is the whole PDF for reference (from Vans Link) - (and peace of mind)


I would alodine if I shaved or disturbed an area and exposed raw metal. Also, the comment on Pro-Seal sticking better after Alodine is a valid comment.
 
I would purchase what you’d call thin skin rivets. I’m on vacation, so don’t have my trusty brain with me. But basically it’s a 4 shank in a 3 countersink.

The ProSeal should accommodate.

I would measure by volume your pro seal mix. To ensure it cures perfectly.

If you can… Alodine you joint, you will get a better bond.

I always let the pro seal partially cure before cleaning up. It’s a bit more work, but tends to allow capillary action to keep a better seal…

In my personal opinion

Steve
This one?


Are there any edge distance issues or the standard limitation of how many “oops” rivets are allowed? It’s essentially all of them at this point. If I’m to use the larger shank.
 
This one?


Are there any edge distance issues or the standard limitation of how many “oops” rivets are allowed? It’s essentially all of them at this point. If I’m to use the larger shank.
Yes there is. Let me look. (Night-Beer in hand)
 
Yes there is. Let me look. (Night-Beer in hand)
Here it is -

3.4.3 Repair limitations. The combined oversize rivet hole repairs and oversizecountersink repairs shall be limited to a maximum of 20 percent of the rivets, or 10 rivets in a single rivet pattern, whichever is less. Repairs to more than two adjacent oversize rivets, or replacing more than half the rivets with oversize rivets in any 10 inch length ofpattern is prohibited.
In other words I must stick with the 3/32 shank.

The baffle is new so those holes will be correctly sized. It’s the tank skin that’s my specific question.
 
Go with the 1097 head (reduced 100 degree) and never look back. I use them often and basically, you have a #3 head diameter with a #4 shank. I am a structures specialist in heavy jet world..they are mostly built with the reduced head fasteners. Your not going to affect the design strength, and should have no issues maintaining edge distance. Avoiding large holes/small shank is more important. slopy hole is no bueno.
 
I would purchase what you’d call thin skin rivets. I’m on vacation, so don’t have my trusty brain with me. But basically it’s a 4 shank in a 3 countersink.
Sounds to me like the head/countersink is the problem, not the shank. Not sure how to fix that other than to redrill to 1/8", use normal 1/8" countersunk rivets and shave them after assembly.
 
Go with the 1097 head (reduced 100 degree) and never look back. I use them often and basically, you have a #3 head diameter with a #4 shank. I am a structures specialist in heavy jet world..they are mostly built with the reduced head fasteners. Your not going to affect the design strength, and should have no issues maintaining edge distance. Avoiding large holes/small shank is more important. slopy hole is no bueno.
That’s kind of what I was thinking. Thank you.
 
Sounds to me like the head/countersink is the problem, not the shank. Not sure how to fix that other than to redrill to 1/8", use normal 1/8" countersunk rivets and shave them after assembly.
I had this idea. I think for now I’ll fly this way on this tank with the special rivets while I just rebuild a set of brand new tanks.

I’m suspecting the other tank was done the same way. It’s lasted 10+ years but still not built 100% the way I would. The left tank has not leaked at all yet.

This tank in particular has a baffle leak at the flange that keeps coming back. The last repair I made lasted a year/200hrs and magically came back one weekend after sitting in a hot hangar after a flight.

I suspect the leak has been there since the beginning as the log says it was dealt with pretty much right after initial test flights. My sealant was not gooey from my fix last year but the original sealant was at the baffle flange across the entire bottom. I think the #3 rivets with the accidental #4 size hole possibly from too deep of a countersink on the skin may have been a factor.
 
Back
Top