What's new
Van's Air Force

Don't miss anything! Register now for full access to the definitive RV support community.

Torquing top left engine bolt

FlyingDiver

Well Known Member
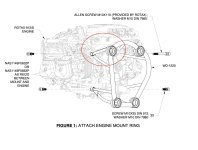
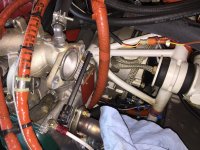
How the heck to do you tighten this bolt, much less get a torque wrench on it? The other three weren't much of a problem. But there's so little clearance between this bolt and the engine head that I can't get a socket in there.

Also looks like I need to go back, pull all the bolts to add Locktite, then retorque them (to 60 N-M instead of 40). Sigh.
 

Attachments

  • Problem Bolt.jpg
    Problem Bolt.jpg
    254 KB · Views: 163
Last edited:
Cut a short piece of the appropriate size Allen key (10mm?). Then use a straight 10/12 ring spanner onto that. At the 12 mm end, use a 12mm Allen socket on your torque wrench. Got the formula for torque wrench extension from Google. Worked like a charm for me. Hope you follow my explanation. If it’s too cryptic, pm me and I’ll draw you a sketch.
Good luck
Cheers DaveH
 
I unbolt the left intake manifold and lift it a couple of inches so I can put an Allen wrench socket on a 3/8” torque wrench extension on it. Takes 5 or 6 miniutes. Just be careful not to lose the intake O-rings or get them out of the retainer groove.
 
Cut a short piece of the appropriate size Allen key (10mm?). Then use a straight 10/12 ring spanner onto that. At the 12 mm end, use a 12mm Allen socket on your torque wrench. Got the formula for torque wrench extension from Google. Worked like a charm for me. Hope you follow my explanation. If it’s too cryptic, pm me and I’ll draw you a sketch.

I think I understand what you're saying. Yeah, that might work. BTW, it's 8mm.
 
I unbolt the left intake manifold and lift it a couple of inches so I can put an Allen wrench socket on a 3/8” torque wrench extension on it. Takes 5 or 6 miniutes. Just be careful not to lose the intake O-rings or get them out of the retainer groove.

Was that a ULS or iS engine? Unbolting the intake manifold on my iS looks like a very complicated operation. See pic.
 

Attachments

  • IMG_9841.jpg
    IMG_9841.jpg
    478.9 KB · Views: 109
Couldn’t remember the size off the top my head. Concept remains the same, just use an 8/10 ring spanner. Trust me, it works, and it’s quick and easy.
Just spotted your other post. Mine is not the injected version. You only need about 1/2 inch of space to make it work. Thinnest spanner you can find, and the depth of the socket head.
Cheers DaveH
120485
 
Last edited:
I think I used a crowfoot, or Tight-Clearance Offset Socket wrench. These are invaluable and I recommend getting a cheap set or two. ~$18

https://www.amazon.com/gp/product/B000KL7MXW/ref=ppx_yo_dt_b_search_asin_title?ie=UTF8&psc=1

EDIT: Sorry, you circled two attachment points in the pic, I was focused on the engine-mount attachment on the right. I can't recall for sure how I did the allen bolt attachment to the engine, but probably some version of what others have said - maybe a crowfoot with extensions on an allen bit.
 
Last edited:
Take an allen key and cut it down so it fits next source a 1 meter long pipe/tube/box section piece of steel. Slide the steel over the allen key shaft and hang a 4Kg ( 40 Newton) weight at the end when the bolt stops turning you are there ( 40 Newton/meters). Mark with torque seal. Its a bit fiddly but very easy.

John.
 
Last edited:
You can use 2 pieces of Allen wrench.
Put 1 short piece in the engine bolt.
Use box wrench (both ends)
Put 1 end of box wrench on Allen in engine bolt
Use other Allen piece in other end of box wrench with socket and torque wrench.
 
You can use 2 pieces of Allen wrench.
Put 1 short piece in the engine bolt.
Use box wrench (both ends)
Put 1 end of box wrench on Allen in engine bolt
Use other Allen piece in other end of box wrench with socket and torque wrench.

Yeah, that's basically what DaveH suggested above.
 
No problem. I think it's Brit for box wrench... I had to look it up.

Oops. Aussie, rather. Probably the same for all the Commonwealth.
 
You can use your short 8mm cut off allen wrench with Snap-On FRDHM8, 2 inch long standard metric torque adaptor ($31.75) attached to your 3/8” drive torque wrench. One place to find the torque values using extensions is at https://belknaptools.com/extensions-calculator/.

Fastenall provides Torque-Tension Reference Guide at: https://www.fastenal.com/content/me...nt-library/Torque-Tension Reference Guide.pdf. The tiny “Notes” at bottom show how different kinds of lubrication including thread lockers affect the torque value displayed on your torque wrench.
 
My ship is an early build circa 2010. At that time there we installed a fiberglass cooling shroud that had no access to the top left engine bolt. I modified my shroud so that a piece could be removed via a #8 screw. About 2011 the factory made a depression in the shroud at that location so no mod was needed. Then, of course, the later airplanes have no shroud at all. Here is how I access the bolt and torque check it with a ball end allen socket. I believe the allen is a metric (8mm) head but I use a 5/16" ball allen which is a good fit.

You have to remove the carb socket and drip tray, I reinstalled with a new O-ring as the old O-rings are always stretched a bit out of shape when doing this.
I just did torque check this bolt today as I'm in annual condition inspection and had the carbs off anyway because they were just returned from a vacation in Florida.
You iS guys -- cover your eyes...
 

Attachments

  • IMG_3387.jpg
    IMG_3387.jpg
    434.9 KB · Views: 80
  • IMG_3388.jpg
    IMG_3388.jpg
    355.3 KB · Views: 57
Last edited:
This is an iS engine. ;)

Anyway, I was able to get it done using DaveH's method. Engine has now been hung, and all the wiring completed. Contemplating what to do next. Really don't want to install the prop yet, so I might do the exhaust. I'm space limited and want to work on the empennage, so I don't want the pitot, etc, sticking out the front. But I will install the pitot line so I can start to finish up the tunnel.
 
Back
Top