Van's Air Force

The definitive Van's Aircraft support community! Buying, building or flying an RV? Join our exclusive family of mentors and enthusiasts!

Top and Bottom Cowling Fitting

rapid_ascent

Well Known Member
Right_side_cowling_joint.JPG
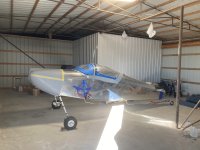
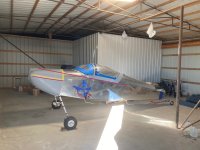
I've been working lately on fitting my Top and Bottom Cowling. I thought things went relatively well on the Top Cowling. I then moved on to fitting the Bottom Cowling. Initially that looked pretty good too. Lots of iterations, but slow progress. Once I got the Bottom Cowling in place though I first had an issue on the left side where the top and bottom were not overlapping. I now have them where they are almost touching. After checking the level of the plane I went to see if the side edges of the top were level. They were not. Not even close. I checked both sides and they are both about 3/4" off at the aft end. So now how I have a dilemma. My original plan won't work without some fiberglass additions to the Top Cowling. I may be able to just cut the overlap and call it good, but when I stood back I could see the slope of the joint. So I'm thinking to add some fiberglass to the edges of the top. BTW I didn't trim anything off the sides so it seems they were cut short.

Just wondering what folks thought. Am I just making difficult on myself?
 
If you tilt the laser 2 degrees clockwise it is perfect! I doubt it changes the flight characteristics at all to use what you have and call it a day.
 
Take the laser level off and step back 10 feet. My guess is if you didn't know it wasn't level, you wouldn't notice at all (especially once you have paint on). I'm just finishing up my cowl fit, and I didn't bother to change anything about the angle of that top cowl line since it was a fairly straight reference line for the bottom cowl. So I'm guessing mine has an angle as well. I've looked at it 1000x though, and nothing about it is bothersome.

Just to state the obvious though, make sure your laser is level with the cockpit rails, not the ground.
 
Larry Larson wrote a pretty good article in Kitplanes about going through fitting the cowling with his build (it can be found online). He added material to the top half to keep the split line level with the longerons. It's a good piece of work to do that, but you'll have to decide if it's worth the trouble. Look at some pics online of other RV-7s and see where their split line comes out. For reference, count down rivets from the overlapping skin above it.

I had to go back to my build pics to see how mine worked out, but I guess I got lucky and it was level. I'm leaning toward what the others are saying that you'll probably never notice it, especially on a taildragger. Ultimately, you need to do what helps you to sleep at night.
 
It's personal preference unless you plan to be judged at Airventure. If you are as OCD as I am, that will make you insane every time you look at it.
I can tell you it wasn't the easiest thing to add 2" along the sides.
My technique is in yhe article. The short version is below.
1. Sand a scarf joint 2" wide on the inside.
2. Find something long and flat. A strip of thin plywood for example. Apply packing tape and wax it.
3. Layup a couple layers inside staggered to match the scarf.
4. Use the mold strip to hold shape.
Expect a lot of work inside and out to get the shape and thickness inside and out to match as before.

If you decide to move on and fix the gap, that's easy. Protect the side you don't want changed. Apply a bead of flox. Install the cowls. Let it cure.
 
Aren't you building a tail dragger? The whole thing is going to be sitting at an angle on the ground, and none of the rivet lines up there are parallel to each other anyway.

I get being OCD where it matters, and good on you if you take the time to get this like you want, but I chose not to worry about it.

For reference, here's a picture of mine and then the same picture with some red lines drawn on the cowl seam and the canopy rails. They're definitely not parallel and I'v never spent a second worrying about it
 

Attachments

  • IMG_9048 2.jpeg
    IMG_9048 2.jpeg
    2.5 MB · Views: 78
  • IMG_9048.jpeg
    IMG_9048.jpeg
    2.8 MB · Views: 78
Aren't you building a tail dragger? The whole thing is going to be sitting at an angle on the ground, and none of the rivet lines up there are parallel to each other anyway.

I get being OCD where it matters, and good on you if you take the time to get this like you want, but I chose not to worry about it.
More power to anyone who has the patience to correct these types of things - it's what creates impressive final results. I have been a perfectionist all my life, and I started out my project with that tendency. This project has been better than professional therapy in getting me over that! 😅

I agree - not likely to ever be noticed on a tail dragger, even if you're really looking for it. Something else to consider is your paint scheme. You can play all sorts of tricks on the eye with the right paint lines.
 
Just to add a +1 to what the others are saying, here's a shot of mine after paint. The cowl split line is straight, but it's hard to tell with conflicting angles from the canopy bend and top skin drawing your eye away. And the swoopiness (is that a word?) of the paint scheme that Evoke designed provides more optical illusions. Just something to think about, as I'm not necessarily trying to sway you one way or the other.
 

Attachments

  • IMG_7904.JPG
    IMG_7904.JPG
    1.7 MB · Views: 63
Obviously not parallel to the longeron.
It is parallel to the forward seam from the roll bar to firewall.
My particular paint job was done in a rendering with no account for any seams. The execution of the design was done by the painter. I’m not sure it would have played so well if the cowl seam was parallel to the longerons.
Just a data point. I’m not sure there is a right or wrong. IMG_4933.jpeg
 
Just to add a +1 to what the others are saying, here's a shot of mine after paint. The cowl split line is straight, but it's hard to tell with conflicting angles from the canopy bend and top skin drawing your eye away. And the swoopiness (is that a word?) of the paint scheme that Evoke designed provides more optical illusions. Just something to think about, as I'm not necessarily trying to sway you one way or the other.
Hey DW- Complete thread drift here, but that looks very similar to what I'm getting rendered from the paint shop. They're suggesting pearl white for the bottom 1/2 rather than the traditional gloss white. I can't tell from your picture, but is yours a pearl? If so, would you do it that way again?
 
Obviously not parallel to the longeron.
It is parallel to the forward seam from the roll bar to firewall.
My particular paint job was done in a rendering with no account for any seams. The execution of the design was done by the painter. I’m not sure it would have played so well if the cowl seam was parallel to the longerons.
Just a data point. I’m not sure there is a right or wrong. View attachment 113324
This raises a great point. The top skin seam is not parallel to longerons. So pick you poison. Vans obviously choose to match the adjacent structure. If you match the longeron, that other, closer structure line will not be parallel.
 
Maybe another way of asking what others have done. Did you just cut at overlap independent of the angle?
Yes, I was shocked (and disturbed) when doing this on my 7. Yes, just fit the upper and lower together- left and right the same way. Also take note that due to engine yaw added with the mounts, one side of the cowling might not be the same as the other. I did not find out until I made internal aluminum strips for Skybolt attachments. Leave a credit card gap all around and hope the painters dont take a sanding board to your beautiful work.
 
Well I decided to go with what appears to be the more standard route and just fit to the overlap and don't worry about being parallel to the longerons. I'll try to make the two sides match as much as I can. This seems to be what most people have done. It also appears to be what Vans intended even though its not 100% clear in their nondescript instructions.

I started work on the left side today and its still TBD whether I have enough material to not have a gap in the forward part of the joint. Its really close. I can add some material if I have a small gap. The right side has plenty of overlap so it should be fine.

IMG_5029.JPG
 
For what it’s worth, mine was very tight too. It did eventually fit and actually comes together better once the excess is trimmed. Just take your time and do it bit by bit.

I got it to fit really tight with no gaps and then the painter made me open up a gap with a hacksaw blade to prevent chipping.
 
The reason your laser level is giving you an out of level picture is due to the fact that the cowling is not a flat and level surface. The light will hit the cowling at an out of level spot giving you a false reading. A way to confirm this is to first ensure your aircraft is level. Second find a rivet line on the forward fuselage. Third use a long level (mine is a 7 ft aluminum bar level) to extend the rivet line a compare it to the cowling seam. You can also simply hold a level at the seam if the aircraft is level.

Good luck
 
Back
Top