Wishing you and yours a happy, safe and RV-filled weekend.
v/r,dr
RV News That Caught My Eye Over The Last Few Hours ….dr
__________________________
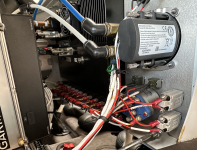
A nice wiring pic I took at Monk’s the other day….dr

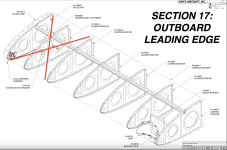
Stall warning assembly and wing access hatch with ER fuel tanks
 vansairforce.net

RE: Conduit …Carl PIREP
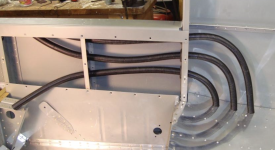
For wing, assuming you have nothing weird going on, I found the plastic cold water pipe from Lowes to fit well in the existing 5/8” rib holes. This ~1/2” ID tubing is very light and tough. It has enough room for a coax, right wing autopilot roll servo, landing/NAV/Strobe line (assuming LED lights), OAT probe wires and such. On the left wing also need to run 1/4” pitot and AOA tubes and heavier Pitot heat wires between the bell crank area and the wing root. For this run I used the standard Van’s black conduit after enlarging the associated wing rib holes from 5/8” to 3/4”. The 3/4” hole makes a tigght fit but with some effort you can make this short run. The run from the bell crank area to the wing tip on the left wing is the same 1/2’ id plastic pipe.
For the fuselage I ran six of the Van’s conduit, three down each side (between the side panels and inside fuse skin). I use 4.5 of them, so have a full spare if needed in the future. Van’s instructions are mute on how to run tail cone wiring other than a small, single run on each side designed mainly for the #2 wire from the battery to firewall. Current RV-10s now have ADAHRS mounting (including wire/Pitot/AOA and static tubes), autopilot, remote ADS-b and other stuff like XPDR, ELT, Nav/strobe and trim wires servo, you will need more wire runs.
https://vansairforce.net/threads/conduit-questions.227907/post-1777142

RE: Wheel Alignment …fl-mike PIREP
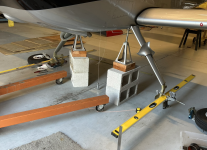
Recently did the same. I use HF 6' levels as straight edges. Found they are about the same cost as buying angle. I was surprised to see how close the "tire" method was to taking the measurements off the legs. I have a 3D "hat" designed to screw on the wheels using the hubcap holes that holds the levels, but our 3D printer is acting up, so I pulled the axles and clamped to the gear legs. Like you, I have Grove legs and quite a bit of camber.
I went for zero at level/weight-off, and have toe-in with the tail down. I was initially over the spec on toe in (level), and shimmed to zero. Seems better behaved now and I'm feeling better about my landing skills! (Although aligned during the build, I had been struggling with "twitchiness" on landing, especially when the tail came down, so thought I would re-check.)
 vansairforce.net

Industry announcement- JD Air Parts
 www.vansairforce.net
OFF TOPIC:

PS: Older issues of the ‘VAF News’ can be found at:
 www.vansairforce.net
v/r,dr
RV News That Caught My Eye Over The Last Few Hours ….dr
__________________________
A nice wiring pic I took at Monk’s the other day….dr

Stall warning assembly and wing access hatch with ER fuel tanks
Stall warning assembly and wing access hatch with ER fuel tanks
I'm a new builder and I'm currently working on the leading edges for my RV-14A wings. I'm also installing the Sky Designs ER fuel tanks. One of the modifications you have to make with the ER fuel tanks is to shorten the leading edge wing skins by two rib bays (and extend the fuel tanks by the...

RE: Conduit …Carl PIREP
For wing, assuming you have nothing weird going on, I found the plastic cold water pipe from Lowes to fit well in the existing 5/8” rib holes. This ~1/2” ID tubing is very light and tough. It has enough room for a coax, right wing autopilot roll servo, landing/NAV/Strobe line (assuming LED lights), OAT probe wires and such. On the left wing also need to run 1/4” pitot and AOA tubes and heavier Pitot heat wires between the bell crank area and the wing root. For this run I used the standard Van’s black conduit after enlarging the associated wing rib holes from 5/8” to 3/4”. The 3/4” hole makes a tigght fit but with some effort you can make this short run. The run from the bell crank area to the wing tip on the left wing is the same 1/2’ id plastic pipe.
For the fuselage I ran six of the Van’s conduit, three down each side (between the side panels and inside fuse skin). I use 4.5 of them, so have a full spare if needed in the future. Van’s instructions are mute on how to run tail cone wiring other than a small, single run on each side designed mainly for the #2 wire from the battery to firewall. Current RV-10s now have ADAHRS mounting (including wire/Pitot/AOA and static tubes), autopilot, remote ADS-b and other stuff like XPDR, ELT, Nav/strobe and trim wires servo, you will need more wire runs.
https://vansairforce.net/threads/conduit-questions.227907/post-1777142

RE: Wheel Alignment …fl-mike PIREP
Recently did the same. I use HF 6' levels as straight edges. Found they are about the same cost as buying angle. I was surprised to see how close the "tire" method was to taking the measurements off the legs. I have a 3D "hat" designed to screw on the wheels using the hubcap holes that holds the levels, but our 3D printer is acting up, so I pulled the axles and clamped to the gear legs. Like you, I have Grove legs and quite a bit of camber.
I went for zero at level/weight-off, and have toe-in with the tail down. I was initially over the spec on toe in (level), and shimmed to zero. Seems better behaved now and I'm feeling better about my landing skills! (Although aligned during the build, I had been struggling with "twitchiness" on landing, especially when the tail came down, so thought I would re-check.)
Wheel Alignment
Recently did a field repair involving ad hoc wheel alignment using whatever was handy. It led me to think about my own alignment, as it hadn't been checked since the fuselage was upside down in the shop. Here's the simple, reliable, repeatable, hardware to do it. The bits are cut from scrap...

Industry announcement- JD Air Parts
Industry announcement- JD Air Parts
JD Air Parts For Immediate Release: RE: Passing the torch The time has come to fully retire. I’ve made the decision to pass the company on to fresh blood. The decision was not easy. Although not a lot of work, I don’t feel it is fair to leave customers waiting for parts when I’m on a...
OFF TOPIC:

PS: Older issues of the ‘VAF News’ can be found at:
Doug's Area ....The VAF News & my flying resume.
Pushed out every now and then.


