

Recently did a field repair involving ad hoc wheel alignment using whatever was handy. It led me to think about my own alignment, as it hadn't been checked since the fuselage was upside down in the shop.
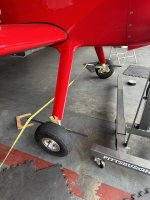
Here's the simple, reliable, repeatable, hardware to do it. The bits are cut from scrap aluminum 3/4" thick. The big block is just a spacer. It ensures the gauge is referencing the wheel, not the relatively squishy tire. The little clamp block is drilled through 0.250" for an AN4A, and tapped through for a 1/4-20. Bolt it to the standard Vans nut, use the 1/4-20 to tighten on an 8 ft length of 1-1/2" aluminum angle from the rack in big box home store.

Ignore the holes in the spacer blocks, an artifact of a previous use.

Stretch a centerline string and measure to it, between the gear and at the ends of the 8 ft angles.

So what was learned? Tail down, the right gear had 0.671 degree toe in. The left was 0.075 degree in.
Because of positive camber, toe in is increased as the tail is lowered. There will be some camber variation between airplanes. My Grove gear has quite a lot of positive camber, so the difference is 3/16" in four feet, per wheel. It's more than enough to make tail down somewhat squirrely compared to tail up.

Grove sells nice tapered shims in 1/4 degree increments. Using them would not result in perfect alignment, as 0.071 and 0.671 are not divisible by 0.250. I elected to install strap shims. A bit of CAD modeling allowed me to determine the exact shim thickness required, 0.0018" and 0.0161". The material is readily available. Just pick up a set of cheap feeler gauges and make shims from the appropriate strips.

Plenty of debate about the merits of toe in and toe out. I'm not going there, except to say do as you please. My choice was to align for exactly parallel with the tailwheel on the ground and the weight of the aircraft on the gear. And I got it too, within the thickness of the mason string. It means I'm toed out slightly at longerons level and no load. In that condition the aircraft is still pretty much flying, and not so much rolling, so I don't think the toe out matters. Did a few landings this AM, and liked it. Some crosswind, so it's hard to quantify a subjective observation just yet.
Anyway, regardless of your preference, I think you'll like the parallel gauge setup a lot.
Here's the simple, reliable, repeatable, hardware to do it. The bits are cut from scrap aluminum 3/4" thick. The big block is just a spacer. It ensures the gauge is referencing the wheel, not the relatively squishy tire. The little clamp block is drilled through 0.250" for an AN4A, and tapped through for a 1/4-20. Bolt it to the standard Vans nut, use the 1/4-20 to tighten on an 8 ft length of 1-1/2" aluminum angle from the rack in big box home store.
Ignore the holes in the spacer blocks, an artifact of a previous use.
Stretch a centerline string and measure to it, between the gear and at the ends of the 8 ft angles.
So what was learned? Tail down, the right gear had 0.671 degree toe in. The left was 0.075 degree in.
Because of positive camber, toe in is increased as the tail is lowered. There will be some camber variation between airplanes. My Grove gear has quite a lot of positive camber, so the difference is 3/16" in four feet, per wheel. It's more than enough to make tail down somewhat squirrely compared to tail up.
Grove sells nice tapered shims in 1/4 degree increments. Using them would not result in perfect alignment, as 0.071 and 0.671 are not divisible by 0.250. I elected to install strap shims. A bit of CAD modeling allowed me to determine the exact shim thickness required, 0.0018" and 0.0161". The material is readily available. Just pick up a set of cheap feeler gauges and make shims from the appropriate strips.
Plenty of debate about the merits of toe in and toe out. I'm not going there, except to say do as you please. My choice was to align for exactly parallel with the tailwheel on the ground and the weight of the aircraft on the gear. And I got it too, within the thickness of the mason string. It means I'm toed out slightly at longerons level and no load. In that condition the aircraft is still pretty much flying, and not so much rolling, so I don't think the toe out matters. Did a few landings this AM, and liked it. Some crosswind, so it's hard to quantify a subjective observation just yet.
Anyway, regardless of your preference, I think you'll like the parallel gauge setup a lot.
Last edited:


 ) Use whatever weights are needed if you're doing this during construction!
 )
)

")


") It made double checking my numbers a little easier. In any case I found that I had a total toe IN of about 0.6°. I ran a centerline and measured each wheel to have approximately 1/4° toe IN. The right axle had a 1/2° toe IN shim. I removed it giving me a 1/4° toe OUT on the right wheel. Now, my total toe was zero. I went up for a test flight today and sure enough the twitchiness is gone or at least significantly reduced.
It made double checking my numbers a little easier. In any case I found that I had a total toe IN of about 0.6°. I ran a centerline and measured each wheel to have approximately 1/4° toe IN. The right axle had a 1/2° toe IN shim. I removed it giving me a 1/4° toe OUT on the right wheel. Now, my total toe was zero. I went up for a test flight today and sure enough the twitchiness is gone or at least significantly reduced. 