Van's Air Force

The definitive Van's Aircraft support community! Buying, building or flying an RV? Join our exclusive family of mentors and enthusiasts!

The Infamous Tip-Up Front Gap

skelrad

Well Known Member
Friend
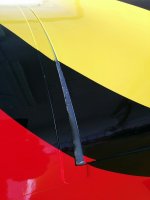
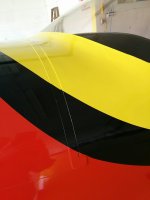
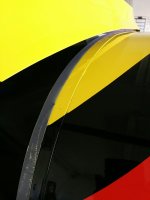
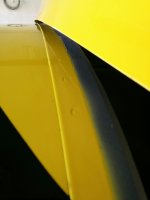
Regarding the front edge of the tip-up canopy frame: my gap between the frame skin and front top skin ended up being larger than I would have liked (a strong 3/32" - less depressing than saying almost 1/8"), primarily because until I was done riveting everything together and really got a good look at the opening movement of the canopy, I never quite understood what I'd read about raising the frame skin with a shim to help with clearance. Hindsight is 20/20. So I'm stuck with a large gap that I don't love. I did fill in the area over the hinges with aluminum, and after I get the front skin on I will put proseal into all of the subpanel flange gaps from underneath to plug all of those holes. So I think from a leak perspective, I'll be as okay as I can be.

My question: Is there a trick to making these subpanel flange gaps a little less unsightly, vs just seeing blobs of filler proseal every 5 or 6 inches? The overall skin gap won't bother me as much if I can somehow create a fairly uniform looking surface. Does it work to simply fill the whole gap with proseal to create a flat surface (for aesthetics, not necessarily as a gasket)? Can I add some sort of die to the proseal to just make it black? I think with the right paint it would blend in okay then. I've heard proseal can be painted, but does it really stand the test of time?

I've moved on and come back to this canopy multiple times over the last year, and I'm finally at a point where I just need to get the canopy on, since I'm now down to finishing the FWF and panel. I've been putting this off because the gap irritates me and I want to try to make it disappear as well as I can so I don't snarl at it every time I look at my beautiful plane.

20250726_110643.jpg
 
1. Remove the canopy.
2. Apply some painters tape as marked in blue -- this will serve as a backing for the next step
Screenshot 2025-07-26 at 3.50.53 PM.png
3. From underneath the sub-panel flanges, apply a small amount of your favorite neutral cure adhesive (GE Silicone II or Ultra Blue, Red, Black [Sensor Safe] ) into the gaps*.
4. Once silicone is cured, remove painters tape.
5. Install smoke seal material along seal flange.
6. Install canopy.

FWIW the gap between the skins looks really good. Your better paint shops are going to file it up to about 1/8" for clearance *and* paint that "knee".

*Edit: Use a filler adhesive material that is paintable -- the DAP ALEX stuff works well...
 
Last edited:
1. Remove the canopy.
2. Apply some painters tape as marked in blue -- this will serve as a backing for the next step
3. From underneath the sub-panel flanges, apply a small amount of your favorite neutral cure adhesive (GE Silicone II or Ultra Blue, Red, Black [Sensor Safe] ) into the gaps.
4. Once silicone is cured, remove painters tape.
5. Install smoke seal material along seal flange.
6. Install canopy.

Thanks for that. Now that I look at the seal shape, I see how that will fill that space and create a uniform look. Crisis averted, and now maybe I can finish this canopy and stop shaking my head over all of the ways I would build #2 differently.
 
Your gap is not too wide. On many airplanes if that gap were any tighter, it will result in a bent skin! Ask me how I know!

The problem is that when this happens, it is very difficult to fix properly without a couple specialized tools and much cursing!
 
Your gap is not too wide. On many airplanes if that gap were any tighter, it will result in a bent skin! Ask me how I know!

The problem is that when this happens, it is very difficult to fix properly without a couple specialized tools and much cursing!
Ok, good to hear. I've seen a number of pics of gaps that look much smaller, but I think they tend to be coupled with a canopy skin that sets quite a bit higher than the front top skin. So I guess that's the tradeoff. If my gap is reasonable, I feel a lot better. I was afraid I'd really screwed up and made it much larger than was typical.
 
I also disliked the gap so I added a 1" wide strip of aluminum to the end of the forward deck. The canopy overlaps it when closed so there is no chance of it getting caught. Since the canopy normally sits flush to the forward deck it sits tight when closed. Over 800 hours on my 7 and no issues with air or water leakage.
 

Attachments

  • 6F16C02B-F0D1-4FAC-BD73-FB82D5B455CC.jpeg
    6F16C02B-F0D1-4FAC-BD73-FB82D5B455CC.jpeg
    170.4 KB · Views: 155
  • 08117DEE-2F65-4B79-8FCC-1FEB84782A4D.jpeg
    08117DEE-2F65-4B79-8FCC-1FEB84782A4D.jpeg
    159.8 KB · Views: 150
I also disliked the gap so I added a 1" wide strip of aluminum to the end of the forward deck. The canopy overlaps it when closed so there is no chance of it getting caught. Since the canopy normally sits flush to the forward deck it sits tight when closed. Over 800 hours on my 7 and no issues with air or water leakage.
So are you saying the 1" strip basically extends aft over the subpanel drip flange? It's just a little hard to tell from the picture - it kind of looks like it's a stepped strip, but that could just be the paint making it seem that way. How thick is the strip? I really like this idea, but not sure how much deflection this will cause for my canopy skin that sits down pretty snug as-is. If it works, it sure seems like a great solution to the whole leak issue.
 
I sold the plane when I finished the 8. These are the only photos I have with the canopy open.
 

Attachments

  • IMG_20180907_131016.jpg
    IMG_20180907_131016.jpg
    161.7 KB · Views: 108
  • IMG_20180907_131001.jpg
    IMG_20180907_131001.jpg
    138.7 KB · Views: 108
This really helps me understand what I was looking at. This is a very cool mod! Not only will it prevent the skins from catching, it gives you a complete surface for the canopy skin to seal to the fuse. A nice thin closed cell foam seal should work perfectly! The original design is almost impossible to keep water out.

Your design works more like how the RV 12 works.
 
Back
Top