Van's Air Force

The definitive Van's Aircraft support community! Buying, building or flying an RV? Join our exclusive family of mentors and enthusiasts!

Stud on engine in way of baffle attachment

howardtlcc

Well Known Member
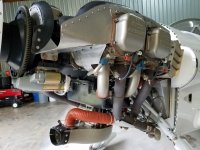
Our engine has an unused stud on the left side, front of the engine that will prevent the baffle bracket from attaching. Per the plans it attaches via a screw to the empty hole. I guess there are two options, remove the stud (which will probably require a lot of heat to break the red loctite and ruin the paint) or drill a hole in the bracket and attach a nut (if there is room).

Anyone else encounter this?

IMG_2108.JPEG
 
The purpose of heat is to expand the area around the stud and allow just enough expansion to remove the stud.
If you heat the stud, you may get lucky and the heat releases the loctite. Or, the stud expands.

If the stud needs help, try tapping on in with a hammer.... straight on.
 
Go to Amazon and search for “ARES 70016” - its a fabulous stud puller - I have never had it fail, and its about $30 - works the same as the expensive Snap-On I first used…then found this one to own….
 
Go to Amazon and search for “ARES 70016” - its a fabulous stud puller - I have never had it fail, and its about $30 - works the same as the expensive Snap-On I first used…then found this one to own….
I bought https://www.amazon.com/dp/B08GCCHF5B?ref=ppx_yo2ov_dt_b_fed_asin_title. Do you think the ARES would be better? The one I got gripped on the fuel servo studs fine. We just could not break them free. We did heat it but from what one shop said, probably not long enough. They said you have to heat for at least a couple of minutes.
 
Then I ruin the nice engine paint!!!

If you can't initially remove the stud using the two-nut method and about 1 ft. of moment arm, then carefully apply flame to the END of the stud -- away from the painted areas.

The stud will get hot and melt the locktite -- Then use the two nut method again...

Here's the torch I'm talking about...

BZO-ST2000_S01_R01_C01-crop.jpg

After you're done, you can use it in the kitchen to make Creme Brulee...

B
 
I bought https://www.amazon.com/dp/B08GCCHF5B?ref=ppx_yo2ov_dt_b_fed_asin_title. Do you think the ARES would be better? The one I got gripped on the fuel servo studs fine. We just could not break them free. We did heat it but from what one shop said, probably not long enough. They said you have to heat for at least a couple of minutes.
Well it looks like the Ares, but having never seen the one or tried you bought, I can’t give you an opinion on its relative merits. Sure LOOKS like the Ares (and the Snap-On) is all I can say…..
 
Make a bracket that has a hole big enough for the stud (use nut on stud) and attach it to your baffle ramp. If it makes the baffle too hard to install, make the bracket attachment with small screws and install it after the baffle assembly is on. Mine is similar on my RV4, but I have bolts instead of studs. No need to pull the stud. My baffles are all hand made and I didn't use a baffle kit per say, but no two are ever quite the same.
 

Attachments

  • Baffle.jpg
    Baffle.jpg
    1.6 MB · Views: 50
Make a bracket that has a hole big enough for the stud (use nut on stud) and attach it to your baffle ramp. If it makes the baffle too hard to install, make the bracket attachment with small screws and install it after the baffle assembly is on. Mine is similar on my RV4, but I have bolts instead of studs. No need to pull the stud. My baffles are all hand made and I didn't use a baffle kit per say, but no two are ever quite the same.
Exactly how I have done it on several engines.
 
After extraction, check that the threaded hole does not extend into the inside of the case & stud is not acting as a plug.
I ran into this on a 540 case…
 
Back
Top