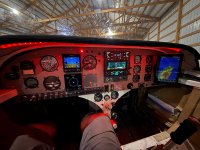
Latintan1, what did you use for an audio panel with two radios? I like your setup!

Van's Air Force
You are using an out of date browser. It may not display this or other websites correctly.
You should upgrade or use an alternative browser.
You should upgrade or use an alternative browser.
Show Us Your Panel
- Thread starter jsharkey
- Start date

Brdog42
Well Known Member
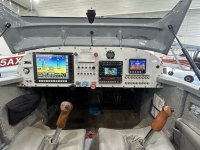
Budget VFR Panel...
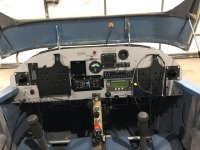
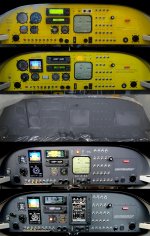
I’m re-building a 6A. The original panel was analog with cast-off, but functional equipment. Items from Piper, Cessna, Terra, etc. were used in the spirit of simplicity and low costs. I don’t think anything was purchased new for the original panel. I’ve tried to keep that theme going from the original builder.
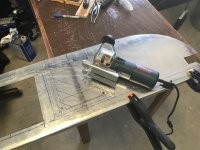
A friend was able to scrounge a big piece of .063” 2024 from a dumpster. A friend put a nice 90* bend on it with his brake. After a few hours in & out of the -6, I had the basic blank. I added .75” extra to the lower portion. Still high enough to clear occupants’ knees. The only new item on the panel is the GTR200. It’s just too good of a value on a single COMM / VFR aircraft to pass up. Even the air vents were scrounged from the dumpster. I’m amazed at what people will throw away.
I’m currently working on wiring the panel, at home. 115*F is too hot to be working in the hangar.
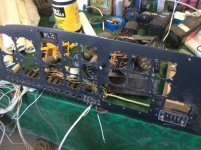
This is what I had to start...
I’m re-building a 6A. The original panel was analog with cast-off, but functional equipment. Items from Piper, Cessna, Terra, etc. were used in the spirit of simplicity and low costs. I don’t think anything was purchased new for the original panel. I’ve tried to keep that theme going from the original builder.
A friend was able to scrounge a big piece of .063” 2024 from a dumpster. A friend put a nice 90* bend on it with his brake. After a few hours in & out of the -6, I had the basic blank. I added .75” extra to the lower portion. Still high enough to clear occupants’ knees. The only new item on the panel is the GTR200. It’s just too good of a value on a single COMM / VFR aircraft to pass up. Even the air vents were scrounged from the dumpster. I’m amazed at what people will throw away.
I’m currently working on wiring the panel, at home. 115*F is too hot to be working in the hangar.
This is what I had to start...
Attachments
Last edited:
Brdog42
Well Known Member
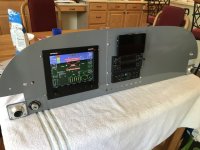
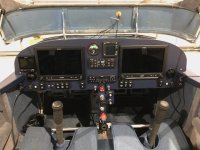
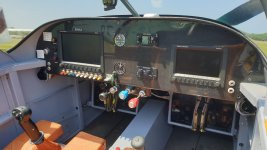
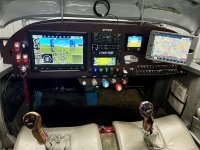
Current progress
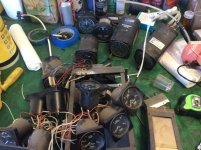
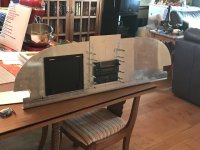
This is what I’ve been able to get done...
This is what I’ve been able to get done...
Attachments
-
 1E4B55AC-2A69-489C-BB93-8D364AAB3090.jpeg91.8 KB · Views: 675
 -
 4E0B8DF6-C7F0-43DF-8893-E3F5C9E23BE4.jpeg111.7 KB · Views: 704
 -
 063D9E0D-A90B-45DB-8A0C-2CAB6183A314.jpeg99.8 KB · Views: 698
 -
 1132E381-5CD8-4725-925B-7CBAA5D93507.jpeg106.5 KB · Views: 797
 -
 EA45A19E-2076-4D28-B48F-7FCE5335DBE3.jpeg106.6 KB · Views: 777
DangerousDave
I'm New Here
")

WingsOnWheels
Well Known Member
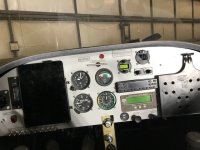
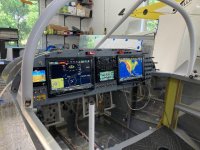
getting there one wire at a time.
Looking Great!
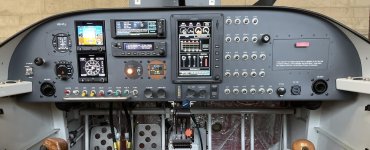
New RV-6A
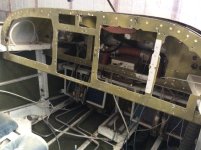
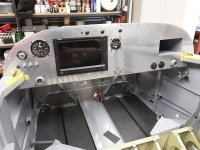
Day VFR RV-6A trying to keep it light and simple. Trial fit before priming and topcoat paint. Final installation will be after the windscreen has been fitted.
Day VFR RV-6A trying to keep it light and simple. Trial fit before priming and topcoat paint. Final installation will be after the windscreen has been fitted.
Attachments
SNIP
Panel design (removable middle section) has been a good learning experience.
You will never regret taking the time now to end years of pain from a panel that you have to crawl under to do anything.
Of note - I’m working a panel for an RV-6A builder (Dual SkyView, GPS-175 and Garmin NAV/Comm). On this panel we made a bottom apron (like the stock RV-10 panel) to mount all the stuff that stays in the plane when removing the panel (switches, cabin heat, engine control cables and such). Once the top portion of the panel is out you have full access to all this stuff. When installed, panel plus apron height remained the same as the stock RV-6 panel.
Carl
Never on your back with your head under the panel…..

zmatt
Well Known Member
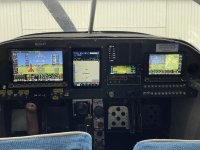
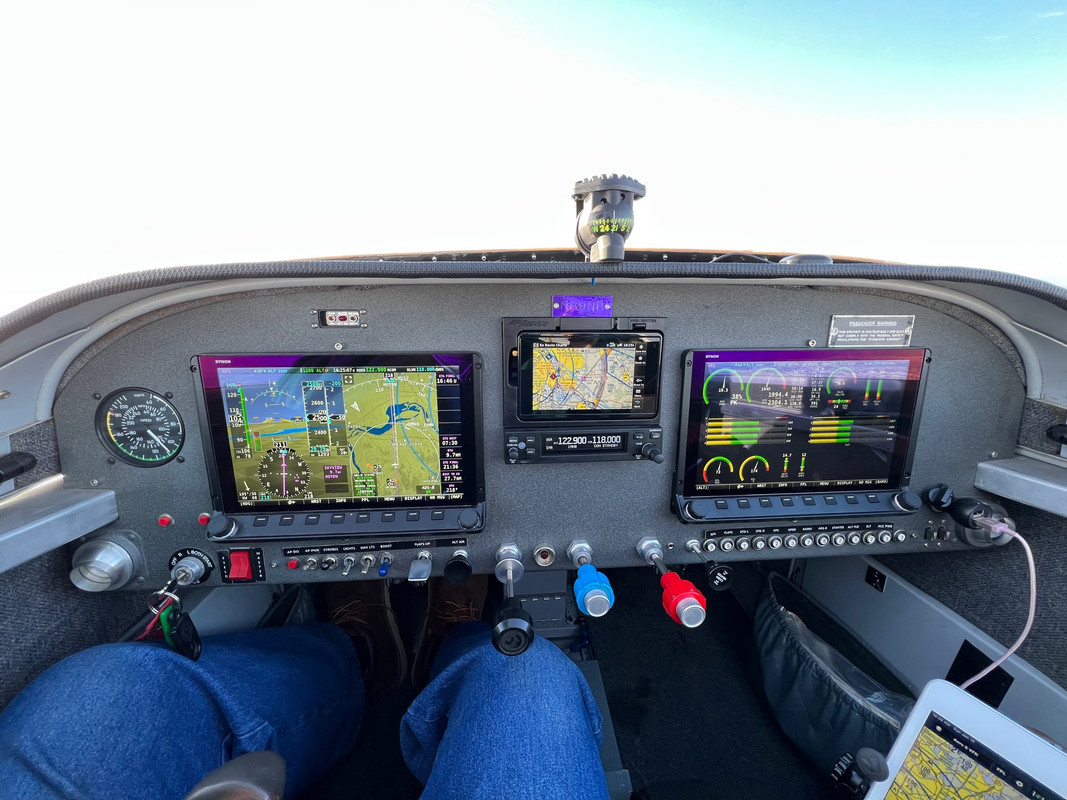
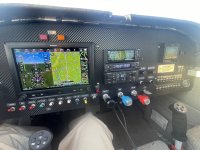
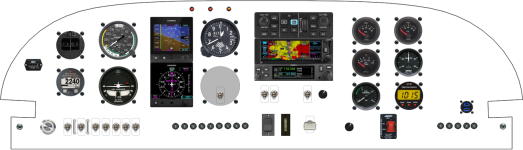
Here's a new panel we just completed for an RV-6 in our hangar. From mid 90s VFR to modern IFR for a local airline captain.
This looks really great!
How do you select between the two radios I do not see an intercom panel?
Thanks, The Garmin audio panel is remote mount, controlled by either touch display.
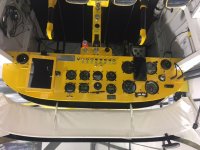
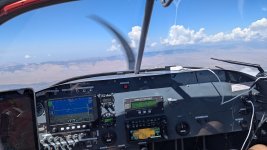
I've had my 6.9i since 1 December 2018... quite a few hours of avionics yoga were spent under the riveted panel, wedged between the manual flap handle and the throttle quadrant... from a pure VFR yellow panel into today's latest iteration ")
PS
The right side of the panel is usually covered by the iPad mini in a Xnaut cooling case on a RAM mount running the very popular (on the old continent) SkyDemon app.
PS
The right side of the panel is usually covered by the iPad mini in a Xnaut cooling case on a RAM mount running the very popular (on the old continent) SkyDemon app.
Attachments
What's on your firewall ?I've had my 6.9i since 1 December 2018... quite a few hours of avionics yoga were spent under the riveted panel, wedged between the manual flap handle and the throttle quadrant... from a pure VFR yellow panel into today's latest iteration
PS
The right side of the panel is usually covered by the iPad mini in a Xnaut cooling case on a RAM mount running the very popular (on the old continent) SkyDemon app.
Whaddayamean?What's on your firewall ?
The material on your firewall cabin sideWhaddayamean?

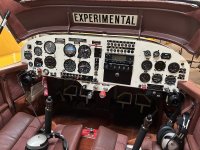
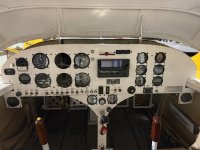
The old panel, quite neat for a steam gauge setup but it was hiding some egregious wiring crimes and the partial remains of a vacuum system.

I ended up replacing all the wiring and starting fresh, requiring quite a few hours in the following position

At the same time I went through the entire plane and fixed anything that needed it and replaced anything made of rubber, or otherwise old and worn. The other big one was conversion from a wood fixed pitch to a constant speed Whirlwind. It was a tricky job to modify the quadrant for an extra lever, but it all worked in the end. Installing the crotch strap for the new 5 point Crow harnesses took most of a week also, though well worth doin.
Since the tipper canopy panel removes with just a few screws, I put everything through a big milspec connector, except the audio which has its own connector. This makes removal for maintenance super quick. All the switches are APEM milspec parts, no automotive grade nonsense here!

Since taking this photo I’ve mounted the iPad back where it was before, which is why there’s the USB power on the new panel


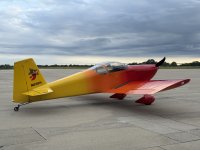
For UK/Europe touring I think this is just about perfect. It only has an O320 but an empty weight of 1030lbs
I ended up replacing all the wiring and starting fresh, requiring quite a few hours in the following position
At the same time I went through the entire plane and fixed anything that needed it and replaced anything made of rubber, or otherwise old and worn. The other big one was conversion from a wood fixed pitch to a constant speed Whirlwind. It was a tricky job to modify the quadrant for an extra lever, but it all worked in the end. Installing the crotch strap for the new 5 point Crow harnesses took most of a week also, though well worth doin.
Since the tipper canopy panel removes with just a few screws, I put everything through a big milspec connector, except the audio which has its own connector. This makes removal for maintenance super quick. All the switches are APEM milspec parts, no automotive grade nonsense here!
Since taking this photo I’ve mounted the iPad back where it was before, which is why there’s the USB power on the new panel
For UK/Europe touring I think this is just about perfect. It only has an O320 but an empty weight of 1030lbs
IO390,
Beautiful work! Nice looking plane! May I ask what the white plastic items are around the larger wire bundles? Plastic adel or "P-clamps"? And what is the black under them? Looks like a great way to tidy the bundles. Stealing ideas for a Bucker panel I'm wrapping up. Thx!!
Cheers,
Bob
Beautiful work! Nice looking plane! May I ask what the white plastic items are around the larger wire bundles? Plastic adel or "P-clamps"? And what is the black under them? Looks like a great way to tidy the bundles. Stealing ideas for a Bucker panel I'm wrapping up. Thx!!
Cheers,
Bob
Thanks! They’re just nylon P-clips as you suggest. I put some tesa wiring loop tape around the wire where it’s clamped. Some example links:IO390,
Beautiful work! Nice looking plane! May I ask what the white plastic items are around the larger wire bundles? Plastic adel or "P-clamps"? And what is the black under them? Looks like a great way to tidy the bundles. Stealing ideas for a Bucker panel I'm wrapping up. Thx!!
Cheers,
Bob
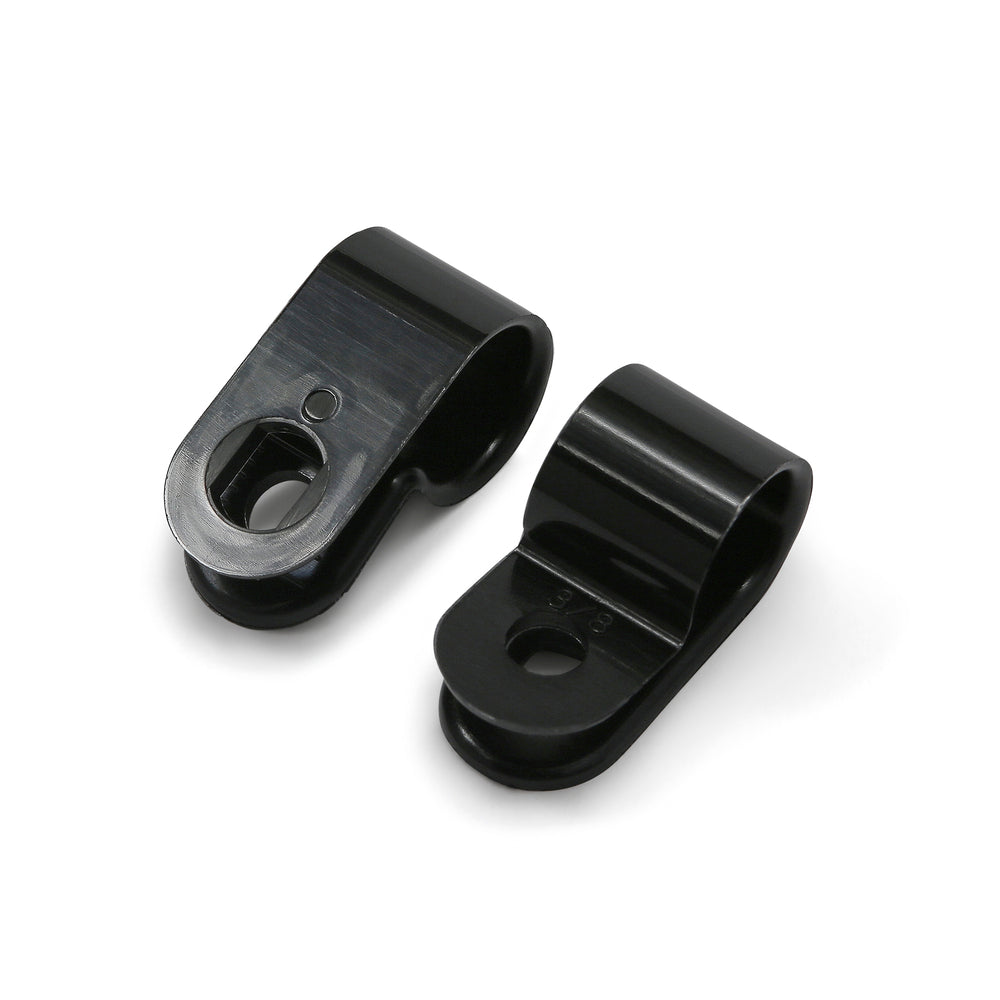
Nylon P-Clips - Pack of 100
Nylon P Clips for securing cable though the use of a pre-drilled hole and screw / Material: Nylon PA66 / Max Cable Bundle Diameter: 5mm - 28.5mm / Fixing Method: 6mm Screw Hole / Colour: Natural / Pack Size: 100pcs / Working Temperature: -20°C to +85°C / UL Approved / ROHS Compliant / Zero Halogen
 cableties.co.uk
Thanks very much!!
Cheers,
Bob
Cheers,
Bob
Thanks! They’re just nylon P-clips as you suggest. I put some tesa wiring loop tape around the wire where it’s clamped. Some example links:


DavidSLewis
I'm New Here
Carl's #1 rule: "build so you do never have go inverted under the panel.You will never regret taking the time now to end years of pain from a panel that you have to crawl under to do anything.
Of note - I’m working a panel for an RV-6A builder (Dual SkyView, GPS-175 and Garmin NAV/Comm). On this panel we made a bottom apron (like the stock RV-10 panel) to mount all the stuff that stays in the plane when removing the panel (switches, cabin heat, engine control cables and such). Once the top portion of the panel is out you have full access to all this stuff. When installed, panel plus apron height remained the same as the stock RV-6 panel.
Carl
Never on your back with your head under the panel…..
I can barely call my panel "mine" , yet in reality, my new RV-6A panel was really a "Carl Special". Tom Doran also helped immensely.
Carl painstakingly taught me along the way. I can be a pain in the a%$, yet he hung in there with me.
From the initial design to v8.
It will make my plane very capable.
https://drive.google.com/file/d/1KNl9ThG5AfXBRcJfFcwVE3P0yGr1tnYT/view?usp=drivesdk
https://drive.google.com/file/d/1EHdzwZqjmh8Z-0tKTVQ0CyrlPiwXG-wM/view?usp=drivesdk
This would not have been a plane at all without his outpouring of knowledge, and experience.
I've been looking forward to posting here for over a year.
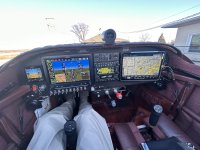
- Dynon 10" displays x2
- Dynon Auto pilots (roll + pitch)
- Dynon A/P panel knobs and AP panel buttons
- Dynon 2020 GPS
- Dynon ADSB
- Dynon heated and temperature controlled pitot
- TC flap controller
- Garmin IFR 175 GPS
- Garmin 255 Nav/Comm
- Garmin 345 intercom
- LED landing lights
- LED Taxi light
- LED position, strobe, Nav lights
- Guarded switches and switch breakers
- Push button start
- Hands on sticks ( A/P disconnect, PTT, trim, and flaps)
- Pilot vs Co-pilot flap selector

Thanks to the folks at Advanced Flight Systems for my RV-6 panel.
Holy Moley,
This doesn't even look real.
Daddyman
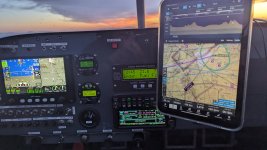
the panel is done now, second screen that was planned several years ago on hangarflying is installed, no regrets except that I did not get it done sooner.
Attachments


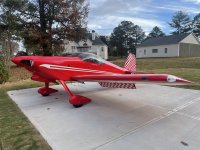
Just finished a big panel upgrade on my -6 a couple weeks ago. I’ve put about 20 hours on it since and amazingly, I haven’t had to rip it back apart to fix anything yet. Now I just have to decide whether an engine monitor is next or dual P-mags….
Attachments
Very nice @lucas2696
Very similar to mine... I will not recommend P-Mags (that's another subject which I covered here à few times already) but did replace my dying VM1000 with a single G3X GDU 470 which is used as an EMS and MFD, see post above. I was able to barely have it fit without any mod to the bulkheads in front of the panel, and I'm super happy about all the data being acquired thru a flight.
Garmin doesn't like it too much as they would prefer us to buy glass real estate, and this non-standard config took some programming time, but real happy now.
By the way, love your paint scheme, same as mine as in somewhat old fashioned, but reminds me of drag racing, shoppers and so on, man I'm showing my age now
Echostar7,the panel is done now, second screen that was planned several years ago on hangarflying is installed, no regrets except that I did not get it done sooner.
Nice clean look.
Daddyman58
Thanks, it's really nice to get the second display,Echostar7,
Nice clean look.
Daddyman58
The flight plan shows up on both displays, baro setting syncs across as well thru display link. The second display has adsb, engine data and air data independently wired to it so those don't rely on the main display. Both power off from the main switch
