seems like we started talking about the RV-10 elevator hinge moments but switched to the RV-10 rudder?
My fault. Senior moment.
seems like we started talking about the RV-10 elevator hinge moments but switched to the RV-10 rudder?
Apparently, a couple of cracks in the elevator skins are NOT acceptable - since according to the SB - "if cracks are found, stop drill and add blind rivets prior to further flight" (emphasis added by me).
But a row of cracks in dimples that you probably can't see after assembly - certainly not in a fuel tank covered in proseal - may well be OK.
Testing or no testing - that's going to be a hard sell for a lot of people I suspect.
Has anyone seen a crack along the rear elevator spar that is NOT adjacent to the trim tab hinge? So far I've only seen two pictures of cracks, one on a -10 and the other of Van's demo -14, and these all appear to be located along the upper flange where the trim tab hinge attaches. It would make sense that cracks in this area are more likely than elsewhere along the rear elev spar due to the additional stress/vibration imparted by the trim tab.
Asking because SB-00043 and the updated section 9 elevator plans for the -14 specify sealant along the full length of the rear elev spar, top and bottom, including the R elev which doesn't have a trim tab. This might make sense as a precautionary measure when building new elevators, but mine are complete (but not yet painted or flying), so I'm thinking it might be a reasonable compromise to only apply sealant to the area of the rear elev spar where the trim tab attaches.
Also if the section along the hinge line is the only area affected, it might work for those of us with completed, unpainted elevators to drill out the rivets that secure the hinge/spar flange/skin, pry it open enough to squeeze in some sealant, and rivet it back together again. That would not produce a nice fillet of sealant on the inside, but it would serve to bond the skin to the spar flange thereby reducing the loads concentrated around the rivets. Seems like it would be a lot quicker, easier, and add less weight than the SB method.
Better to do the entire joint now while your elevator isn't painted than after 5 years of flying and you get cracks somewhere else.
SB-00043 is a royal PITAas written but it’s done. Well the messy part is at least.
Removing the Rudder and VS just to get the elevators off is fun.Building the wedge support and drilling out the 78 pop rivets isn’t that bad.
It’s the tube extension that is horrible. I haven’t found any tape the can hold aluminum to plastic while pressuring sludge through it. Do yourself a favor and skip steps 12 and 13. I wasted most of one pro seal tube trying.
There is a MUCH better way. When you order the SB kit from Vans, Call Spruce and order (if you don’t already have these) an AN816, AN818, and AN 819 in a 6D. Flare the 3/8” tube and install the parts. Screw directly into the proseal cartridge and your set. You can now one hand the gun while holding a flashlight in the other.
I highly recommend Vans revise the procedure and kit to this method.
https://photos.smugmug.com/photos/i-tMm3SjC/0/df5dd16f/X3/i-tMm3SjC-X3.jpg
Did you have cracks or were you trying to eliminate the annual inspection requirement of the SB?
I had two cracks.
Scott, where exactly are the cracks on your -10?
Hi Greg,
Can you elaborate on the purpose of the additional elevator counterweight? E-01414? (I assume that’s that it is from the instructions?)
Are the cracks caused by some kind of flutter or vibration?
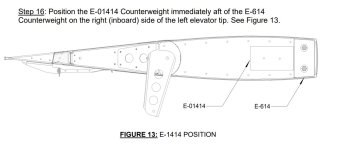
Sure. The E-01414 is covered in the Service Bulletin, starting at Step 16. The purpose is to offset the additional mass introduced aft of the spar, inside the trailing edges, when the sealant is applied internally.
The cracks are fatigue cracks, determined to be the result of pulse vibration such as happens from propeller wash/pulses and similar. The engine, propeller, and other aircraft configuration details will result in some variance in that regard, but the proactive placement of the sealant compensates for those potential fatigue-related stresses.

As noted above and shown in the attached image, the SB-00043 kit includes E-01414 counterweights, which are placed aft of the E-614 counterweights.
KAI 9_10 incorporates SB-00043 into the plans for construction of new-build RV-10 elevators. While the plans clearly include the use of tank sealant on the trailing edge, I don't see the E-01414 counterweight mentioned or depicted in KAI 9_10.
Thoughts?
View attachment 50964
While the plans clearly include the use of tank sealant on the trailing edge, I don't see the E-01414 counterweight mentioned or depicted in KAI 9_10.
Thoughts?
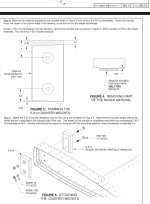
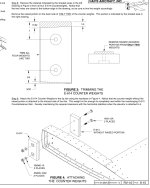
The updated KAI for the RV-14A has the builder trimming less material from 2 of the counterweights than had been done prior to the SB. I assume the '10 is the same.
If anyone has a saved copy of the previous version of the RV-10 elevator assembly instructions to compare with the current instructions, I'd be curious to know if that is in fact the case.


Has anyone seen a crack along the rear elevator spar that is NOT adjacent to the trim tab hinge? So far I've only seen two pictures of cracks, one on a -10 and the other of Van's demo -14, and these all appear to be located along the upper flange where the trim tab hinge attaches. It would make sense that cracks in this area are more likely than elsewhere along the rear elev spar due to the additional stress/vibration imparted by the trim tab.
Asking because SB-00043 and the updated section 9 elevator plans for the -14 specify sealant along the full length of the rear elev spar, top and bottom, including the R elev which doesn't have a trim tab. This might make sense as a precautionary measure when building new elevators, but mine are complete (but not yet painted or flying), so I'm thinking it might be a reasonable compromise to only apply sealant to the area of the rear elev spar where the trim tab attaches.
Also if the section along the hinge line is the only area affected, it might work for those of us with completed, unpainted elevators to drill out the rivets that secure the hinge/spar flange/skin, pry it open enough to squeeze in some sealant, and rivet it back together again. That would not produce a nice fillet of sealant on the inside, but it would serve to bond the skin to the spar flange thereby reducing the loads concentrated around the rivets. Seems like it would be a lot quicker, easier, and add less weight than the SB method.
All of my 2008 vintage elevator parts were match drilled, deburred, dimpled and primed. I had two cracks on the left elevator.
Thanks for replying. I have been wondering about this and you answered my question. I would almost rather build new elevators that comply with the SB.
I received my RV-10 empennage kit/plans on 9/5/2023. It appears Section 9 of the plans included are updated with the steps to add the proseal, and the counterweight changes.
SB-00043 is a royal PITAas written but it’s done. Well the messy part is at least.
Removing the Rudder and VS just to get the elevators off is fun.Building the wedge support and drilling out the 58 pop rivets isn’t that bad.
It’s the tube extension that is horrible. I haven’t found any tape the can hold aluminum to plastic while pressuring sludge through it. Do yourself a favor and skip steps 12 and 13. I wasted most of one pro seal tube trying.
There is a MUCH better way. When you order the SB kit from Vans, Call Spruce and order (if you don’t already have these) an AN816, AN818, and AN 819 in a 6D. Flare the 3/8” tube and install the parts. Screw directly into the proseal cartridge and your set. You can now one hand the gun while holding a flashlight in the other.
I highly recommend Vans revise the procedure and kit to this method.
https://photos.smugmug.com/photos/i.
Why not use the nylo-seal fittings that came with the kit for the brake lines. Just tighten on the aluminum tubing. Most of us are not using them anyway. But thanks for the idea. I’m giving it try today.
I put a little bit of a flare on the tubing and used Gorilla tape to attach the tubing to the ProSeal cartridge. It worked great. Don't forget to cut back the ProSeal applicator tip as shown in the bulletin, otherwise it must push through a pretty small opening.
Anyone have the thickness measurement of the E-01414 lead weight ? Just watched a video of the SB being preformed and I had assumed the E-01414 was lead but it looked like 1/8” aluminum?
If we have an empennage kit that’s not started yet, do we need to order the entire kit or can the counterweights be ordered separate?
If I was building new right now and the elevator was not riveted together yet, I would bond the rear spar, trim hinge and skin together with Pro Seal (tank sealant) as I was assembling it. For good measure I would put extra rivets between the plans rivets and of course carefully ream, debur and dimple everything. The tiny amount of sealant required would be inconsequential as far as weight goes. (It should be spread quite thin, just enough to bond) However I would put maybe 2 1/4-28 nutplate on the outside of the outboard rib to adjust balance if necessary.
Mine has been finished since 2/2020 with 480 hours and no cracks. I think the Van’s fix is marginal and if I get any cracks I am going to order new elevator kits and build them as I described.
Are you using a 2 bladed prop or 3 blades? It has occurred to me that the load on the elevators is likely a little different as a 3 bladed prop will provide roughly 50% more puffs of air than a 2 bladed prop changing the frequency quite a bit.All of my 2008 vintage elevator parts were match drilled, deburred, dimpled and primed. I had two cracks on the left elevator.
I agree with your assessment of Van’s fix. I have no cracks at 480 hours and I will build new elevators If I get any.If I was building new right now and the elevator was not riveted together yet, I would bond the rear spar, trim hinge and skin together with Pro Seal (tank sealant) as I was assembling it. For good measure I would put extra rivets between the plans rivets and of course carefully ream, debur and dimple everything. The tiny amount of sealant required would be inconsequential as far as weight goes. (It should be spread quite thin, just enough to bond) However I would put maybe 2 1/4-28 nutplate on the outside of the outboard rib to adjust balance if necessary.
Mine has been finished since 2/2020 with 480 hours and no cracks. I think the Van’s fix is marginal and if I get any cracks I am going to order new elevator kits and build them as I described.
I think that we need to find what is common on those aircraft that have cracks. Even if we don’t understand the reason why, it will give the better educated in our group food for thought that may eventually explain the reason why.Be careful
One needs to understand the powerplant/prop combination before jumping to conclusions. Diesels produce a very different vibration sequence than a Lycoming. As stated earlier all Vans 14’s demo aircraft have produced multiple cracks but as far as I know the Vans 10 demo has not produced any elevator trim cracking, why? It’s much older and many more hours than the 14’s. 4 cylinder engines with 2 blade props produce a very different harmonic disruption that a 6 cylinder engine with a 2 or 3 blades prop.
Aeronautical engineers welcome to jump in.
I have a three bladed propeller. I also have a HIGH compression engine which will change the harmonics transferred through the airframe.Are you using a 2 bladed prop or 3 blades? It has occurred to me that the load on the elevators is likely a little different as a 3 bladed prop will provide roughly 50% more puffs of air than a 2 bladed prop changing the frequency quite a bit.
I have no idea if that would make a difference but it is something that should be looked at by people with more engineering knowledge than I have.
I am baffled why some high timers have no problems and some low timers have cracks. There has to be a reason that is yet un discovered.
Just a quick comment, the wings SB are for the inboard attach bracket. My thought on the elevator is early on when I started doing the first flights on my 7, I was use to holding full back elevator while doing the run up. When observing another RV doing a run up I noticed a lot of buffeting going on at the elevator while doing their run up. Since then over the years I’m leaving the elevator neutral and I’m getting no buffeting during run ups and no cracks.This is only based upon experience of having looked at over 2000 RVs over the years. These are metal aircraft, and overall the fleet is quite young. Plus, we have lots of different combinations of propellers and engines. With regards to props it is everything from fixed pitch metal, wood, composite, ground-adjustable, constant speed, etc. Engines are all over the map, too, from 4/6 cylinder, a gas, auto fuel, diesel, high compression, electronic ignition, etc. It’s really hard to find and study a control group.
But here’s what I’ve noticed over the years: when we started balancing propellers I did notice a substantial decrease in cracking of baffles in the engine compartments. When we started seeing more composite props installed, I noticed less cracking elsewhere throughout the aircraft. My own RV-10 airframe has almost 3500 hours, with no cracking. It has a 6 cylinder Thunderbolt and an MT prop.
I started thinking about this a long time ago when we started seeing SBs published for the hinge spar cracks on the ailerons and elevators. they are at the outboard locations of these metal aircraft, and I can’t help but wonder if there are some harmonics going on that we haven’t discovered yet, especially with the metal props? Those metal props are big tuning forks.
I’m wondering if we could get some more data with a poll that would include the type of engine/propeller combination, along with a check box for cracks associated with each SB?
I am not saying this is the problem. It is an observation based upon field experience. But is might shed some light on while some aircraft have cracks and others don’t.
Vic
Yes, I agree it’s the inboard bracket, but it’s on an outboard control surface.Just a quick comment, the wings SB are for the inboard attach bracket. My thought on the elevator is early on when I started doing the first flights on my 7, I was use to holding full back elevator while doing the run up. When observing another RV doing a run up I noticed a lot of buffeting going on at the elevator while doing their run up. Since then over the years I’m leaving the elevator neutral and I’m getting no buffeting during run ups and no cracks.
