Van's Air Force

The definitive Van's Aircraft support community! Buying, building or flying an RV? Join our exclusive family of mentors and enthusiasts!

RV-10 Window install adhesive...continued

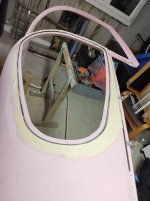
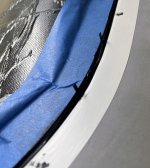
I also want to make a pitch for Jan's process of bedding the windshield in Sikaflex. It made for a very nice installation using it to make the fillet on the outside instead of the microballoon build up. And then on the inside, I made a nice fillet as well that prevents the deep crevice between the glare shield and windshield to help minimize the guck that can build up there over time.

Thank you very much :)
 
I did build up the window flanges to have enough "meat" for the glue, a 1/4" PP rod was fited inside the joggle and then putty added all around. Will do the Silpruf method which came out and hold well over 20 yrs on my Glastar.
 

Attachments

  • IMG_20211226_172549575.jpg
    IMG_20211226_172549575.jpg
    1.6 MB · Views: 166
I have only used Sika 295UV

BAck to RV10s. I see a lot of talk about spacers. What I have done is to apply a bead of uniform thickness to the plexi. Then push the windows into place. Squeeze out the Sika until the plexi is more or less level with the fiber glass. Finally kept it in place with a few clecoes. I found this way the Sika thickness is good. The #40 holes are filled with Sika afterwards.

I prefer not covering the side four windows with glass or anything as it tends to crack. Only paint up to the sika. Except on the windscreen where one or two layers of glass should be applied. I m attaching a few pictures from different builds that should make it clear.

Looking at your pictures of the green RV-10, I see a seamless transition from the green fiberglass to what I assume is black Sika. Did you originally have a gap there and then did you fill it with more Sika as part of the painting process?
 
Looking at your pictures of the green RV-10, I see a seamless transition from the green fiberglass to what I assume is black Sika. Did you originally have a gap there and then did you fill it with more Sika as part of the painting process?
In that method, you don’t fill the gap when installing the window. You then paint and afterwards fill the gap with sika and smooth out with a finger or tool soaked in mineral spirits.
 
Looking at your pictures of the green RV-10, I see a seamless transition from the green fiberglass to what I assume is black Sika. Did you originally have a gap there and then did you fill it with more Sika as part of the painting process?
Basically what Ir172 is saying. What you see is that the black Sika has been painted green. The Sika has been filled and sanded afterwards. It sands well and to paint over it is ok as well.
 
Considering I'm going to be flying for at least a year before paint (or so it seems) is it safe to fly with the windows only held in by the Sika between it and the underlying joggle? I'm just thinking the gap might provide an avenue for wind to get under the plexiglass. On that note, does anybody ever put a couple of screws or similar though the plexiglass to provide additional support? Perhaps something like this?

And since this seems to be the go-to thread for the available window options, can I summarize what I understand so that you can correct me if I'm wrong?
  • Some common methods of attaching the windows are: Weld-on, Lord Adhesive, Silpruf and Sikaflex.
  • Weld-on and Lord Adhesive are more firm with less flexibility, while Silpruf and Sikaflex provide more elasticity
  • Not many people seem to like Weld-on despite the fact that it's in the plans
  • Theoretically, you can fiberglass over the outside edges using any of the three methods, however Silpruf/Sikaflex has more variability in size with temperature and it seems likely it will end up cracking sooner or later
  • If you don't fiberglass the outside edges, then you'll need to fill the gaps with something -- Sika seems great for this and is also paintable.
  • The windscreen definitely needs fiberglass, so should somebody consider, for example, using Lord Adhesive + Fiberglass for the windscreen but Sika for the side windows?
  • It seems like at this stage (about to put the fiberglass top on), having a 5/8" flange for the side windows would set me up for any of these options later
  • With Sikaflex and/or if you cover the outside edges with fiberglass, it could end up raising the area around the windows a bit relative to the rest of the side of the airplane, so you may need to transition to the window edges by building up other fiberglass
 
Last edited:
Most of your statement are correct and has beencovered. You do mention screws. There is no need to add screws when using Sika as it is really strong by itself. For example - I have had to replace two windscreens after bird strikes. Both installed with Sika. It was a huge job to get the broken screens and Sika off.
 
From my neighbor -

Why fiberglass over the windows at all? As has been stated several times, properly installed Sika is strong enough. A removable fairing for the lower windscreen can be done in metal or composites. Ask anyone that has had to replace the windows due to cracking or crazing how much repainting was required when using fiberglass over the windows. Sika or equivalent makes for a very nice clean installation with no worry about fiberglass cracking at the overlay. All Photos - 1 of 1.jpegLibrary - 1 of 1.jpeg
 
I’d appreciate details on how the fairing was made, what materials and how attached.

Carl
My neighbor's answer -

Carl, the fairing is made from aluminum and was made in two pieces. It would have been difficult to do this as a single piece given the compound curves. I don't possess the skills to do this on my own, but I had a local sheet metal "artist" help me with that. He made a paper pattern and then used an english wheel, stretcher and metal squeezer to form the fairing. We attached it using countersunk screws in dimpled holes with nut plates (plate nuts if you insist) riveted to the upper fuselage skin.

If I had to do this on my own, I would make it out of fiberglass or better yet, carbon fiber. I don't think it would be exceedingly difficult to do that and you could make it removable.

I did fly the airplane most of Phase I without the fairing installed. The clips specified in the plans were installed (since removed) and I also added some 3M "speed tape" at the base of the windscreen (also now removed) as a backup.
 
If I had to do this on my own, I would make it out of fiberglass or better yet, carbon fiber. I don't think it would be exceedingly difficult to do that and you could make it removable.
Thanks. I think I’ll make it out of carbon.

Note - I have proven that carbon on aluminum will corrode the aluminum skin over a decade or so. This new one will have a bid or two of glass on the aluminum, then carbon on top of that to not repeat the issue.

Carl
 
Can Sika be used to repair the paint seam crack/split that some experience (like me) around the top of the windscreen and around the side windows? The paint is cracked at the seam and I have been told it’s just the paint, not deeper into the structure. The pic is looking down into the cockpit standing on the wing. The crack goes along the top of the cabin and does not go down the sides.
 

Attachments

  • IMG_4725.png
    IMG_4725.png
    3.6 MB · Views: 88
Can Sika be used to repair the paint seam crack/split that some experience (like me) around the top of the windscreen and around the side windows? The paint is cracked at the seam and I have been told it’s just the paint, not deeper into the structure. The pic is looking down into the cockpit standing on the wing. The crack goes along the top of the cabin and does not go down the sides.
I have seen this type of crack quite often. It is on the joint between the cabin top and the plexi. Yes you can open it up slightly with a Dremel or similar. Then fill with Sika, sand and paint again. To make it easier I would mask it and paint it black if you cannot match the green.
 
Need input from the hive. My hangar neighbor is helping an older airline pilot out with a build that had to be rescued from a well-known builder assist group. It was probably 70% done and they did the windows. He has seen for some time delamination between the window and adhesive on most windows. He is fairly sure it is Sika, but it appears to me that no primer was used or else that would have stuck for sure. Before my 10's windows were installed I made test pieces (2 in. by 2 in.) both Sika and Silpruf. Eventually Silpruf was chosen for mine. FYI, when I applied just primer and let it dry overnight just to check the adhesion and abrasion resistance on my test pieces it was almost impossible to scratch let alone delaminate the primer. BTW when I tested Sika properly activated, primed and adhesion applied to both sides of 1/8 in. Acrylic performed pretty much the same as Silpruf with no activator and primer. The orange strip is just a reflection from above. When you press hard on it you can see the delaminated part go back to gloss black. Options? It's definitely delaminated at the layer between the window and adhesive; you can see the light scratches on the window for prep.

,Screenshot 2025-09-14 154618.png
 
When you press hard on it you can see the delaminated part go back to gloss black. Options? It's definitely delaminated at the layer between the window and adhesive; you can see the light scratches on the window for prep.
Snake a piece of safety wire under the glass, work it around and remove the window. Start over with proper technique.

Carl
 
but it appears to me that no primer was used or else that would have stuck for sure.
I agree - looks to me like no primer was used. Assuming this was 295, without primer, it can be peeled off of acrylic much like RTV if a solvent is used, but WITH the correct primer, i..e 209N - my experience is that you'll break the plastic first. The primer creates an interlaced bond with the surface of the plastic, so while the Sikaflex can be removed with a solvent such as Sika 208 (remover), the primer only comes off with mechanical means, such as sanding or grinding.
 
Appreciate the comments. Also, what is concerning is the edge clearance from the window to outer joggle. I was told that this needs to be at least 1/8 in. if not 3/16 in. to allow for expansion and contraction. The builder will contact the build center and ask questions. Looks like a cluster.
 
Appreciate the comments. Also, what is concerning is the edge clearance from the window to outer joggle. I was told that this needs to be at least 1/8 in. if not 3/16 in. to allow for expansion and contraction. The builder will contact the build center and ask questions. Looks like a cluster.
Yes, at least an 1/8”, especially in a hot climate. My sika goes from heavily concave in the winter to mildly convex in july. I estimate that my acrylic is closing up over 1/16” of the clearance. What you show in the pick is at a real risk of cracking in hot temps.
 
Does someone have a 3D print file for these spacers? I've looked everywhere and can't find it.

Thanks!
Mike

1758817514520.png
 
Does someone have a 3D print file for these spacers? I've looked everywhere and can't find it.

Thanks!
Mike
Quickly created the file, it's here in my cloud:

Project source is here if you want to change the dimensions:
 
Last edited:
Does someone have a 3D print file for these spacers? I've looked everywhere and can't find it.

Thanks!
Mike
What is the downside to using this method and not worry about drilling holes outside the joggle? (The 3D printed spacers are nice)

Screenshot 2025-09-25 130705.png
 
Quickly created the file, it's here in my cloud:

Project source is here if you want to change the dimensions:
Thanks for the file! Wished I time to sit down and learn how to make files and 3D print. Maybe when the plane is done.
 
I noticed that Sika recommends 207 primer for both the acrylic pane and the cabin top. Also no activator is required with the 207 primer.
To be sure I was not missing anything I got confirmation from SIKA.
 
I noticed that Sika recommends 207 primer for both the acrylic pane and the cabin top. Also no activator is required with the 207 primer.
To be sure I was not missing anything I got confirmation from SIKA.
Did you also confirm your thickness of the adhesive that you would use? Since most of us are on the thin side of recommended thickness possibly the activator (has adhesion promoter) would not hurt? Most have used the activator for their project from what I've seen.
 
Did you also confirm your thickness of the adhesive that you would use? Since most of us are on the thin side of recommended thickness possibly the activator (has adhesion promoter) would not hurt? Most have used the activator for their project from what I've seen.
Agreed, that doesn’t mesh with what I researched 5 years ago. Yes, the same primer is used (unsure if it was 207), but activator was required. I would confirm what you stated with the sika folks.
 
I did not bring up the film thickness, but here is the reply I got to the activator question. I decided to use the SA100 activator after reading the reply. I'm shy on flange width, so every little bit will help. If nothing else the activator is described as a good cleaner

"The Sika Primer 207 is generally designed to provide adhesion without the need for an activator on most substrates, so the added activator in this case would not provide much additional benefit."
 
Put my first door window into today using Sikaflex, here are my takeaways. Hope this help other new builders.

I used the method Jan "Janekom" described earlier in this thread. The Sika is VERY hard to push out of a standard caulk gun! Make sure you have a leverage type gun. Like Jan suggested, I applied a bead on the plexi then pressed the glass into place. I did not use any type of spacers. I pressed the window until flush and found the window wanted to stay in place/level. I had drilled two locating holes earlier while fitting/sanding the plexi. I hated to drill through the plexi but I just couldn't find another way to put the plexi back in the exact same position as it was fitted. Like Jan's method, the holes will get filled with Sika. Today I stuck two straight picks though the locating holes vs. clecos. I was afraid clecos would squeeze the Sika down too far. I used some other tabs across the window for security but probably didn't need them. I used the tape below from Amazon. I didn't have any under-flow of aktivator/primer under the tape, nice crisp lines. I pulled the tape after about 3 hours. Cleaning the Sika out of the outside joggle was a pain!

Thanks to Jan for the help!

Mike

 
I 3d printed little spacers from PETG-CF and inserted them between the cabin top and window. Sika does not attach to the spacers and I was able to get them out easily with my fingers. For whatever reason I'm not able to attach STL file to this post
 

Attachments

  • Screenshot 2025-10-30 at 08.22.19.png
    Screenshot 2025-10-30 at 08.22.19.png
    441.9 KB · Views: 50
  • IMG_2003.jpeg
    IMG_2003.jpeg
    1.8 MB · Views: 51
Last edited:
Back
Top