What's new
Van's Air Force

Don't miss anything! Register now for full access to the definitive RV support community.

Round Scat to Rectangular Oil Cooler Inlet.....

Reflex

Well Known Member
All,

I've been searching for the last hour or so to find out how folks installed round 5" scat tubing to a rectangular inlet in the oil cooler (RV-14). I KNOW I've seen it discussed here but can't seem to find it. Spoke to the Mother ship four days ago and the gent I spoke with was going to consult Sterling and get back to me. I haven't heard back.

I "think" I remember something about cutting one a wire to allow the fit. If I really did read this, it doesn't make sense to me as cutting the wire would reduce the strength of the tubing.

Can anybody offer assistance, tell me where to look, or what to google?

Thanks,

Fred
 
I followed the instructions for scat tubes in general by pushing back the wire far enough to have no wire on the flange portion of the scat tube. I don't believe the wire provides strength as much a rigidity to the hose.
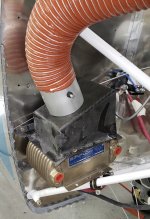
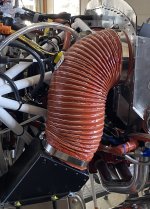
Section 48-05 describes the process. Then I bent the hose clamp into a square the size of the square flange. You really want to make sure both the top and bottom hose clamps are torqued tight and do a pull test on the hose every opportunity you get. I pull on the top of the scat hose through the oil door on my preflight. I have seen them come off and it results in a instant very hot oil temp situation. The incident I saw the scat hose came off at the top. ( Round portion on the rear baffle)


IMG_4333.JPG
 
I've been searching for the last hour or so to find out how folks installed round 5" scat tubing to a rectangular inlet in the oil cooler (RV-14).

I followed the instructions for scat tubes in general by pushing back the wire far enough to have no wire on the flange portion of the scat tube....I have seen them come off and it results in a instant very hot oil temp situation. The incident I saw the scat hose came off at the top. ( Round portion on the rear baffle)

Ahhh, yes, the 'ole "square flange in the round hole" test for -14 builders. 😉

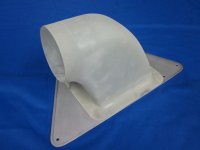
The fix at both ends of the SCAT would be to make some simple glass transitions. They're easily sized so the wire will squeeze over the neck and be under the hose clamp. A glass elbow at the top offers better flow and leaves the hose mostly straight. A smooth transition at the cooler reduces loss. The hard parts can usually be shaped so the SCAT can never touch the motor mounts.

These are on my 390-powered -8. The cooler diffuser shape would be different for the -14, but the concept is the same.

IMG_1205 800W.jpg
 
Along with removing the wire back an inch or so, it also helped me very much to trace the oil cooler opening onto a piece of cardboard and then on the shopbench prebend your clamp to that shape. You‘ll get a better fit than just tightening it with brute force. Good Luck 👍
 
Along with removing the wire back an inch or so, it also helped me very much to trace the oil cooler opening onto a piece of cardboard and then on the shopbench prebend your clamp to that shape. You‘ll get a better fit than just tightening it with brute force. Good Luck 👍
Good tip
The wire inside the SCAT hose bends easily enough that you can also massage the shape so that it makes a transition to a rectangle as it nears the end.
 
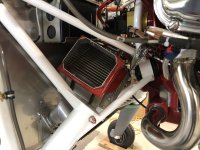
Many thanks for your replies. While there's an explanation in the manual, it stops short of showing how to make a "nice" transition from round to square (rectangular). IMO, what's in the manual could be described as "good enough" but it's, ugly, clunky, and looks like a hurry up fix from an engineering/design standpoint. I can't imagine it has smooth airflow when transitioning from round to square. In addition, the current configuration it makes it very difficult to clear the motor mount as recommended.

I've looked at multiple web sites and I know there are many (probably all) RV-14's flying with what is depicted. Glenn's (Jetmart) installation pictured above is the best of seen. On most of the balance I've been able to see, the square to round transition on various web sites doesn't look like it's a good solution to the problem. The 14A would be considerably easier to install as the scat only has to make a single bend and there's no clearance issue on the motor mount.

After working on this for a couple of evenings and installing and reinstalling it 3 times, It looks like the best solution is to make transition out of fiberglass as Dan suggested. Quick question for Dan, how many layers and what weight of cloth do you recommend for making a lay up? Since the layup will be clamped, I'm assuming that the thickness or reinforcement where the clamp is installed needs to be carefully considered.

Thanks again,

Fred
 
Not an RV-14, but I suspect the same issue. I made a foam block and wrapped it with packing tape as the release agent. Some carbon fiber over the form then trim when set.

The hose attaches to the butterfly valve, the butter fly valve attaches to an aluminum flange that is inside the top of the box.

Carl
IMG_0507.jpeg
 
Ahhh, yes, the 'ole "square flange in the round hole" test for -14 builders. 😉

The fix at both ends of the SCAT would be to make some simple glass transitions. They're easily sized so the wire will squeeze over the neck and be under the hose clamp. A glass elbow at the top offers better flow and leaves the hose mostly straight. A smooth transition at the cooler reduces loss. The hard parts can usually be shaped so the SCAT can never touch the motor mounts.

These are on my 390-powered -8. The cooler diffuser shape would be different for the -14, but the concept is the same.

View attachment 53895
I'm about to dive into learning how to use fiberglass just to make the oil cooler duct. How thick does it have to be in order for it to be strong but not over due it and it comes out too heavy? Will one sheet of the fabric plus the resin mix be enough or did you use more fabric? Those look very nice and smooth.
 
Dan, how many layers and what weight of cloth do you recommend for making a lay up?
Exactly my doubt too. I'm going to use a piece of the same aluminum tube I used for the duct I installed on the rear baffle for the hose connection part but I also need to find out how thick to make the duct itself.
 
Many thanks for your replies. While there's an explanation in the manual, it stops short of showing how to make a "nice" transition from round to square (rectangular). IMO, what's in the manual could be described as "good enough" but it's, ugly, clunky, and looks like a hurry up fix from an engineering/design standpoint. I can't imagine it has smooth airflow when transitioning from round to square. In addition, the current configuration it makes it very difficult to clear the motor mount as recommended.

I've looked at multiple web sites and I know there are many (probably all) RV-14's flying with what is depicted. Glenn's (Jetmart) installation pictured above is the best of seen. On most of the balance I've been able to see, the square to round transition on various web sites doesn't look like it's a good solution to the problem. The 14A would be considerably easier to install as the scat only has to make a single bend and there's no clearance issue on the motor mount.

After working on this for a couple of evenings and installing and reinstalling it 3 times, It looks like the best solution is to make transition out of fiberglass as Dan suggested. Quick question for Dan, how many layers and what weight of cloth do you recommend for making a lay up? Since the layup will be clamped, I'm assuming that the thickness or reinforcement where the clamp is installed needs to be carefully considered.

Thanks again,

FredIMG_4105.JPG

I really don't think the current set up is all that bad. At some point you have to transition the 5" scat tube to a square whether it be with the scat tube or fibreglass. What isn't ideal in my opinion is the top connection at the baffles. Putting a 45 or greater elbow on that would ease the load on the scat tube bend. Fred please report back on your fix. Would like to consider improvements.

.IMG_4105.JPG
 
Typically something like a duct would be four plies of 8.9 oz 8-harness crowfoot, or 9 oz plain weave.

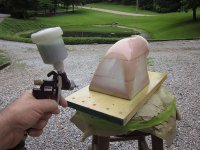
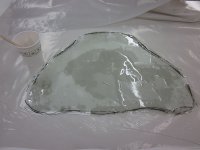
Pink foam form, skinned with straight epoxy, sanded lightly, waxed, and sprayed with PVA...

IMG_1174 800W.jpg

Dry wrap to form a cutting pattern. 8.9 crowfoot can wrap a basketball. That's a single piece of fabric.

Dry Wrap.jpg

Wet all four plies in one stack, between plastic sheets.

Fabric Wet.jpg

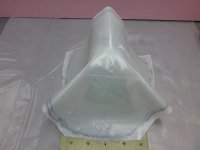
Peel off one plastic sheet, drape the wet stack on the form, peel the plastic backing....

Fabric Draped.jpg

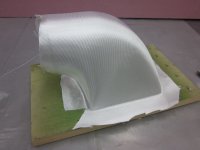
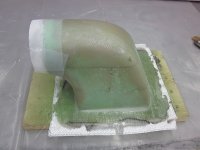
...and smooth it into place with gloved hands. Peel ply around the neck keeps the plies consolidated there; overlap seam is on the underside. A few strips of tape thickens the flange, as we want it to be stiff, flat, and leak free when screwed to the cooler or mount plate.

When cured, dig our the foam. The epoxy skin, wax, and PVA will then release from the inside like a peeling sunburn.

Fabric Wrapped.jpg

IMG_1207 800w.jpg

Grafted some additional neck length and installed a turning vane...

IMG_1219.jpg
 
Last edited:
Thank you !! That'll help get me started on my first one, since I know I'll end up doing a few of them until I get one right. Something like this is my goal with fiberglass and I'll glue a short piece of aluminum tube to the entrance for the hose to clamp onto.
 

Attachments

  • Front 45 degree.png
    Front 45 degree.png
    2.4 MB · Views: 35
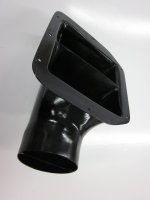
In a post above, I was asked me to follow-up on my "fix". The short version is that I took Dan's advice and decided to try to create a fiberglass duct. In the end, I succeeded.

I maintain that Van's design for the round to square transition on the RV-14 is very poor at best. Note that this issue appears to be for the taildragger only. The nosewheel version seems to be very straight forward as it is "round to round". In addition, there doesn't seem to be a large number of basic IO-390's in taildraggers, most folks appear to have gone to the EXP-119 which has a different cooling configuration eliminating the problem.

First, I tried to design a "duct" for both the baffle (intake) and the round to square transition (outlet). After a few nights of various jigs and measurements, I found that the baffle inlet and the oil cooler inlet were too close vertically to allow for a nice transition from fiberglass to scat back to fiberglass. I opted to make the transition at the oil cooler inlet only.

So, if you have a RV-14 with a standard 5" round to square transition on the scat tubing, here's how I solved the problem.

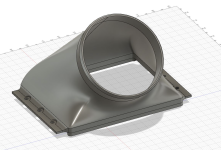
I wanted to be able to use the basic carved foam method as Dan shows above, but unfortunately I wasn't able to duplicate the shape of the oil cooler inlet (square with 45 degree corners) well enough to make me happy. With this in mind I turned to my 3D printer. There is one major problem with using a 3D printed mold for this item. Due to the shape, how would I get the mold out/released once it's cured?

Any mold that would be robust enough to hold it's shape using PLA filament would be difficult to "break" away from the fiberglass. In the end, my son the nerd engineer found that PVA filament is supposed to be water soluble. It's expensve, but I purchased some and made a simple mold to test...it worked. Problem solved.

It took 3 iterations to come up with a shape that worked well. The iterations are shown below.

The first version didn't fit as I punched in the wrong measurement for the corners into Solidworks. However, the layup was valuable to prove that I had the dimensions for the flanges of the box correct. I also downsized the round portion of the outlet to allow for easy insertion into the 5" scat tubing. So, the version 1 wasn't a complete waste of time.

The second version fit like a glove! I was very happy with how everything fit. However, when I put it all together, I found and unacceptable amount of stress on the part and the scat tubing. This was due to the fiberglass transition coming out further from the oil cooler box allowing less length for the scat tubing to make the bend. After some study, I found that angling the intake would reduce or eliminate the stress.

The third version has an angle to reduce stress. It worked. While there's stress in getting the scat tubing and fiberglass "started", once it's over the top of the square flange, it almost snaps into place and stress is minimal. The angle is critical for a proper fit.

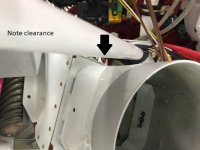
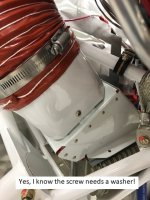
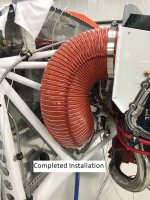
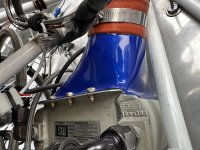
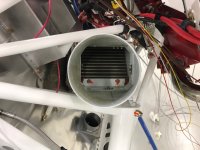
The transition allows for good clearance to the motor mount on both the top and bottom and is held in place with nutplates. I painted the it to match the intake box and left the top portion in rough primer to allow just a bit more friction when the scat tubing is installed. A fiberglass "ridge" could easily be put into place to give a mechanical stop for the scat tubing/SS band clamp.

Pictures below: Note, I can print extra molds. If you want one PM me. Cost $95 shipped anywhere in the continental U.S. This is a ONE USE mold as you're going to dissolve/ruin it when it is removed.
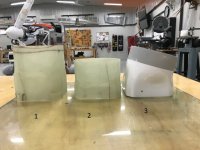
3 Versions.jpg

Inlet.jpg

Clearance.jpg

Closeup.jpg

Completed Installation.jpg
 
Last edited:
Well done Fred. That's nice!

BTW, all the best airplanes generated a few reject parts for a box under the bench....
 
So is the RV-14A oil cooler intake Round? or is it Square (rectangle)? Mine, kit no 140550, is rectangular.
It is rectangular with rounded corners.

It works just fine, but some builders don’t like it so they have used it as an opportunity to learn the skills of making single use male molds and fiberglass layup techniques.
 
Thanks, I have installed it, not very pretty, but it's in place. I think the 5 inch round hole in the aft of the baffel is what should be on the oil cooler. I guess a few others have thought the same thing.
 
This may upset some folks, but --- Any round duct-to-"box plenum" is not optimal.

If you're going to make the effort to layup fiberglass for the SCAT/SCEET duct, why not take it a step further and make a smooth transition all the way to the face of the oil cooler?

IMG_4938.jpeg
 
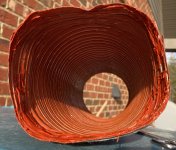
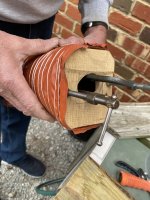
I wish I had read these entries first because just this week I struggled for hours trying various methods of prying, pushing and pulling. (RV 14A). I was afraid to cut the wires as done with the smaller SCAT hoses. That might be the quickest solution if it doesn’t effect the hose integrity. Ultimately my solution was to cut an oak board to the shape of the oil cooler intake, a sort of chamfered rectangle. Then cut the board in two with a long angled (scarf) cut. Then sanded the cut smooth on both halves and waxed the now wedge shape. With help, we used two small C-clamps to push the pieces slightly apart so the duct was stretched into the rectangular shape. The final key step was to hammer the last three wire coils at the corners to fit the shape.
Even with the duct now shaped, I couldn’t slide the duct’s three desired coils on at once. But starting at the coil wire’s end and following the coil around from corner-to-corner until I had the desired three coils of the wire onto the did work.
If either the SCAT hose was a wee bit bigger or the aluminum fittings just a wee bit smaller…
I will closely monitor this hose though. Sure would be a quick way to cook the engine if this hose blew off. My two cents.
 

Attachments

  • IMG_7171.jpeg
    IMG_7171.jpeg
    1.7 MB · Views: 32
  • IMG_7178.jpeg
    IMG_7178.jpeg
    1,004.8 KB · Views: 31
  • IMG_7168.jpeg
    IMG_7168.jpeg
    1.6 MB · Views: 33
Sure would be a quick way to cook the engine if this hose blew off. My two cents.
Absolutely accurate. I took off with my oil cooler damper closed (Was trying to warm the oil on a cold Ohio winter morning) and within minutes (maybe less) the oil temp was at red-line and received a CAS alarm and opened the damper. Took several minutes for the temp to get back in the green. Angle valve engines will heat your oil very, very quickly. If the SCAT or SCEET tube would blow off would be a very bad day. I check mine every oil change.
 
As mentioned earlier I would not discount the round top connection. Depending on your set up the top of the scat tube may need to be removed for a right hand emag annual inspection. You really want to make sure both the top and bottom hose clamps are torqued tight and do a pull test on the hose every opportunity you get. I pull on the top of the scat hose through the oil door on my preflight. I have seen them come off and it results in a instant very hot oil temp situation. The incident I saw the scat hose came off at the top. ( Round portion on the rear baffle)
 
Back
Top