Van's Air Force

The definitive Van's Aircraft support community! Buying, building or flying an RV? Join our exclusive family of mentors and enthusiasts!

Red Cube Install - Take Two

Keith, I wasnt trying to be confrontational.

Tom

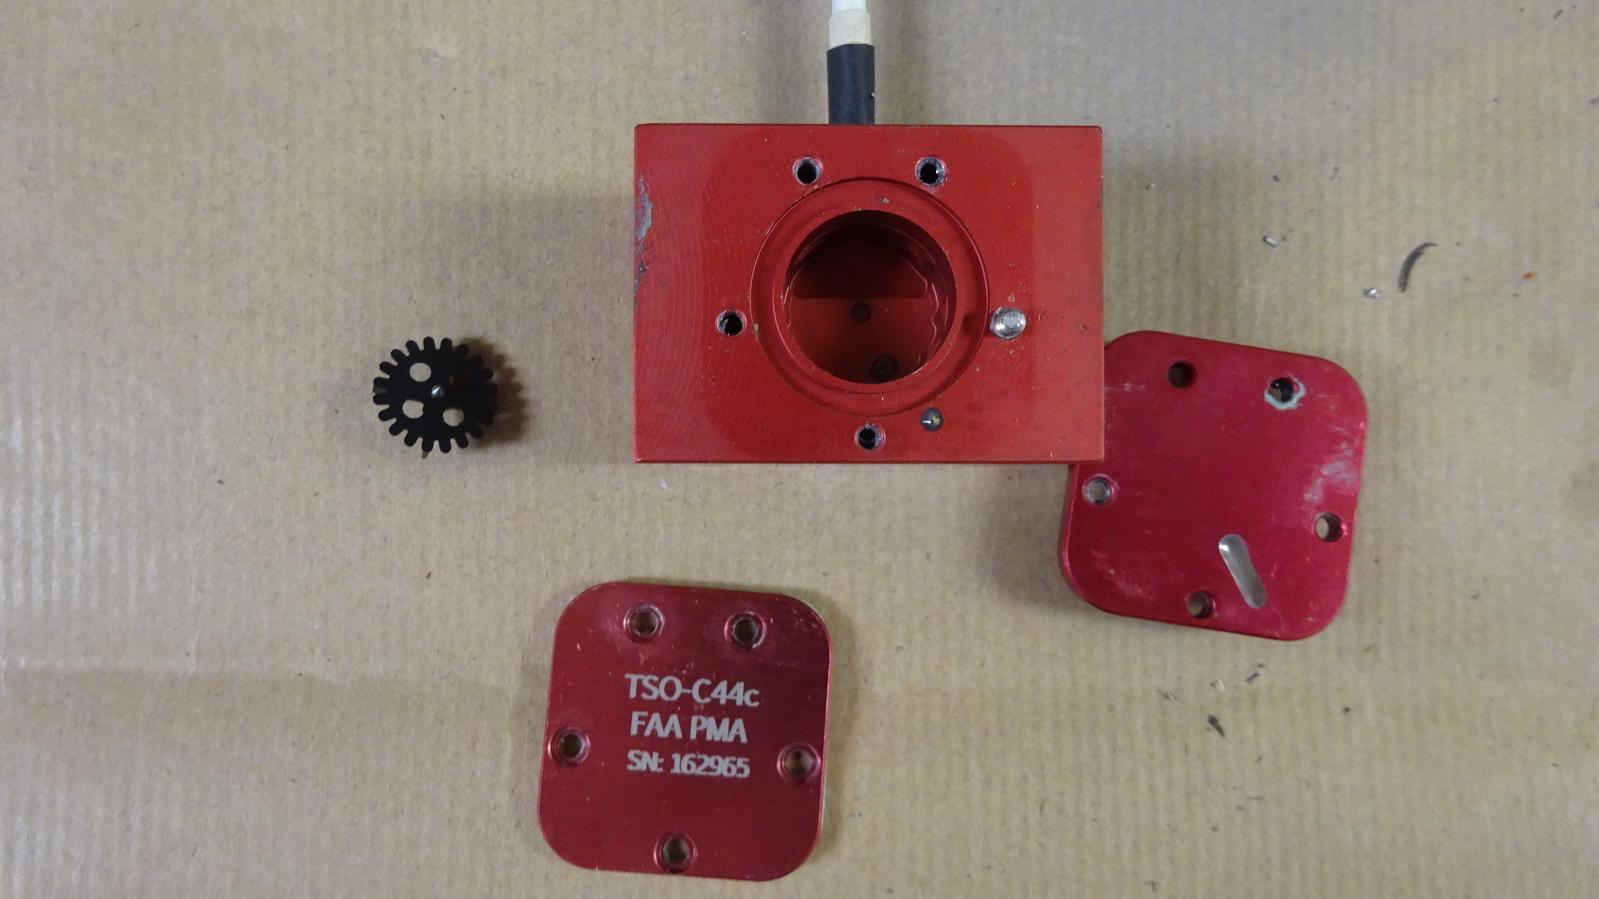
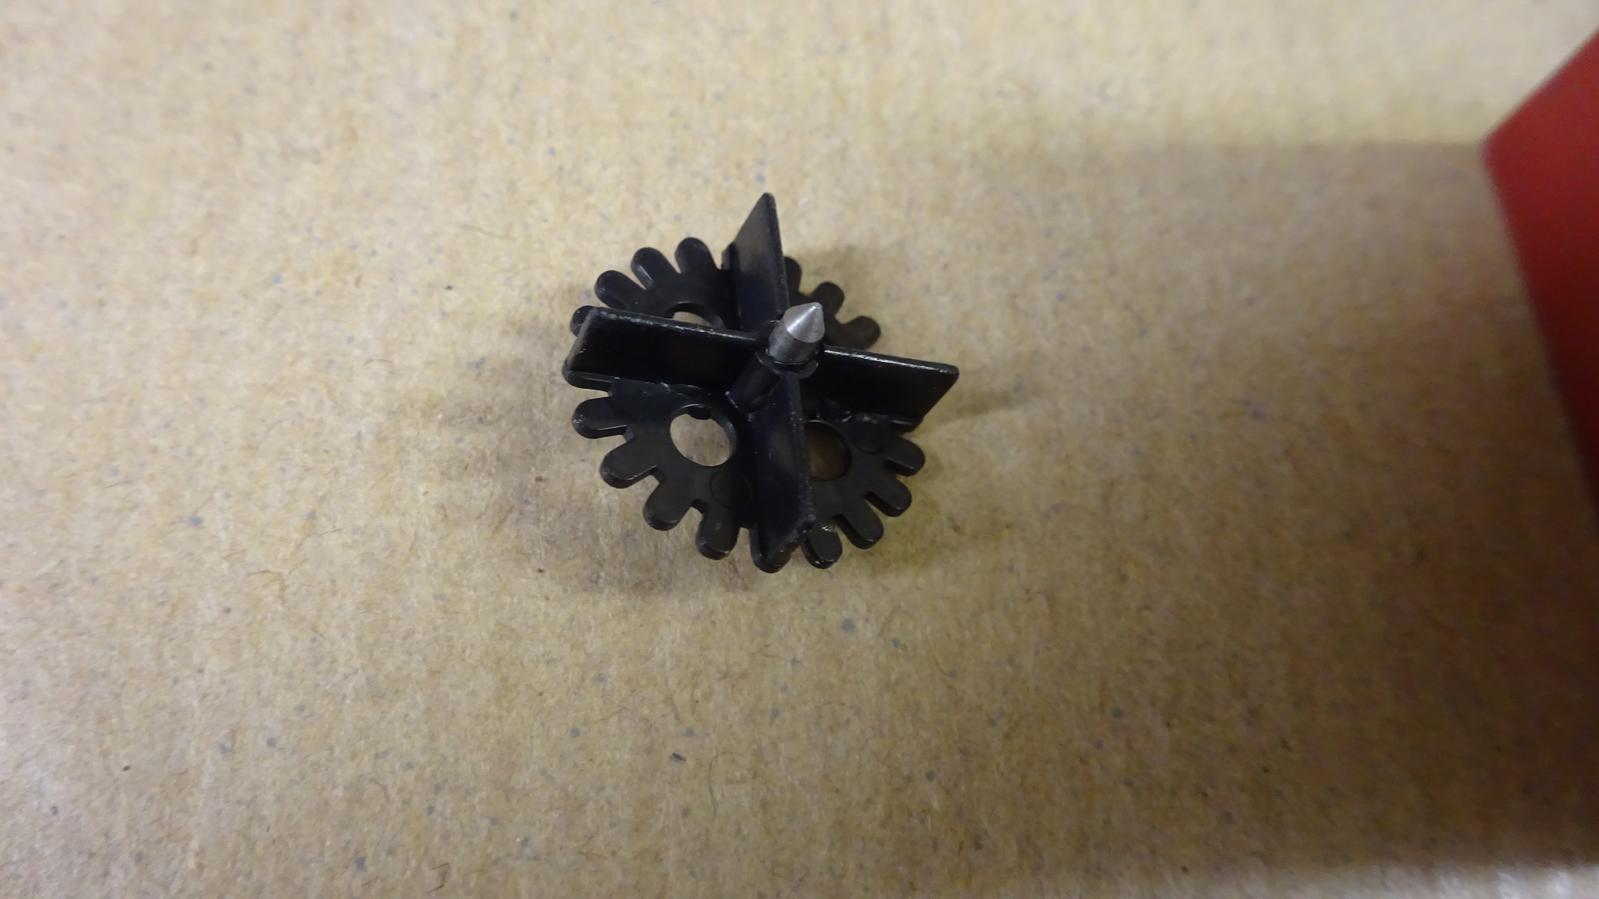
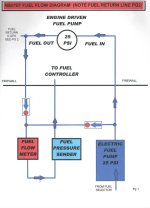
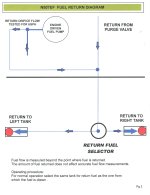
Tom, nor I. If my attempt at levity fell flat my apologies. I have the greatest respect for you and your joint venture products. Having come from the large commercial and military aerospace world the experimental world certainly has challenges that I only imagined. The RV-7A that I am building will not be the lightest or the prettiest in the fleet. I do hope it is right up there with the safest and most reliable (which is why I used your fuel line products). I believe that good theory, rigorous analysis and adequate testing, coupled with experienced intuitive engineering gets the best results. If it looks right it quite often is - the converse is also mostly true. To each our own way of doing things. Hopefully we can continue to view all potential solutions with an open mind against the usual criteria of safety, reliabilty, maintanability, manufacterabilty, weight and cost.
KT
 
Here are two pics from the internals of the Red Cube. This one failed on me and I wanted to have a look. There is only a plastic wheel inside which is driven by the fuel flow. This wheel interrupts a LED light and so counts the wheel speed and so fuel flow. It is all sealed and I don´t see the reason why the manufacturer recommends wires up if possible.

wpMQVtT.jpg


gThdDmb.jpg
 
My thoughts are they recommend wires up to avoid a fuel leak entering the electrical connections. Just my theory...
 
I can see that 9 out of 10 installations cook the red cube somewhere between the cylinders.
I know many experts recommend this location but this solution seems to always require engineering contortions and
solutions that should be obvious by now.
My red cube transducer is located in the tunnel and installed as per recommendations. The tunnel gets warm to the touch but never hot and
as you can see in my tagline, I burn mogas with evil ethanol and I can say with absolute certainty that I have never once had a fuel issue, be that vapor lock, jumpy fuel pressure or flow readings or anything else. I have a constant flow return line and only one red cube is required. 800 plus hours .
 

Attachments

  • Fuel diagram 2.jpeg
    Fuel diagram 2.jpeg
    78 KB · Views: 50
I can see that 9 out of 10 installations cook the red cube somewhere between the cylinders.
I know many experts recommend this location but this solution seems to always require engineering contortions and
solutions that should be obvious by now.
My red cube transducer is located in the tunnel and installed as per recommendations. The tunnel gets warm to the touch but never hot and
as you can see in my tagline, I burn mogas with evil ethanol and I can say with absolute certainty that I have never once had a fuel issue, be that vapor lock, jumpy fuel pressure or flow readings or anything else. I have a constant flow return line and only one red cube is required. 800 plus hours .
Are you using a fuel pressure regulator? If so whose?

Screenshot 2026-05-09 191811.png

These are one way check valves? If so, whose?

Like the concept !
 
No pressure regulator.
https://www.aircraftspruce.com/catalog/appages/acscheckvalve.php $27.- aircraft Spruce.
Folks continue to install their red cube up there in a super hot environment, vibrating, 90 degree fittings on the outlet side, wires not pointed up and not adhering to the installation instructions. Grappling with brackets and fitting issues as well as hose connections ect.
The instructions say:
  • Orientation: Install with the three wires pointing UP to ensure accuracy and avoid trapping air bubbles.
  • Location: Place downstream of the last fuel pump to avoid vapor lock. Ideal placement is between the fuel servo and the flow divider.
  • Plumbing: Do not use 90-degree fittings (elbows) directly on the input or output, as they create turbulence. Ensure no fuel line drops down immediately after the outlet.
  • Vibration Protection: Use rubber isolators (cushion clamps) to attach the transducer to a bracket, reducing failure risk from engine vibration.
  • Fittings & Sealant: Use steel fittings rather than aluminum to prevent galling, and use a paste-type thread sealant (not Teflon tape). Torque fittings to 8-10 ft-lbs, max 12 ft-lbs.
  • Filtering: Install a fuel filter upstream of the transducer to prevent debris from damaging the turbine.
  • Heat Protection: Protect the unit from high engine temperatures by using fire sleeve or shielding. [1, 2, 3, 4]
That location between the cylinders violates almost every part of the installation instructions except the part where it says " ideal placement between fuel servo and flow divider. My installation complies with all of them except the "ideal placement suggestions.
Cool environment, wires pointing up, 2" straight pipe running in and out of the cube, no vibration, installed downstream of the last fuel pump.
 
My installation complies with all of them except the "ideal placement suggestions.
Hi Ernst, not 100% sure I understand the drawing - do you flow fuel out to the mechanical fuel pump, then back into the cockpit and then back out to the engine?
 
No pressure regulator.
https://www.aircraftspruce.com/catalog/appages/acscheckvalve.php $27.- aircraft Spruce.
Folks continue to install their red cube up there in a super hot environment, vibrating, 90 degree fittings on the outlet side, wires not pointed up and not adhering to the installation instructions. Grappling with brackets and fitting issues as well as hose connections ect.
The instructions say:
  • Orientation: Install with the three wires pointing UP to ensure accuracy and avoid trapping air bubbles.
  • Location: Place downstream of the last fuel pump to avoid vapor lock. Ideal placement is between the fuel servo and the flow divider.
  • Plumbing: Do not use 90-degree fittings (elbows) directly on the input or output, as they create turbulence. Ensure no fuel line drops down immediately after the outlet.
  • Vibration Protection: Use rubber isolators (cushion clamps) to attach the transducer to a bracket, reducing failure risk from engine vibration.
  • Fittings & Sealant: Use steel fittings rather than aluminum to prevent galling, and use a paste-type thread sealant (not Teflon tape). Torque fittings to 8-10 ft-lbs, max 12 ft-lbs.
  • Filtering: Install a fuel filter upstream of the transducer to prevent debris from damaging the turbine.
  • Heat Protection: Protect the unit from high engine temperatures by using fire sleeve or shielding. [1, 2, 3, 4]
That location between the cylinders violates almost every part of the installation instructions except the part where it says " ideal placement between fuel servo and flow divider. My installation complies with all of them except the "ideal placement suggestions.
Cool environment, wires pointing up, 2" straight pipe running in and out of the cube, no vibration, installed downstream of the last fuel pump.
Hi Ernst

Do you have some pictures of your install

Will soon be doing this.

Regards
Rob
 
Hi Ernst, not 100% sure I understand the drawing - do you flow fuel out to the mechanical fuel pump, then back into the cockpit and then back out to the engine?
Yes, the outlet T was plugged with a rivet and drilled for a .028 orifice or #70 drill and restricts the fuel return to 6 gph at 30 psi.
The return hose Ts into the purge line ahead of the firewall and back to the return tank selector and back to the tank where the fuel was drawn.
Metering is done downstream of the constant flow return and the fuel computer does not need to know.
FWF fuel hose and components are kept to an absolute minimum, a short hose leading from the firewall to the mechanical fuel pump (fuel boiler), a short hose back to the firewall, another short hose firewall to fuel controller and the longest hose going up to the spider from the controller.
 

Attachments

  • Fuel returnjpeg.jpeg
    Fuel returnjpeg.jpeg
    425.7 KB · Views: 13
FWIW, my red cube was installed on the firewall using a rather non-standard mounting plan. Not my installation nor my choice, and I don't endorse the installation, but it's worked fine in this location other than having to replace it once in 500 hours.

1778420286173.png
 
FWIW, my red cube was installed on the firewall using a rather non-standard mounting plan. Not my installation nor my choice, and I don't endorse the installation, but it's worked fine in this location other than having to replace it once in 500 hours.

View attachment 117143
Mac and others----here is another case of a non-standard install, not per the EI old instructions ( wire up). But its worked. So---many ways to do this, some obviously better than others. I CERTAINLY am not saying ours is the best. My suggestion would be to think about your install and the effects it might have.
 
FWIW, my red cube was installed on the firewall using a rather non-standard mounting plan. Not my installation nor my choice, and I don't endorse the installation, but it's worked fine in this location other than having to replace it once in 500 hours.

View attachment 117143
At least you'll know where to look when the 'cube drops offline, gives you red "X"s on the EFIS...

Reposition that SCAT duct and/or isolate (stand off, anti-chafe sleeve, etc.) the wire from the SCAT.
 
mine is located between the fuel servo and the spider, but behind the rear baffles ( so in a cool zone) and this is working well so far.
Well, actually, the area between the firewall and the rear baffle can be one of the hottest areas under the cowl. Very little airflow happening in that area.
 
At least you'll know where to look when the 'cube drops offline, gives you red "X"s on the EFIS...

Reposition that SCAT duct and/or isolate (stand off, anti-chafe sleeve, etc.) the wire from the SCAT.
Yeah, I had it fail once. Nothing as dramatic as a red X, it just began to deliver erratic fuel flow readings on the EFIS, including zero...which, from what I read, is its usual failure mode. It was indeed pretty simple to replace.
 
Yes, the outlet T was plugged with a rivet and drilled for a .028 orifice or #70 drill and restricts the fuel return to 6 gph at 30 psi.
The return hose Ts into the purge line ahead of the firewall and back to the return tank selector and back to the tank where the fuel was drawn.
Metering is done downstream of the constant flow return and the fuel computer does not need to know.
FWF fuel hose and components are kept to an absolute minimum, a short hose leading from the firewall to the mechanical fuel pump (fuel boiler), a short hose back to the firewall, another short hose firewall to fuel controller and the longest hose going up to the spider from the controller.
  1. Is the reason for the 6gph fuel return at the engine driven fuel pump exit to keep fuel moving to keep Mogas fuel temp down?
  2. Did you install it to fix a problem?
  3. It interesting that you have both that fuel return AND a purge valve.
  4. Do have a self imposed shelf-life limits on Mogas in your tanks? Do you shut down with Mogas in the servo & flow devider or shut down with 100LL in them?
  5. Do you treat your 91 octane 10% ethanol Mogas with any kind of fuel stablizer?
  6. Do you see any changes when fuel swaps over from winter to summer blends?
 
1. yes, keeps fuel (mogas and avgas) from getting warm especially during taxi and low consumption. Remember, vapor lock happens even in certified airplanes under certain conditions and moist often on take off right after a long and hot taxi.
2. No, been like this without any changes since new.
3.The purge valve aids in hot starts by purging hot fuel from the system but does nothing when the engine is running.
Constant flow is, I belief, the most effective remedy to keep cool fuel in your system.
4. No, but I am aware that mogas may not be tolerant of months without using it. I try to fly often. As a rule I keep one tank with avgas for take offs and landings (storage)
In the beginning I did extensive testing with mogas only in all sorts of conditions especially temperatures over 100F, letting it sit for an hour in the sun after shut down and following up with a climb to 14'000 feet with the mechanical fuel pump only. No hick up, no burble, running smooth and strong. Plus more but we are getting away from the red cube installation, sorry.
5. No, and I never test it. The system either runs or it doesn't, if it was on the edge of intolerance to minor changes in fuel chemistry, I wouldn't fly it.
6. No, no noticeable changes. I see a very light increase in EGTs (only noticeable on downloaded data and displayed on a graph) about 10 degrees higher than Avgas.
 
No issues in 1300 hours on my RV7. Perfectly accurate.

View attachment 117197
My transducer is also mounted between my electric but before the mechanical pump. I’m carbureted, and have a “click style” electric fuel pump. It’s super accurate if I don’t use the electric pump. When my electric pump is on, I read about 2gph more than reality. Do you notice any fuel flow change when you turn off the electric pump?
 
Best to soft mount it between two flex hoses.

Bounce vs. Vibration
  • Bounce (Good): Suspending the Red Cube between flexible, fire-sleeved hoses allows it to "bounce" or move slightly with the engine's natural torque and movement. This flexibility prevents the internal turbine and electronics from absorbing the engine's harsh mechanical shocks.
  • Vibration (Bad): If you hard-mount (bolt) the transducer directly to the engine case or a rigid bracket, it will vibrate at the same high frequency as the engine. This high-frequency "buzz" is what causes the internal rotor to wear out prematurely or the electronics to fail.
Factory recommendation.
 
Well, actually, the area between the firewall and the rear baffle can be one of the hottest areas under the cowl. Very little airflow happening in that area.
I have a blast tubes in the accessory area, for mags, and for red cube. Im sure it's cooler than mounted on top of the cylinders, plus it's not hard mounted so doesn't suffer from vibration.
 
My transducer is also mounted between my electric but before the mechanical pump. I’m carbureted, and have a “click style” electric fuel pump. It’s super accurate if I don’t use the electric pump. When my electric pump is on, I read about 2gph more than reality. Do you notice any fuel flow change when you turn off the electric pump?
It does bump up slightly but since it’s not on for any significant length of time, I’ve never noted any error in the fuel totalizer.
 
Hate to ask but this seems to be the only layout I’ve seen in this section of the airplane. I get that it’s measuring something (boost pump) but is it measuring what it’s meant to measure ?
Whatever is being measured it doesn’t seem to affect the general totalizer reading. I’m am always within one gallon of expected fuel to be added when I fill up.
 
Back
Top