Van's Air Force
You are using an out of date browser. It may not display this or other websites correctly.
You should upgrade or use an alternative browser.
You should upgrade or use an alternative browser.
Paint Booth
- Thread starter BrianP
- Start date

For priming parts, you can get away with a fairly small booth, size it long enough to do the longest skins (wing skins I guess). If you're going to prime everything, you need to make up a large table with mesh on it, I used galvanized wire mesh with about 1/2" squares, to hold a zillion small parts at a time and shoot primer so over-spray goes straight through the table. I made up a booth with a timber frame and clear plastic, with the table built in, and fitted it with wheels so I could roll it out of the way when not using it.Planning to buy an inflatable paint booth for priming and potentially painting the plane ourselves once finished. Anybody have experience with these and have suggestions for size/brand.
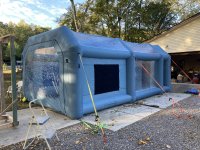
On the other hand, if you're planning on painting a completed RV-10 with an inflatable booth, then read on and you might decide against it:
I used a relatively cheap Ch*nese inflatable booth from a company called Vevor. See the following link, and some prior posts on the same site:
https://tasrv10.com/?p=4511
This thing was quite robust, but the inflation fan is very noisy (I wore noise cancelling headphones all the time it was on). The biggest problem with these things is air flow. The black filters they supply are quite ordinary, the exit filters clog up fairly quickly and the fan that is supposed to pressurize the booth and lead to airflow through the booth, is next to useless. I wound up buying some proper spray booth exit filter material, and replacing their two "exit" filters. I also fitted a large blower on the inlet side of the booth, and wrapping proper inlet filter material on the inlet side of this fan. Only then was there enough airflow to be able to shoot a large spray job like the RV-10 fuselage. Without these additions, the booth would fog up quickly, and you can't see what you are doing making it very difficult to maintain a wet edge.
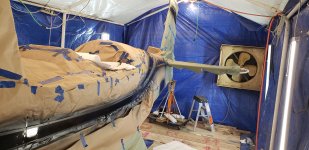
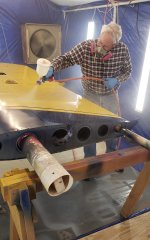
If you're planning on painting an RV-10 fuselage in one of these, you need room around the fuse for a lot of lighting, and depending on how you do it you will probably need extra room for the cowls and doors. You've got to be able to work around the thing for masking, you need trestles to stand on and spray the high parts, and a dolly that you don't like to roll around on and paint the bottom of the fuse (as well as yourself, and the dolly). I bought the largest size inflatable booth available, which as I recall was 33x20x13 feet. Even then it was a bit of a squeeze for the complete fuselage with the doors and bottom cowl on for mask application and back off again for painting the colors. It was OK for the wings, which I did one at a time but it would be possible to set them both up to spray as one job.
Given what I had to do to fix up the airflow problems, if I was doing it again I think I'd build a booth out of timber and plastic. I have heard of people building a wooden frame inside one of these inflatable booths so it could be 'deflated' between jobs without removing everything from inside it. Hanging lights up high is also a problem, but you need high lights to be able to see the glare and keep a wet edge across the top of the cabin. At least a wooden frame would make mounting lights high easier, but if you're going to do that ... may as well forget the inflatable thing and cover the wooden frame in plastic!
Also, I put a tarp down on the floor, and taped drop cloths over it, to keep things clean-ish during a job. I wet down the floor with a garden sprayer between colors. Overspray falls on the floor, dries, then kicks up as dust when you walk over it, and the poor airflow through the booth makes overspray a lot worse than it should be. The worst for this was the (polyurethane) primer. After each major operation, I folded up and discarded the drop cloths, and taped down new ones for the next job.
Are you sure you wouldn't rather pay for a professional paint job???

Adrian
Attachments
Last edited:
Thanks Tassie. That’s very helpful. I definitely don’t have enough space for something that size. We’re building in a 44x38 hangar that also has our RV8 inside of it. I think we could probably get a 20x15 booth in there but definitely not something that size. I was hoping for something easy and quick to set up and take down when needed. I hadn’t thought much about all the rigging around the plane and the airflow issues. I’ve never painted a plane before. My dad has painted a few muscle cars and I thought we might give it a go but that might be biting off a little more than we can chew. We were also considering wrapping the plane instead of painting but haven’t done much research into what that would mean for weight, corrosion etc. Thanks again!For priming parts, you can get away with a fairly small booth, size it long enough to do the longest skins (wing skins I guess). If you're going to prime everything, you need to make up a large table with mesh on it, I used galvanized wire mesh with about 1/2" squares, to hold a zillion small parts at a time and shoot primer so over-spray goes straight through the table. I made up a booth with a timber frame and clear plastic, with the table built in, and fitted it with wheels so I could roll it out of the way when not using it.
On the other hand, if you're planning on painting a completed RV-10 with an inflatable booth, then read on and you might decide against it:
I used a relatively cheap Ch*nese inflatable booth from a company called Vevor. See the following link, and some prior posts on the same site:
https://tasrv10.com/?p=4511
This thing was quite robust, but the inflation fan is very noisy (I wore noise cancelling headphones all the time it was on). The biggest problem with these things is air flow. The black filters they supply are quite ordinary, the exit filters clog up fairly quickly and the fan that is supposed to pressurize the booth and lead to airflow through the booth, is next to useless. I wound up buying some proper spray booth exit filter material, and replacing their two "exit" filters. I also fitted a large blower on the inlet side of the booth, and wrapping proper inlet filter material on the inlet side of this fan. Only then was there enough airflow to be able to shoot a large spray job like the RV-10 fuselage. Without these additions, the booth would fog up quickly, and you can't see what you are doing making it very difficult to maintain a wet
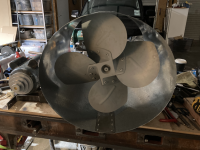
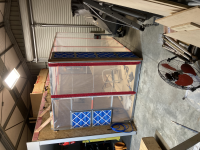
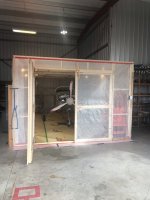
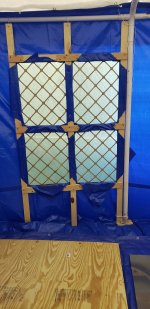
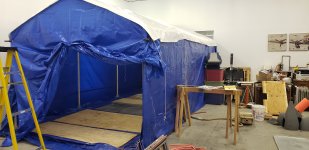
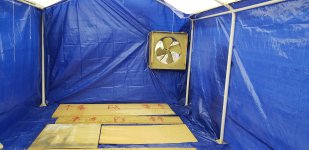
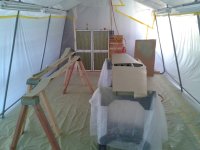
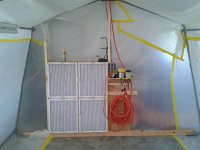
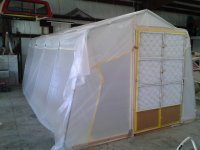
I see from another post you are at the beginning of your build. In that case I wouldn't bother thinking about painting the completed aircraft for now. If your plan is to prime all parts, then I'd suggest that an inflatable booth is a bad idea, you'll get sick of blowing it up and letting it down. Here's a picture of the inside of my "priming parts" booth, made out of wood and plastic, on wheels so it can be rolled out of the way when not in use. It wasn't very wide, just high enough to stand in, but long enough to do the long parts. The mesh table was really useful. A mini-gun is essential for all the small parts so they don't blow all over the place while you're trying to spray them. Priming internal parts, should you elect to do that, is a forgiving operation, I think I only replaced the plastic cover around the booth once during the entire all-slow-build project.
This was late in its life. It had a small extraction fan with a foil tube I just ran outside when I was using it.

This was late in its life. It had a small extraction fan with a foil tube I just ran outside when I was using it.
bobrv7taildragger
Well Known Member
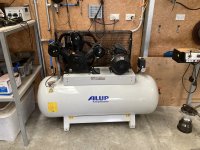
I made a plastic booth...orange plastic electrical tubing covered in 3 mil plastic. 7 box filters to let air in. one box filter out. I needed this or the both tried to vacuum pack me...lol. I have a huge 500mm fan running 1100 rpm and it sucks air through the one box filter causing a nice downdraft over the "table". soft enough to not pull paint away but hard enough to move the overspray away from me and the work. use a descent compressor and of course spend money on PPE. good money. make sure fresh air comes in and overspray is sucked out to be evacuated outside of your building. this is nasty stuff we spray. I made things to hold the ribs so i could paint the whole way around it in one go...probably not necessary....could use the old mesh trick and paint one side then dry and paint the other.
Attachments
I have these in the large and small sizes:
Spray tents
Along with filters and a box fan.
The large one is 9ft long!
Spray tents
Along with filters and a box fan.
The large one is 9ft long!
scottmillhouse
Well Known Member
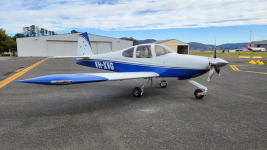
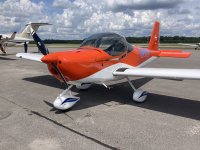
I had good luck with an inflatable booth. Not perfect as others said but very convenient to put up and down as needed to paint a component. Found out to only use when the sun is low in morning or evening because of glare and heat through the clear roof. Paint done with vinyl side stripes being added soon.
Attachments
I built my own paint booth in my hanger. Its used right now for climate controlled working during the build. Its got a small propane furnace and a small AC unit. I'll just put in the air filters and exhaust fan when its time to paint. I am pretty frugal and it ran about $300 to built. 12' W X 24' L X 8' H.
Attachments
G'day Bob, Have you actually started building your -7 yet or are you still just playing around?I made a plastic booth...orange plastic electrical tubing covered in 3 mil plastic. 7 box filters to let air in. one box filter out. I needed this or the both tried to vacuum pack me...lol. I have a huge 500mm fan running 1100 rpm and it sucks air through the one box filter causing a nice downdraft over the "table". soft enough to not pull paint away but hard enough to move the overspray away from me and the work. use a descent compressor and of course spend money on PPE. good money. make sure fresh air comes in and overspray is sucked out to be evacuated outside of your building. this is nasty stuff we spray. I made things to hold the ribs so i could paint the whole way around it in one go...probably not necessary....could use the old mesh trick and paint one side then dry and paint the other.

I am using one of the vevor booths for priming. Just be a bit careful as it requires continuous power to the blower to stay inflated. I had a short power outage and almost had it collapse on my wet paint parts. Luckily the power came back on fairly quickly

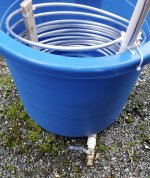
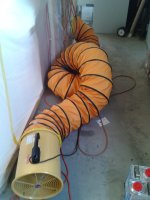
My neighbor has a party tent left over from a wedding that he gave me. A few new pieces of blue plastic, an old attic fan for exhaust, shipping crate plywood on the floor, a bunch of lights and good to go. I made an air intake filter from scrap lumber and such. The cold water bucket was the final barrier to water in the airline. I drained a lot of water out of it.
I did three planes, but I’m done. The current build will get final paint using my checkbook…
Carl
I did three planes, but I’m done. The current build will get final paint using my checkbook…
Carl
Attachments
My first “paint booth” was a small tent I bought on Craigslist ($40). I cut a hole in one side for a filter, and in the other side for an exhaust fan. I was able to paint small parts, like wheel pants, tail fairings, etc. Worked well, and when it was done, I just threw it away.
later, I bought a “paint booth” from Menards.

 www.menards.com
Worked for many small parts, and I still have it.
later, I bought a “paint booth” from Menards.
Wagner® Spray Shelter - Small
The Small Spray Shelter is designed to provide a clean workspace for painting and crafting small to medium sized projects such as lamps, small cabinets and other home decor accessories. This portable, pop-up shelter reduces and catches overspray when working with aerosol cans or paint sprayers...
www.menards.com
Worked for many small parts, and I still have it.
bobrv7taildragger
Well Known Member
mate im kicking my procrastination tomorrow!...or at least in a few days...maybe next week....or next year....ok...I dont know when.G'day Bob, Have you actually started building your -7 yet or are you still just playing around?
Bought a large, self standing party tent off Amazon for painting my RV9A (before final assembly) in my back yard last Spring. I had looked at the option of inflatable booths but running the blowers overnight or longer while parts cured was not attractive. It took about 3 weeks to get all the subassemblies painted and I’m glad I had a freestanding tent to do it all in.
I purchased a 10'x20' metal frame portable garage. Built some framing for the two ends and used 5mil plastic with some homemade simple PVC pipe clips to attach to the frame. I bought a heavy duty blower motor with 12" ducting to ventilate the booth. Built a simple 4' door with intake paint filters and rear exit filters with a plenum. Center lights along the ridge and side lights along the upper sides. It worked great! I installed switches inside for the lights and a paddle switch that went outside the tent to turn the blower on and off. It handled everything except for the wings and fuselage which I painted in the hangar.
Attachments
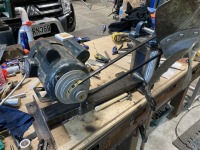
I built an air filter/blower using an old HVAC fan, for my paint booth. Its housed in an simple wood box that fits a pleated HVAC filter. The nice part about these fans is that they have multiple speeds, so you can put in something like a rotary switch, and select the speed you want. I got my fan out of a furnace being replaced in my home. You can try reaching out to an HVAC contractor for one. They cart the old furnaces away for customers, and scrap them for the recycled metals.
***CAUTION*** If you are going to us this or any other fan to exhaust your paint booth, and plan on spraying volatile paints (oils, lacquers, etc.), there is an explosion risk. The only way to have an exhaust fan creates a negative pressure in you booth, without such a concern, is with an explosion proof fan. These are specialized, and expensive. Do some reading on professional paint booths, to know more on what these systems entail. That said, I use this fan box to exhaust my boot. I just don't go crazy with the VOC volume in my boot. Of course, the better option is to use a fan like this to create a positive pressure in the booth. That is, on the outside of the booth blowing in.

***CAUTION*** If you are going to us this or any other fan to exhaust your paint booth, and plan on spraying volatile paints (oils, lacquers, etc.), there is an explosion risk. The only way to have an exhaust fan creates a negative pressure in you booth, without such a concern, is with an explosion proof fan. These are specialized, and expensive. Do some reading on professional paint booths, to know more on what these systems entail. That said, I use this fan box to exhaust my boot. I just don't go crazy with the VOC volume in my boot. Of course, the better option is to use a fan like this to create a positive pressure in the booth. That is, on the outside of the booth blowing in.
Last edited:
bobrv7taildragger
Well Known Member