What's new
Van's Air Force

Don't miss anything! Register now for full access to the definitive RV support community.

Notch in factory final sized holes?

lampwins

Member
Patron
Hi all,

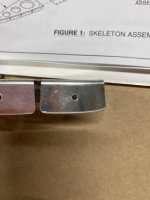
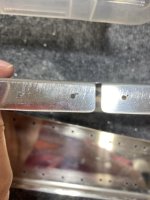
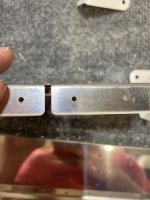
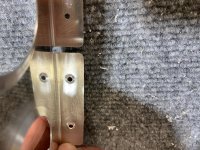
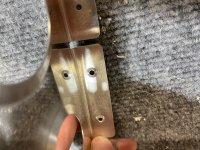
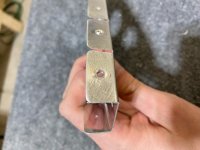
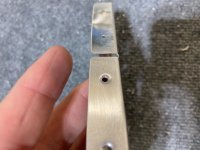
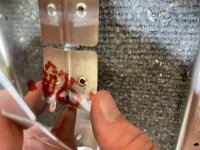
I am just getting started on my -10 vertical stab and I am noticing what appear to be tooling marks on the #40 factory final sized holes of the many of the parts. On most of the holes I see a black burn mark. On 1/3 to 1/2 of those holes, near the burn mark, I see and and even feel a notch cut on the side of the hole. My concern is when dimpling, that the notch will further blow out and crack. On the thicker stock parts like the rear spar, I only see the burn mark, without a notch, so it is only the thinner parts, mostly the tabs of the ribs. Please find attached photos from VS-1013 and VS-1015. I have confirmed that normal deburring nor reaming #40 do anything for the notch because it is beyond the #40 diameter and is flush to the surface.

This threw my technical advisor for a loop, however neither of us have first hand experience with the new -10 kits which are final sized. On his advice I reached out to Vans with these same pictures and this is the engineering team's response in its entirety:

"The parts are fine to use as long as the holes that are going to be dimpled do not crack when dimpled. If they do, then we will provide a replacement part at no cost to the builder."

I can follow the reasoning, but honestly it does not give me the warm and fuzzies. Obviously a cracked dimple can be spotted, but I am very worried about borderline cracks that become problems later, or simply that the notch becomes a stress point.

Is this normal, have folks seen this before? What would you do?

-John
 

Attachments

  • IMG_3264.jpg
    IMG_3264.jpg
    156.5 KB · Views: 524
  • IMG_3266.jpg
    IMG_3266.jpg
    226.9 KB · Views: 568
  • IMG_3265.jpg
    IMG_3265.jpg
    234.9 KB · Views: 436
  • 69275071177__DDE1A14E-4857-4327-813E-C414C9195965.jpg
    69275071177__DDE1A14E-4857-4327-813E-C414C9195965.jpg
    164.1 KB · Views: 500
Last edited:
I'll note that I have't actually dimpled any yet as I'd like to see what others think, but given Vans' response, that would be the next logical step for me.
 
Reamer

I would match drill with a reamer. It might remove most if not all of the notch. Nice to know they will replace but the caveat seems a bit extreme. You will be well into match drilling to other parts before you find out.
 
If I were a betting man (fly experimental a/c, dive off the Sonoma coast for ab's and drove a Flammable Haz Mat truck for 20 years) I would expect most holes in that condition to crack when dimpled. And if they don't, they are still in line to crack when the rivet expands.

I sure hope you prove me wrong.
 
Another example of Van’s diminished quality lately. I do hope they haven’t taken their finger off the pulse in a bid to clear backlogs…
 
These are the laser cut parts. You will also find punched, final size parts which have a much cleaner hole but more of a burr.

I suspect that the burn marks are the entry/exit for the hole where the laser started or ended. I can’t help but think there could be some tool path optimization here as not to sit too long on the edge of a hole. Possibly spiral? Vans has some smart people though, so it’s likely the best way to do it.
 
Same Problem

I had the same issue with the shims on my tank attach brackets trying to dimple #19 holes for screws. I purchased three extra sets of shims and managed to get holes dimpled in the last set without a crack. I had to drill to #17 to get it to work.

Not only is it rough and creating a stress riser but I would suspect that the edge is also hardened in that area which will tend to crack when you try and dimple or rivet it.

I wonder if Vans needs to rethink the final hole size thing with laser cutting. If undersized, a reamer at least has a chance to remove the roughness and possibly any hardening on the edge.
 
Yep, laser cut, reamer is what I did after a part was scrapped. I was dimpling, had a rear bulkhead scrapped, but they didn’t offer a new part.
 
I've run a cnc laser before, it looks like they are piercing on the final cut. They should be piercing in the center of the hole and moving to the edge to cut the hole. Or they don't have the laser dialed in. A laser should cut this thin of material cleanly with very little burr or distortion of the final hole size.
 
Another example of Van’s diminished quality lately. I do hope they haven’t taken their finger off the pulse in a bid to clear backlogs…

I agree. There's several separate issues referenced in just today's posts. I saw the cracked A704 aileron pieces and the plastic wing tip lenses that looks like they were 3D printed in a bubble machine.
 
Vans has become more thorough over the decades.

I had the same issue with the shims on my tank attach brackets trying to dimple #19 holes for screws. I purchased three extra sets of shims and managed to get holes dimpled in the last set without a crack. I had to drill to #17 to get it to work.

Not only is it rough and creating a stress riser but I would suspect that the edge is also hardened in that area which will tend to crack when you try and dimple or rivet it.

I wonder if Vans needs to rethink the final hole size thing with laser cutting. If undersized, a reamer at least has a chance to remove the roughness and possibly any hardening on the edge.

Good question and one that Vans has addressed before approving this method (laser cutting) for production. I forget who, but a Vans engineer presented some data at the OSH RV15 presentation where the laser cutting process parts were being fatigue tested. The test appeared to be in house.

If you are finding otherwise, they might like to gather your data.
 
Result after dimpling

I finally got a chance to try some dimples and the results are... well... not great I don't think.

I will see what Vans has to say.
 

Attachments

  • IMG_3315.jpg
    IMG_3315.jpg
    631.8 KB · Views: 435
  • IMG_3316.jpg
    IMG_3316.jpg
    612.8 KB · Views: 324
  • IMG_3313.jpg
    IMG_3313.jpg
    220 KB · Views: 426
  • IMG_3314.jpg
    IMG_3314.jpg
    229.8 KB · Views: 347
  • IMG_3317.jpg
    IMG_3317.jpg
    465.5 KB · Views: 376
I finally got a chance to try some dimples and the results are... well... not great I don't think.

I will see what Vans has to say.

I agree doesn't look good, too many are cracking.

Did you ream them first? What prep did you do on them? Looks like a laser cut part, need to ream and get that notch out in my experience.
 
unaceptable

There is no way I would proceed with holes like those. They would not pass any aviation quality standards (OEM, Military, FAA...) They should be replaced by Vans.
 
Drill to #30 for a clean hole and use oooops riviets.

that's what i would do (if the number of those holes is managable). drill #30, dimple 1/8, put in AN426D4-X, check off.

otherwise the dimpled holes in #40 shown on the pics are out of question.

John: you're building a big aircraft, no shame to use big rivets. :)
 
My -10 is mostly full size holes. But I am still reaming and lightly hand deburring both sides of the holes prior to dimpling or rough up and prime. Thus far I have not encountered the same problem but am watching closely. On my -12 kit I used the Cogsdill for all the holes (also full sized but old tech) some felt it took off too much material but those save a lot of time on the debur front.

I agree on the use of the larger size of the "oops" rivet as an initial fix - unless it was in a place that might cost me the gold medal award...lol.
 
Last edited:
You may not wanna look to closely at the insides of F-16s...

The specification for your F-16 were likely GD specific, but would have to have been compliant with MIL-R46196, Preparation for, and Installation of Buck Rivets. Para 3.2.1 covers rivet holes, and the holes in John's parts are clearly non-compliant.
Vans refers to this MIL-SPEC, and provides a copy on their web site...
 
Back
Top