Van's Air Force

The definitive Van's Aircraft support community! Buying, building or flying an RV? Join our exclusive family of mentors and enthusiasts!

Irv’s RV-7A journey

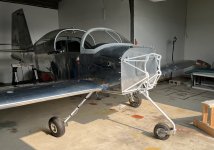
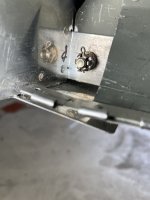
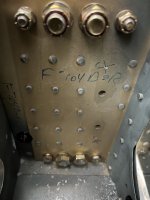
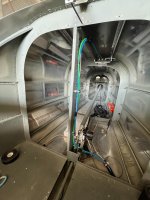
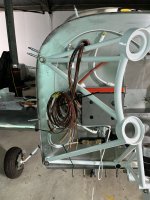
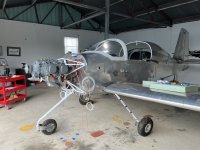
I added an inspection window I saw on another builders project.

I recommend you remove it and reinstall the solid inspection plate.

The RV-7 already has an problem with flutter of the vertical stabilizer and rudder if VNE is accidentally exceeded. Reducing torsional stiffness in the bay just forward of the vertical stabilizer spar just makes it worse.

Risk aside, the mod is pointless. I'm not aware of anyone reporting loss of a nut on the elevator tie bolt, ever.
Interesting. I saw a guy do the whole empenage fairing and inspection covers with one big fiberglass unit and he put an inspection panel on it. He got a lot of compliments on it. But I hear your concern.
 
Wing install in progress. Love it when the holes line up! I’m having difficulty with torquing the bottom nuts. I know this is common and I’ve addressed it in the appropriate thread.
 

Attachments

  • IMG_0569.jpeg
    IMG_0569.jpeg
    1.6 MB · Views: 72
  • IMG_0570.jpeg
    IMG_0570.jpeg
    1.4 MB · Views: 66
  • IMG_0593.jpeg
    IMG_0593.jpeg
    1.4 MB · Views: 63
  • IMG_0607.jpeg
    IMG_0607.jpeg
    1.6 MB · Views: 67
Wiring of my Dynon advanced panel. Boy the 7 wasn’t designed with the ease of wiring like the 14s I’ve seen. Also engine day arrived after some shipping buffoonery.
 

Attachments

  • IMG_0889.jpeg
    IMG_0889.jpeg
    1.7 MB · Views: 58
  • IMG_0939.jpeg
    IMG_0939.jpeg
    1.9 MB · Views: 50
  • IMG_0988.jpeg
    IMG_0988.jpeg
    1.6 MB · Views: 43
  • IMG_0991.jpeg
    IMG_0991.jpeg
    1.6 MB · Views: 42
  • IMG_0992.jpeg
    IMG_0992.jpeg
    1.6 MB · Views: 48
  • IMG_1122.jpeg
    IMG_1122.jpeg
    3 MB · Views: 49
  • IMG_1119.jpeg
    IMG_1119.jpeg
    2.5 MB · Views: 64
I’ve been running wires for awhile. Like the FFWD kit, there really aren’t instructions rather a bunch of wiring diagrams. Not having a build order like the airplane, sometimes it’s two steps forward one step back as I have to rebundle as wires are added. But nonetheless progress is being made. Below is the pic of the panel being placed in the cockpit to begin the attachment. Also one of engine wires through my penetrations.
 

Attachments

  • IMG_1747.jpeg
    IMG_1747.jpeg
    3.6 MB · Views: 37
  • IMG_1743.jpeg
    IMG_1743.jpeg
    1.8 MB · Views: 37
Slowly solving some challenges assembling my panel. I ordered a key to push button start from Advanced Panel. These components came with no basic instructions. I learned that I’d have to use a multi-meter and test for continuity in all key and push button positions. Once I discovered what terminals did what, I soldered wires in the correct pattern. Not intuitive at all. Was hoping for “red tab into red slot..blue tab into blue slot”. I revisited Coax crimping for more antennas and and ran wires through my three circuit breakers and back out to the components. Also with wiring up the mags, the directions were not clear so after multiple emails from Dynon support and some “not in the manual” pics he provided, I got it done. I told the guy he should re-write the manual with all the answers to the most frequently asked questions!
 

Attachments

  • IMG_1829.jpeg
    IMG_1829.jpeg
    1.8 MB · Views: 40
  • IMG_1834.jpeg
    IMG_1834.jpeg
    1.5 MB · Views: 37
  • IMG_1845.jpeg
    IMG_1845.jpeg
    1.8 MB · Views: 35
  • IMG_1851.jpeg
    IMG_1851.jpeg
    1.4 MB · Views: 38
  • IMG_1870.jpeg
    IMG_1870.jpeg
    3.2 MB · Views: 35
Last edited:
Slowly solving some challenges assembling my panel. I ordered a key to push button start from Advanced Panel. These components came with no basic instructions. I learned that I’d have to use a multi-meter and test for continuity in all key and push button positions. Once I discovered what terminals did what, I soldered wires in the correct pattern. Not intuitive at all. Was hoping for “red tab into red slot..blue tab into blue slot”. I revisited Coax crimping for more antennas and and ran wires through my three circuit breakers and back out to the components. Also with wiring up the mags, the directions were not clear so after multiple emails from Dynon support and some “not in the manual” pics he provided, I got it done. I told the guy he should re-write the manual with all the answers to the most frequently asked questions!
PM sent
 
Big day at the hangar! I had the airport mechanics come and help me with this one. No way was this engine hang a one person job imo.
 

Attachments

  • IMG_2002.jpeg
    IMG_2002.jpeg
    2.4 MB · Views: 29
  • IMG_2004.jpeg
    IMG_2004.jpeg
    1.6 MB · Views: 27
  • IMG_2005.jpeg
    IMG_2005.jpeg
    3.1 MB · Views: 25
  • IMG_2007.jpeg
    IMG_2007.jpeg
    2.8 MB · Views: 26
  • IMG_2009.jpeg
    IMG_2009.jpeg
    3.2 MB · Views: 29
Back
Top