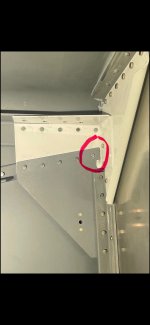
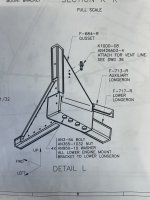
I riveted on the F684 gusset plate on the lower left longeron/firewall engine bracket. When I set the last (forward) rivet, the shop head was a little thinner than the rest. Upon closer examination, there is a slight gap behind the gusset plate at this rivet. The cause was because I drilled this one rivet out and had to tap the shank with a punch. I must have just slightly bent the plate outward. This is a long rivet, so I’m hesitant to drill it out again for fear that I’ll cause more damage. Looking for some thoughts. Leave it or try to rework it to get the gusset plate tight?

Van's Air Force
You are using an out of date browser. It may not display this or other websites correctly.
You should upgrade or use an alternative browser.
You should upgrade or use an alternative browser.
Gusset Plate Question
- Thread starter dwollen89
- Start date

As I see it, those rivets along both sides are in shear. So the rivet in question is at the end of the shear train. Four would have to fail before it was in trouble.
Build on.
Build on.
If it was mine, I would drill it out, clamp the plate down tight, and put in a new #4 rivet. If the hole gets hogged out a little, I would install a #5 rivet. As installed with a gap, the shear strength of that rivet has been sacrificed. It was designed to have 5 rivets in that shear zone, not 4.
This is the correct answer. This is a critical structure. Failure of this joint would cause you a LOT of grief and be difficult to fix once the plane is assembled. If in doubt, get advice from Vans.If it was mine, I would drill it out, clamp the plate down tight, and put in a new #4 rivet. If the hole gets hogged out a little, I would install a #5 rivet. As installed with a gap, the shear strength of that rivet has been sacrificed. It was designed to have 5 rivets in that shear zone, not 4.
Thanks for the reply. I did get advice from Vans on this and was told to build on. I would like to replace the rivet, but I fear doing more damage by drilling it out again. Upsizing to a bigger rivet would also likely create edge distance issues. I’m leaning toward leaving it, but not sure yet.This is the correct answer. This is a critical structure. Failure of this joint would cause you a LOT of grief and be difficult to fix once the plane is assembled. If in doubt, get advice from Vans.
For future reference, you must exercise caution when driving rivets out with a punch. If you can't them loose enough by drilling, you should back up the skin/plate with a small socket and bucking bar to resist the punch forces. This will prevent bending the skin/plate.Thanks for the reply. I did get advice from Vans on this and was told to build on. I would like to replace the rivet, but I fear doing more damage by drilling it out again. Upsizing to a bigger rivet would also likely create edge distance issues. I’m leaning toward leaving it, but not sure yet.
Lesson learned for sure, unfortunately the hard way, lol. I have to keep telling myself that it’s a learning process.For future reference, you must exercise caution when driving rivets out with a punch. If you can't them loose enough by drilling, you should back up the skin/plate with a small socket and bucking bar to resist the punch forces. This will prevent bending the skin/plate.
I don't recommend using this, but I have a couple punches (3/32 & 1/8) modified to fit a rivet gun set with a 3/16" hole. Dial pressure down to about 5psi and you have a one handed punch.Lesson learned for sure, unfortunately the hard way, lol. I have to keep telling myself that it’s a learning process.
I fabricated a set of home made bucking bars with holes for backing up the shop side. Works great when there's no help around.
Last edited:
Sadly, with airplanes it seems you never stop learning.Lesson learned for sure, unfortunately the hard way, lol. I have to keep telling myself that it’s a learning process.
") So much knowledge to acquire.
So much knowledge to acquire.