Yesterday was my first very frustrating day.
I was looking forward to riveting the skeleton of my RV7 VS. So far everything went pretty smooth, I'm nearly ready to rivet the HS but decided to replace one part.
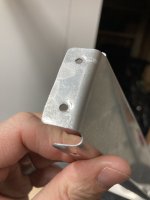
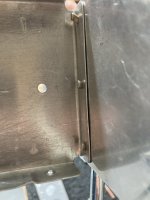
While waiting for delivery I started the VS and was pretty confident (after the rear spar came out nice) until I began riveting the VS-704 to VS-706 to the front spar. Not even one single rivet fit nicely. The rivets bent, the shop head was not even, there was a gap between the flanges an the spar, or the manufactured head and the metal...
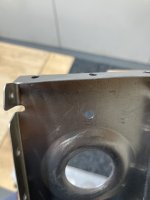
I drilled out several times, fittet, fluted everything again, clecoed together, it looked good but as soon the first rivet was squeezed the same sh... happened again. Now all the ribs have marks, the holes are uneven so I guess I have to replace all of them maybe also the spar. See pics.
I have no idea where the problem is, I'm totally new to building with metal but the practice kits (I did 4 of them) came out pretty nice.
I suspect the forward and aft flanges of the ribs are not in the right angle for the shape of the HS.
How can you make sure? As soon as I put clecos in the flanges are pulled in the right position and it looks good.
Also I'm afraid the holes are not 100% perpendicular from the spar into the fwd and aft flanges.
I checked several building blogs and nobody seems to have such problems.
Now I'm afraid I'll encounter the same problems when riveting the HS.
Any ideas?
Thanks
I was looking forward to riveting the skeleton of my RV7 VS. So far everything went pretty smooth, I'm nearly ready to rivet the HS but decided to replace one part.
While waiting for delivery I started the VS and was pretty confident (after the rear spar came out nice) until I began riveting the VS-704 to VS-706 to the front spar. Not even one single rivet fit nicely. The rivets bent, the shop head was not even, there was a gap between the flanges an the spar, or the manufactured head and the metal...
I drilled out several times, fittet, fluted everything again, clecoed together, it looked good but as soon the first rivet was squeezed the same sh... happened again. Now all the ribs have marks, the holes are uneven so I guess I have to replace all of them maybe also the spar. See pics.
I have no idea where the problem is, I'm totally new to building with metal but the practice kits (I did 4 of them) came out pretty nice.
I suspect the forward and aft flanges of the ribs are not in the right angle for the shape of the HS.
How can you make sure? As soon as I put clecos in the flanges are pulled in the right position and it looks good.
Also I'm afraid the holes are not 100% perpendicular from the spar into the fwd and aft flanges.
I checked several building blogs and nobody seems to have such problems.
Now I'm afraid I'll encounter the same problems when riveting the HS.
Any ideas?
Thanks
Attachments
Last edited: