What's new
Van's Air Force

Don't miss anything! Register now for full access to the definitive RV support community.

Do I have to overhaul my alternator?

Pilot135pd

Well Known Member
I think my previous thread was deleted because it sent members to a YouTube video I uploaded there. We've all heard a picture is worth a thousand words and I think a video is worth ten times more. It was the only way for me to explain the problem I had with my alternator.

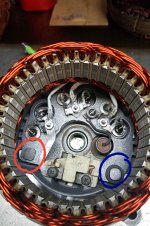
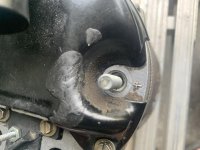
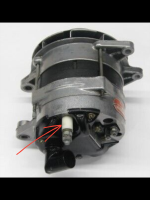
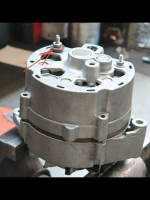
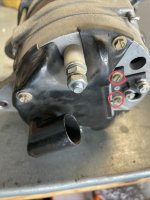
Thank you to all who gave me suggestions on what to do. Sadly the 2 year old I had hired to help me rebuild the alternator was on time-out today and her parents didn't let her help me, so I removed the cooling shroud and noticed that if I pull that bolt up it locks in place so I'm hoping that any wire connected to it is actually connected to something like an eye ring and when the bolt is locked in place it makes the connection. I bought the extra nuts needed to install it correctly.

I'll know more once I install and test it this weekend. If it doesn't work, or works intermittently, then I'll follow Bill's advice and just take it to the local alternator shop and have them reattach the wire correctly, if the 2 year old isn't available ;);)

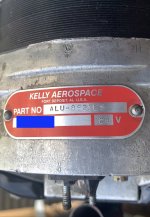
Bill, this is the model
 

Attachments

  • IMG_8531.jpg
    IMG_8531.jpg
    350.8 KB · Views: 76
Its a stud, nothing is on it. You could take it apart and put it together with your eyes closed quicker than breaking down an M16
 
Its a stud, nothing is on it. You could take it apart and put it together with your eyes closed quicker than breaking down an M16

That's what I think, that it's a stud so I believe I already fixed it. I'll know this weekend when I install and test it.
 
The chevette I mean corvette alternator, red circled stud is not insilated and transfers juice from its contact to stator. Blue circled is negative stud and has insulator washer between stator diode power. Diagram of ALU alternator attached, could be different but my money is on same as chevette alternator
 

Attachments

  • 20230923_071537.jpg
    20230923_071537.jpg
    861 KB · Views: 70
  • 20230923_063151.png
    20230923_063151.png
    413.3 KB · Views: 63
The chevette I mean corvette alternator, red circled stud is not insilated and transfers juice from its contact to stator. Blue circled is negative stud and has insulator washer between stator diode power. Diagram of ALU alternator attached, could be different but my money is on same as chevette alternator

I'm pretty sure my issue was with the one in blue ( because I can see the white insulator) so hopefully it's now fixed. Thanks !
 

Attachments

  • IMG_8547.jpg
    IMG_8547.jpg
    294.4 KB · Views: 67
There will be several insulator on both POS and NEG studs. The one in my pic is the Delco 10DN 24 volt alternator off a 68 C310, the blue circle is the NEG stud and the black insulator washer stops it from contacting the POS charged plate. The POS stud has one to stop in from touching the ground. Your pic is the POS stud and the white washer stops it from grounding on the case, you have it off might as well pop it apart and put new brushes in it.
 
Last edited:
There will be several insulator on both POS and NEG studs. The one in my pic is the Delco 10DN 24 volt alternator off a 68 C310, the blue circle is the NEG stud ans the black insulator washer stops it from contacting the POS charged plate. The POS stud has one to stop in from touching the ground. Your pic is rhe POS stud and the white washer istops it from grounding on the case, you have it off might as well pop it apart and put new brushes in it.

You are missing a nylon insulator spacer that goes on that stud, did you take it off?

Yep, I just noticed the other one has insulators too. It's just a little over 300 hours since birth so I'll gamble that the brushes should be fine, plus i don't want to push my luck.
 
You are missing a nylon insulator spacer that goes on that stud, did you take it off?

You CANT put it together with a nut against the case on that POS stud terminal, you need the insulating spacer, my 10DN has a smaller flat red nylon washer, you have to have something to keep it from grounding to the case. Those big 100amp ALT circuit breakers work but are not cheap.
 

Attachments

  • 20230923_111719.png
    20230923_111719.png
    1.1 MB · Views: 54
  • Screenshot_20230923-110649.png
    Screenshot_20230923-110649.png
    1.6 MB · Views: 46
Last edited:
Yes, both have insulated washers, one longer than the other one.
 

Attachments

  • IMG_8567.jpg
    IMG_8567.jpg
    219.9 KB · Views: 45
  • IMG_8568.jpg
    IMG_8568.jpg
    169.7 KB · Views: 55
I think this is the correct diagram for the 8521LS alternator. It appears the B+ is attached to the stator wire - but who knows how accurate that is with production changes. If it is attached, let's hope it works with the extra nut. Just in case when torquing the jam nut, don't allow the "stud" to rotate.

It appears to be made by Prestolite - who makes (made?) custom low production volume alternators for heavy duty applications. I have not found any "general" will-fit parts for it. Most parts are cubic $ by comparison to automotive.


Screenshot 2023-09-22 at 3.40.48 PM.png

Screenshot 2023-09-22 at 3.39.51 PM.png
 
Last edited:
Cant see the second nut being a problem, the pic I posted yesterday pointing out the nylon insulator has the second nut and here is another pic of an ALU8521 with the cable securing nut still on it.

A very nice thing about this alternator is they made the brush removal and install extremely simple, take the two screws out circled in red and the brush assy pops out, no sticking a rod in hole to secure them like my 10DN alternators. Once that brush assy is out there is NOTHING inside the alternator that can pop out and get lost like the op is concerned about. Seriously, not joking a 2 year old could take this apart and put it back together and it would work, a 5 year old could do the 10DN, 2 might have a problem with the 10DN brush holder, but this ALU8521 is like a snap together model
 

Attachments

  • s-l1600 (41)~2.jpg
    s-l1600 (41)~2.jpg
    234.4 KB · Views: 29
  • 20230923_111719.png
    20230923_111719.png
    1.1 MB · Views: 23
Last edited:
Just in case when torquing the jam nut, don't allow the "stud" to rotate.

If I could post a link to YouTube I would upload a short video I took that shows that the stud, when pulled out, locks in place and can't rotate, so that's one less worry I had.

I installed it yesterday and I hope to get a chance to test run it later today. I'm slow due to being medically grounded for the last couple of weeks ( I can only partially see out of my left eye due to surgery ) and the doctor would most likely be upset at me if he saw what I've been doing the last few days :eek: but I hope to be cleared by next month.


Seriously, not joking a 2 year old could take this apart and put it back together and it would work

But does this 2 year old have both of their eyes working correctly? :D
 
UPDATE :

Glad to report that I ran the engine and the alternator worked great. Thanks for the suggestions.
 
Awesome, but curious how you are checking it? I awlways look for a volt increase to at least 27 at idle power after starting.
 
Back
Top