How tight should the upper and lower cowls slide together at the nosebowl (RV9)? Should they actually slide together with friction, or should there be a slight gap in everything except where the screws go through in the inlets? My fit is the typical Van's fiberglass fit, so I'm going to have to do a lot of sanding and then re-fiberglassing, but I'm not sure what to target for the fit. Likewise, for the horizontal junction and firewall fit, is 1/16" gap between all parts about right, or do I need a little more?

Van's Air Force
You are using an out of date browser. It may not display this or other websites correctly.
You should upgrade or use an alternative browser.
You should upgrade or use an alternative browser.
Cowl Fit
- Thread starter skelrad
- Start date

I have about 1/16" gap everywhere and a couple areas (10 and 2 clock) on the upper cowl to firewall that are a little bigger than 1/16" . Initially I wanted it super tight, but in reality when/if you paint I think the consensus is to have that gap to not mess up paint. I've lightened up big time on wanting my airplane perfect or that smooth baby but fiberglass cirrus look. Take a look at all your emp fairings, wing fairings etc, they all look just fine with a small 1/16" gap. I think it looks good. To make yourself feel better, go look at any flight line 172 or 182 that gets beaten up daily, all the dents, rough factory protrusions, standard head rivets.....yours will look just fine Brandon. It just shows that you are an aware builder. Kudos.How tight should the upper and lower cowls slide together at the nosebowl (RV9)? Should they actually slide together with friction, or should there be a slight gap in everything except where the screws go through in the inlets? My fit is the typical Van's fiberglass fit, so I'm going to have to do a lot of sanding and then re-fiberglassing, but I'm not sure what to target for the fit. Likewise, for the horizontal junction and firewall fit, is 1/16" gap between all parts about right, or do I need a little more?
Extra: BTW, I used the standard OEM hinged cowl design and I'm glad I did. Super clean installation and if you take the time to get the hinges lined up then the pins slide in and out no problem and cowl removal a non issue. I did use the RV-14 design of the bottom of the cowl to Fuse attach with alum bars and nut plates as this is an area of cracking due to exhaust vibration
Last edited:
Ideally, you should have a 1/4" gap between the front face and your spinner. Anything closer makes removal hard and can scratch your cowl up pretty bad.
Gaps around the seams should be 1/16 or less as you will have primer build up and paint on the edges. The seams between the cowls are very noticeable so I would pay attention in that area and not let the seams get too far apart. The Piano hinge will determine that a little, even if you preset it tight in initial fitting together.
Gaps around the seams should be 1/16 or less as you will have primer build up and paint on the edges. The seams between the cowls are very noticeable so I would pay attention in that area and not let the seams get too far apart. The Piano hinge will determine that a little, even if you preset it tight in initial fitting together.
I built for a 1/4" gap between spinner and cowl. The seams are all pretty snug. I used micro/flox to get them right. Here's a short how I did it...
Basically apply tape where you don't want filler to stick. If you want a uniform gap, add a layer or two of tape. Wax it. Squeegee a bead of filler. Install the cowl. Cure. Sand.
Basically apply tape where you don't want filler to stick. If you want a uniform gap, add a layer or two of tape. Wax it. Squeegee a bead of filler. Install the cowl. Cure. Sand.
All of the above helps, but yes, my question was regarding the junction of the two halves behind the spinner plate where the flanges of the top and bottom cowl nest together. Rigth now it's a very snug fit, and I'm not sure if that's where it should stay, or if the halves should slide together fairly freely. I still have gobs of work to do to get that whole area looking like it didn't just come out of a kingergarten pottery class.Correct me if wrong but I think OP is talking about where the two halves (upper and lower cowl slide together) at the inlets. But I also have 1/4" gap per plans between cowl and spinner
mine slide together pretty easily. If I remember right...Note the triangular cuts on the plans on the inboard of the inlets that will facilitate them sliding together. Don't cut the outboard where they're visible of course. I have a bit more work to do there as well before I prime and Paint. I had to add more micro to the face of the lower than the upper to get both halves to be flush with each other on the front face. This is an area that I could work on forever to get perfect and not quite sure when to call it good. I doubt I'll win the oshkosh bronze lindy. There are some great craftsman/women out there for sure.All of the above helps, but yes, my question was regarding the junction of the two halves behind the spinner plate where the flanges of the top and bottom cowl nest together. Rigth now it's a very snug fit, and I'm not sure if that's where it should stay, or if the halves should slide together fairly freely. I still have gobs of work to do to get that whole area looking like it didn't just come out of a kingergarten pottery class.
I had to scarf in approx 11/2-2" fiberglass all the way around the perimeter of my cowl because I bought an old pepto 6A cowl from a builder and am using the 4" saber spacer on my prop engine and it made the whole thing short. Dang near got 1/16" all the way around after the gazillion on off fitting dances and I still ended up off in a couple areas. Had to move the oil door opening too. Overall really happy with how it turned out. Tight. Fingers crossed that my W&B is ideal since it is a taildragger and I've got a light Sensenich ground adjustable on the nose. We'll see
Last edited:

I found that area of the cowl to be difficult to mate nicely, so I just cut that flange right off and sanded the surfaces smooth to make them sit together evenly, leaving an adequate opening for engine cooling, and to make the 13” spinner line up properly with the cowl. Then I fabricated the join with pieces of .063 Al. Those are both riveted and bonded to the cowl with a structural adhesive. The nutplates on the Al splice piece is robust. My gaps along the sides and behind the spinner were checked with a piece of .032 Al. That gives enough room for paint and results in a nice tight look.
Attachments
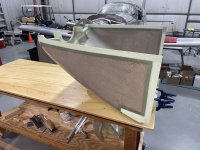
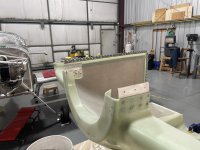
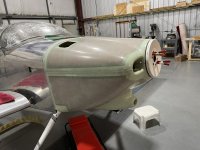
Nice work. I like your paint job too Scott. Simple and Clean but still Striking.I found that area of the cowl to be difficult to mate nicely, so I just cut that flange right off and sanded the surfaces smooth to make them sit together evenly, leaving an adequate opening for engine cooling, and to make the 13” spinner line up properly with the cowl. Then I fabricated the join with pieces of .063 Al. Those are both riveted and bonded to the cowl with a structural adhesive. The nutplates on the Al splice piece is robust. My gaps along the sides and behind the spinner were checked with a piece of .032 Al. That gives enough room for paint and results in a nice tight look.
Another methodHow tight should the upper and lower cowls slide together at the nosebowl (RV9)? Should they actually slide together with friction, or should there be a slight gap in everything except where the screws go through in the inlets? My fit is the typical Van's fiberglass fit, so I'm going to have to do a lot of sanding and then re-fiberglassing, but I'm not sure what to target for the fit. Likewise, for the horizontal junction and firewall fit, is 1/16" gap between all parts about right, or do I need a little more?
I just cut the flange off and use a piece of .063 to join the pieces.
The way I do it is to make a rectangular piece of aluminum whatever size but large enough to accept a row of #8 screws on the top piece and lower piece. It needs a slight bend to conform.
A row of three screws on the top and the bottom. Nut plates on the aluminum. No bonding required.
Then you can address the separation the same as the rest of the cowling.
I use an old gift card with sticky sand paper folded around the edge to make the gap. An old hack saw blade will work to get things started but I always finish with the credit card with sandpaper to get the edges consistent.
This seems to be the easiest way to get the correct space to allow for the paint.
YMMV but this has always worked for me.
My latest struggle is in making the nose bowl round vs oval. As it came, the two halves are such different sizes that making a circle without major surgery is impossible. On top of the size difference, the lower cowl nose bowl itself is simply not symmetrical. I centered the spinner as best as I could, but I’m going to have to do a lot of filling and sanding around the perimeter just to give the illusion that it’s a circle. Good times!
Get the two halves to fit and look correct. No one will notice the bowl doesn't match the spinner.My latest struggle is in making the nose bowl round vs oval. As it came, the two halves are such different sizes that making a circle without major surgery is impossible. On top of the size difference, the lower cowl nose bowl itself is simply not symmetrical. I centered the spinner as best as I could, but I’m going to have to do a lot of filling and sanding around the perimeter just to give the illusion that it’s a circle. Good times!
The forward "ears" are a tough area. I found it easiest to open the "female" and sand the "male" ears to a very loose fit first. That way, there's no tension. Fit the cowl.
Last...apply some tape and wax to the female ears. Apply flox then mate the cowls and let it cure. The rest is just dressing as they say. The birds nest should fit pretty well.
By the way, my Sweetie is a potter. I do the preliminary wedging. She finishes. We are improving, but some of our work wouldn't even make it out of Kindergarden!
Last edited:
dnimigon
Well Known Member
Kindergarten pottery class. LOL. Thats funny.. I love the comments people have on here. Makes for a fun time reading posts.All of the above helps, but yes, my question was regarding the junction of the two halves behind the spinner plate where the flanges of the top and bottom cowl nest together. Rigth now it's a very snug fit, and I'm not sure if that's where it should stay, or if the halves should slide together fairly freely. I still have gobs of work to do to get that whole area looking like it didn't just come out of a kingergarten pottery class.
