Van's Air Force

The definitive Van's Aircraft support community! Buying, building or flying an RV? Join our exclusive family of mentors and enthusiasts!

.any tips for installing the wings.

raisbeck

Member
Patron
I'm to the point of installing the wings on my -8, and one thing that I have learned from the past 25 years of this project is that it's time well spent to get as much information as upossible and try to visualize the process from the inside out.

That said, I the instructions i got with the kit are the terrbly detailed and im having trouble isualizing the process.

Does anyone have any tips for accomplishing this project?
 
Obviously,
As Bruce said, get additional help, you will have to measure a lot, wing sweep, incidence angle, diedral... before drilling the rear spar...
Those holes needs to be really square.
Read the instructions carefully.
Measure three, four times, be patient and precise... It will be worth it.
Good luck
 
Don’t overthink it. Get a few friends over, lift & stabilize the wing into place. Insert temporary undersized positioning bolts, than get the permanent bolts out of the freezer, lather them up with a bit of grease & tap them in place (note placement of washers & nuts per plans)
Things to be cautious of- note the belly skin doesn’t get snagged, tuck wiring & stuff out of the way when inserting the wing, make those connections if it makes sense while you can get your hands in there.
I personally have mounted most of my project wings with just me & an engine hoist (plus knowing how to safely balance the wing myself).
After your wings are mounted, you will wonder what all the worry was.
 
First time or final?
One buddy for me. First time my Mentor. Last time Sweetie helped me.
First time...
Four adjustable saw horses with padding or towels on top.
Drift pins (hardware store bolts ground to a rounded point)
Temp bolts (hardware store)
Wood shims for fine tuning the saw horse height.
On the 7 a shim is needed to slide the wing skin past the fuse skin.

Set two saw horses each side and adjust so they are close to correct height. Outboard will be higher.
Place wings on the saw horses.
Adjust height so the spar will slide in.
Slide one wing in and look with a mirror to see which way the tip needs to move. Buddy can manage that. When it aligns, slide in a drift pin.
Slip the bolts in the holes.
Repeat the other side.

Final...
Same process up to the bolts.
Lube the holes and bolts with a light lubricant.
Triple check plans and make sure bolts, washers, etc are exactly as called out. They don't come out easy.
Make sure you have tools needed.
Install as before with temp bolts.
Freeze bolts if you like. I didn't.
Replace them one at a time. If you need to drive a bolt, use brass. Brass hammer. Brass punch. Whatever. Drive till a few threads are exposed then start a nut. Repeat. Use the nuts & bolts to tighten in a cross pattern. Check running torque on each from both sides. You may have to tighten from the bolt side. That number is important.
Repeat other side.
 
Three people makes life easy. One in the plane with a couple alignment pins (hardware store bolt with the head cut off and the end tapered) and a dead blow hammer or hammer and a brass drift, one at the wing root to guide the spar and check/guide the skin overlap and one at the tip providing the muscle to push/wiggle it in place. Light oil or grease on the pins and outsides of the spar. One pin on the top and one on the bottom will align the spar to the centersection and hold the wing secure. If it's the first install do all the root fairing, fuel/vent line, electrical and alignment prep and rear spar attach drilling. Remove the wing and finish the final install prep. Second/final install is the same as the first except using the close tolerance bolts and final install hardware. Freeze and lube the bolts prior to install. A round brass bar in the rivet gun will make short work of driving the bolts in, or a hammer and brass drift.
 
. . . you will have to measure a lot, wing sweep, incidence angle, dihedral... before drilling the rear spar...
Those holes need to be really square.
^^^ This! ^^^
Make a special jig to ensure the rear spar is drilled squarely and within the margin provided in the instructions. With 25 years invested, this is one of those holes you don't want to mess up! A chucking reamer is best for the final hole size:

1765079321558.png
 
I installed the wings in my garage to set incidence, then again for the final time in the hangar. Both times it was just me and my A&P/IA brother in law. He was on the wingtip, I was inboard. I had a couple of big yeti style coolers and furniture pads under the wing in case we had trouble getting it in and needed something to sit it on while regrouping, but they went in on the first try.

Sprayed the spar ends with LP3 to make them a little more slippery. Once we had them started he continued to hold the tip while I crawled in the plane.

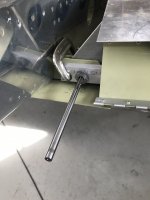
Once inside, I reached back over the side and lifted up on the inboard edge of the wing while he pushed. I used a flashlight and inspection mirror to get an inboard hole aligned well enough to install a drift pin made from a hardware store bolt with the threads ground down. Once I had that in, it was simple for him to wiggle the tip up and down to get another hole lined up.

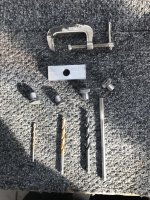
I had everything I needed either in the plane or on a shop table that I could reach while I was inside. Hardware, plans to show the washer stackup, a couple of soft hammers, Wooden dowl to knock the drift pin back out, a couple of small pieces of aluminum skin scraps to to encourage the lower wing skin to not get caught on the fuselage skin and to funnel the aft spar into the fuselage carry through fork if it got hung up, stuff like that.

The real bolts are close tolerance. They're going to have to be tapped in for final assembly. I put a block of hardwood on the head and then tapped that with a brass set in a rivet gun turned down low.

Think it through ahead of time. Have everything you need within reach before you start. It's not super hard. Without the flap & aileron the wing only weighs probably about 80 lbs or so. It's pretty easy for two guys to maneuver around.
 
^^^ This! ^^^
Make a special jig to ensure the rear spar is drilled squarely and within the margin provided in the instructions. With 25 years invested, this is one of those holes you don't want to mess up! A chucking reamer is best for the final hole size:

Noah Nelly! Vans is adamant no touchy the holes. Better ask first.
 
This all reminds me of the time we hung the wings on the RV-3 for the first time. He a couple fo neighbors at our Airpark hekpeing out. One was flying to Moscow the next day to then go on to Baikonur to launch to the Sace Station. All I could think of as we were wiggling and pushing the wings in to place was that if Dan got even a little finger smooshed in the process, we were all going to be in a lot of trouble! But he found it relaxing, and a good way to take his mind off what he doing for the next week…..🤣
 
All has been said:
-don‘t overthink
-4 people (wingtip, leading edge wing root, trailing edge wing root, inside fuselage)
-normal hardware (undersized) driftpins, i grinded the threads off and to a pointy ending
-freeze the final hardware.
-lubrication
-wiggle
-tap (i had a brass inset for my rivet gun, worked like charme!!)

enjoy!
 
I built a rolling dolly so when the inner wing rested on it, the main wing spar sat at the same height as spar carry through box. This helps to insert the wings into the fuselage. The rolling dolly also made it easier to align the wings. When it was time to insert the wing, it only required one person on the wingtip to gently push in the wing and one person inside the fuselage to insert the drift pins. The same dolly was reused to insert the wings for the last time. With the dolly supporting all the weight, a couple of old guys could handle the wing without breaking our backs.

The dolly was nothing more than a low bench table (2ft x 4ft) made from dividing the 4ft x 8ft plywood board. The height was about 24 inches, depending on the height of your RV at the time of assembly.
 
+1 on the drill block, clamped, just as you see it in Scott's photo above.

Grease the spar bolts. It's not just a matter of sliding them in. It's about getting them back out if necessary.

It's an -8, so make sure the -4 bolts are installed in the center section.
 
A table saw outfeed roller stand works at the root, or some kind of support. As others have noted, grease it up! grease it!

I also put some thin strips of scrap aluminum between the spar and belly skin, just to make sure I didn't gouge the skin.

I used an engine hoist and strap on the tip rib to allow fine adjustments in dihedral, then a ratchet strap from that strap to the roll bar to provide some "in" pressure.
Some wiggling, ratcheting, and hoist adjustments and I was able to do it myself, but having at least one more body would make it faster (probably inside with some drift pins and the temp bolts)
 
+1 on the drill block, clamped, just as you see it in Scott's photo above.

My version of a drill fixture using drill bushings. The reamer tends to follow the hole.


Attachments

  • IMG_3266.jpeg
    IMG_3266.jpeg
    2.8 MB · Views: 49
  • IMG_3264.jpeg
    IMG_3264.jpeg
    1 MB · Views: 48
Last edited:
My version of a drill fixture using drill bushings. The reamer tends to follow the hole.

I used one just like Mike above. I got it from somebody here on VAF, then sent it on to somebody else after I was done. They're out there. Whether you make one or scrounge one from somebody else, I highly recommend a drill guide and reamer here. Screwing up that hole would result in months of re-work.
 
I used one just like Mike above. I got it from somebody here on VAF, then sent it on to somebody else after I was done. They're out there. Whether you make one or scrounge one from somebody else, I highly recommend a drill guide and reamer here. Screwing up that hole would result in months of re-work.

I lent them to a VAFer and got em back. I’ll lend you the blocks and bushings if you are ready to rig.
 
Last edited:
My A&P helped. He brought out a can of some slippery stuff. A couple of taps and the bolts were in. Point is some lube made the issue a non event. I texted him and when I find out I’ll report back.
 
From my A&P on lubing the wing bolts.
 

Attachments

  • 2357353588583411889.png
    2357353588583411889.png
    449.3 KB · Views: 24
Back
Top