What's new
Van's Air Force

Don't miss anything! Register now for full access to the definitive RV support community.

7A elevator spar crack

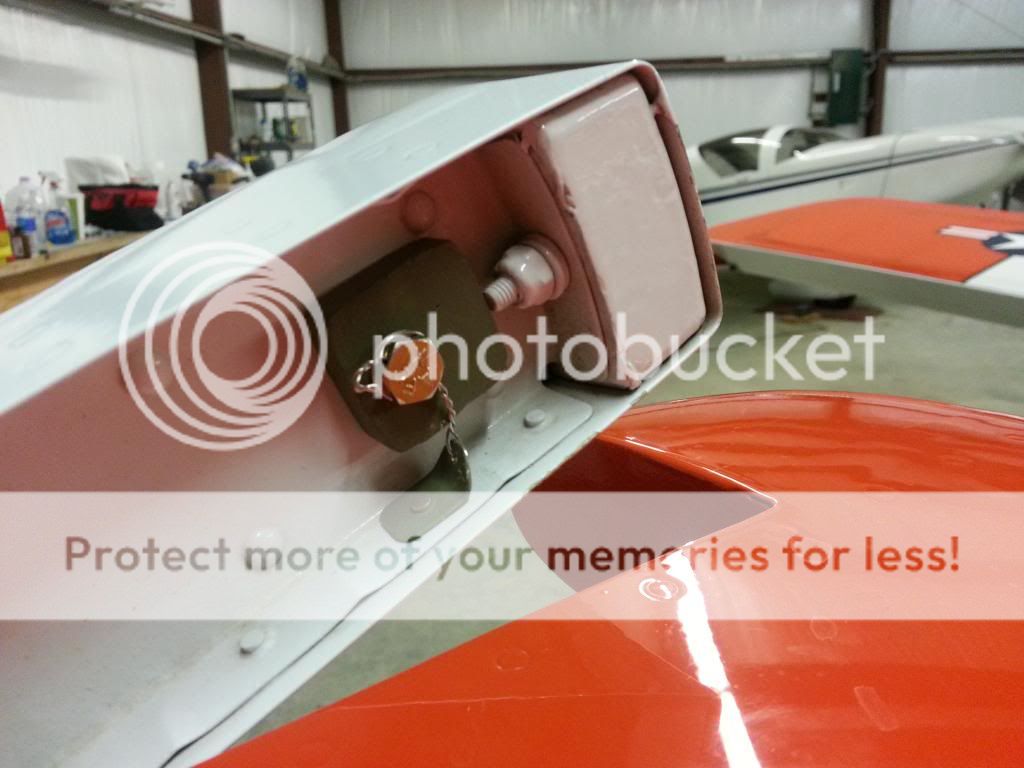
Control Surface Rod end Check

I am coming up on my annual and to be honest I was not planning to put a wrench on these nuts. I set the torque when I installed them for the final time and marked them. With the discussions on this forum I have given them a close look.

What is the procedure you a talking about, do you loosen then reset the torque. I am no expert but two things come to mind, if the torque was set originally and marked and there has been no movement then all should be good. Second if you loosen then rest the torque then it seems to me you run the risk that you will make a mistake doing this then set yourself up for future issues. Kind of like a quote I heard once; "the Annual is where the mechanic takes your plane apart to see why it is still working normally". The implication is if it is working fine don't mess with it otherwise you might induce some sort of failure.

I would be curious to hear what the proper way to check these items. do you actually reset the torque on all the hardware throughout the aircraft?

This is the learning part of this hobby so I look forward to all opinions.

Cheers

from post #154

Quote:
Originally Posted by vic syracuse
That those locknuts on the rod end bearings, once tightened and torque- sealed, would never come lose without visibly breaking the torque seal. Yesterday, I found myself shaken to the core, seriously. I always visibly look at the locknuts on the all control surfaces during a preflight for just that, and I routinely touch most, but not all of them. Well, yesterday, after 720 hours on the Hobbs, I checked the tail a little more closely and I found one on the left elevator, and one on the rudder that I turned with my fingers during the preflight!
end Quote

My response:
This is precisely why I have said many times that a dab of torque seal means nothing to me when doing an inspection, its presence does not guarantee proper torque, only a wrench can do that.

Walt
 
Loose Nuts and Bolts in Tail

After finding 4 loose jam nuts on a friends RV-7 elevator, I noticed creaking noises when I wiggled the tip of the HS. There were also creaking sounds when I pushed down on the tail spring. So I put a wrench on every nut/bolt I could find in the tail area and took a closer look at everything. I found a total of 22 loose fasteners including 12 in the VS/HS attach area. Total time on this airplane is 350 and most of it is off an average grass field. Gotta really do the condition inspections :)
 
Inspection

Just did a annual/condition insp on a 10 yr old 6A with 510 hrs total time. Most of the elevator and rudder rod end jam nuts needed to be tightened about 1 to 2 flats and most of nuts and bolts attaching the vertical fin and horiz stab to the fuselage needed tightening.


Don Broussard
A&P, IA
RV 9 Rebuild in Progress

When you say they needed tightening do you mean they "could be turned 1-2 flats" or do you mean they "needed 1-2 turns to meet the required torque"?
Just cautioning on turn nuts just because you can and end up over torquing.
 
As a non-builder, not sure how anyone could get a torque wrench in such a place after the build. And how many ft-lbs are we talking if we could? I did cut a notch into a wrench like Walt, but sacrificed a Harbor Freight wrench instead. Just $15.00 for 8 wrenches with 16 different sizes. I also grinded down the head of it a bit to make it thinner to get in and out, otherwise you won't be able to get it over the shaft to get to the nut. Also had to grind down other parts of it as well. It?s still a snug fit, but does a much better job.

I checked all of the other nuts in the VS, and all showed to be quite snug. 565 TT hours on the airframe, but this 8 tail probably only has about 200 hours or so.

I think I?ll remove the main wing inspection plates next, and see what else can keep me up at night. I?ve got a CI coming up next month, I?ll spend more time on it than ever before, and will probably have more hours looking things over than the A&P himself. Maybe this will start giving me peace of mind again.
 
I would be curious to hear what the proper way to check these items. do you actually reset the torque on all the hardware throughout the aircraft?

This is the learning part of this hobby so I look forward to all opinions.

Cheers

No, you don't reset the torque. What I do is put a wrench on the fastener that you want to check. Put some light to moderate force towards the tighten direction. You're not cranking hard here. If you get movement, that's when you want to re-torque the fastener.

I have used broken torque stripe as an indicator during pre-flights but as Vic pointed out, this is not fool proof. I have heard that the torque stripe can release on one surface but not the other and allow the fastener to move without showing a break in the stripe. I can't recall seeing that lately at work on our satellites or on my plane but I know it can happen.

At the CI, I'll put a wrench on those critical fasteners on the airplane that don't have a locking feature using the procedure above. This includes fuel lines, control surface jam nuts, and such. If we are talking about safetied hardware, such as those with safety wire or cotter pins, I don't generally remove the locking mechanism to check. The big exception is the prop bolts. I do remove the safety wire and check those.

I've only been through one CI on my plane and, although I didn't find many loose fasteners, the majority were firewall forward. The valve cover screws like to loosen up but I wouldn't call them critical.

That's my 2 cents.
 
bolts & nuts for flight controls

After doing some research I decided to perform a little mod into my flight control chain.

I'll change all the nuts/bolts with this combination :

- bolts : ANn-n instead of ANn-nA
- nuts : MS17825-n instead AN365-n
- and a cotter pin, of course

MS17825 is a castle lock nut (both world an365 + an310)

ms17825selflock.jpg
.

All the replacement cost in my 8 is circa 75 us dollars, in my opinion worth the money
 
Last edited:
I checked all my jam nuts on tail and all of them are good. This is after 1,370 hrs of service.

I also checked a friend's newly acquired low time RV. I found all the jam nuts on elevator and rudder were loose.

I did not use a torque wrench on mine. But from the outcome I can conclude that they are tight enough. Just offer one data point. Those jam nuts don't always come loose after certain hours in service.

Of course I will continue to check all nuts and screws.
 
Checked my buddy's RV-8 today for loose jam nuts. About 300 hrs on the hobbs. 3 out of 4 elevator nuts were loose. None on the rudder. The nuts were not just a little loose, they were way loose as you could just spin them with one finger.
 
Food for thought...

I checked all my jam nuts on tail and all of them are good. This is after 1,370 hrs of service.

I also checked a friend's newly acquired low time RV. I found all the jam nuts on elevator and rudder were loose.

I did not use a torque wrench on mine. But from the outcome I can conclude that they are tight enough. Just offer one data point. Those jam nuts don't always come loose after certain hours in service.

Of course I will continue to check all nuts and screws.

There are a number of different explanations for loose rod end jam nuts.

One obvious one is that they weren't properly tightened in the first place. It is very difficult to use a standard open end wrench, and get them tightened properly.

Another one is paint and/or primer under the nut. Not everyone paints with the rod ends removed, but a lot of anal people do (can't stand the thought of paint on the rod ends and jam nuts). Even if you don't remove the rod ends for painting, most everyone that primed their parts has primer under the nuts (some people a lot more than others).

Paint or primer under fasteners will always have the potential for the torque to drop off over time as the paint/primer gets compressed / extruded from under the nut. It only take a coating a few thousandths thick to have an impact.

This issue can also be present on the rudder and elevator attach hardware but to an even greater extent because the steel attach brackets often get much more primer, paint, and sometimes even a few coats of clear, than would be under the jam nuts. Same problem... different location.
 
Scott

Once again, thank you. This is the kind of info that you provide here on the VAF that is priceless. I absolutely no aircraft experience so this kind of tip may even be life saving to me. I may have figured out that I should not paint the rod ends but maybe not. Again, thank you sir!:cool:
 
Once again, thank you. This is the kind of info that you provide here on the VAF that is priceless. I absolutely no aircraft experience so this kind of tip may even be life saving to me. I may have figured out that I should not paint the rod ends but maybe not. Again, thank you sir!:cool:

To clarify, an issue painting the rod ends is not what I was describing (though if the are it could soak into the ball/bearing area and cause it to bind up).

The paint / primer issue is primarily if there is a coating between the jam nut and the surface it is supposed to contact (the spar web) when torqued.
 
Rod ends

When you say they needed tightening do you mean they "could be turned 1-2 flats" or do you mean they "needed 1-2 turns to meet the required torque"?
Just cautioning on turn nuts just because you can and end up over torquing.

I would say they were loose to the point of almost being able to rotate them with your fingers and needed 1-2 flats to not be loose. The rest of the tail attach fasteners needed about 1 flat. No torque wrench used for this operation.


Don B
 
Update

I got the elevator repair completed and flew this afternoon!
It felt great to get back in the air!!

I just repainted the tip area. I had to replace the fiberglass tip and do all the glass work.
I touched up all the rivets that are in the skin to spar with a small artist brush and you really can't tell it's been apart!

20131008_212153.jpg


I few quick data points.
My elevators were balanced "together". They were still "perfect" after the spar replacement.

I decided to balance them separately and fly another 900 hours to see if it helps:)

I had to add 2.4 ounces to the left elevator at the tooling hole. Not sure how much I drilled out of the right counterweight. I had installed a nutplate in the tooling hole during the build so I used it on the left elevator. I also safety wired this bolt just to be sure it doesn't back out.

20131009_192856.jpg


20131009_192946.jpg


Mark
 
I had to add 2.4 ounces to the left elevator at the tooling hole. Not sure how much I drilled out of the right counterweight. I had installed a nutplate in the tooling hole during the build so I used it on the left elevator. I also safety wired this bolt just to be sure it doesn't back out.

20131009_192856.jpg

Mark,

Congrats on getting your plane back in the air.

However....that little tab and associated stuff you have added just doesn't give me a warm and fuzzy feeling. If any of that ever managed to get loose it most likely would jam the elevator...and ruin your day. I think this is a case where the cure is worse than the disease.

I would remove the extra weight so I would never have to worry about it coming loose....this arrangement raises red flags for me.
 
Last edited:
Mark,
Your fix looks great. Your down time was minimal. Not sure what Sam doesn't like here, it all looks secure to me. Safety is correct and my guess is the bolt securing the weight is either in a nut plate or self locking nut. How much more secure can you be?
Ryan
 
Mark,

Congrats on getting your plane back in the air.

However....that little tab and associated stuff you have added just doesn't give me a warm and fuzzy feeling. If any of that ever managed to get loose it most likely would jam the elevator...and ruin your day. I think this is a case where the cure is worse than the disease.

I would remove the extra weight so I would never have to worry about it coming loose....this arrangement raises red flags for me.

+1 on what Sam said. I'd worry about the tab pulling out and/or any of the parts coming loose and blocking the elevator. I know it's not ideal but adding weight to the inside of the elevator horn is what I would recommend. I added buckshot through that tooling hole, tilted the elevator up (horn down) and then added epoxy to hold it in place. Worked great and nothing on the outside to potentially fall off.
 
+1 on what Sam said. I'd worry about the tab pulling out and/or any of the parts coming loose and blocking the elevator. I know it's not ideal but adding weight to the inside of the elevator horn is what I would recommend. I added buckshot through that tooling hole, tilted the elevator up (horn down) and then added epoxy to hold it in place. Worked great and nothing on the outside to potentially fall off.

The bolt is safety wired in place and the tab is riveted. I don't see any of these objects coming off. It's also in an area easily inspected during pre-flight.
 
Maybe the thought is that since the tab is riveted with a single rivet that it could rotate and jam the elevator?
 
You guys all make great points! :)

The only reason I said anything is that my initial reaction to the photo was that there could possibly be a better way with much less of a chance of coming off in flight, and NO CHANCE at all of obstructing a moving surface. I'm not saying Mark's approach is bad...just was thinking there could be a better, safer way, which I think was also Sam's point.

I guess I just don't like responses of "it's safe enough"...or "that looks like a good solution", when it may be for a tractor, but not for an airplane. Despite what Van's says, we're NOT building tractors.
 
Have you guys looked at the stock counterweight attachment screws? If they loosen, they will jam the elevator and ruin your day. The only thing holding them on is a locknut (one of them hidden behind the rib). And then there are the flight control connections that are only held in place by a locknut, but I digress.
 
Have you guys looked at the stock counterweight attachment screws? If they loosen, they will jam the elevator and ruin your day. The only thing holding them on is a locknut (one of them hidden behind the rib). And then there are the flight control connections that are only held in place by a locknut, but I digress.

Aren't the heads of those bolts covered by the fiberglass tip?
 
Have you guys looked at the stock counterweight attachment screws? If they loosen, they will jam the elevator and ruin your day. The only thing holding them on is a locknut (one of them hidden behind the rib). And then there are the flight control connections that are only held in place by a locknut, but I digress.

And the landing gear, wing spar bolts, vertical and horizontal stabilizer, and many, many others.

There is nothing wrong with self locking nuts as long as they are used in the proper application and installed properly. Acceptable uses are locations that they are not exposed to high heat and on moving components where the bolt it self is not subject to rotation (nothing pivoting or rotating on the bolt).
 
Lock Nuts

The high heat restriction applies only to elastic lock nuts. All metal lock nuts are typically found on turbine engines where temperatures can be extremely high.
 
The high heat restriction applies only to elastic lock nuts. All metal lock nuts are typically found on turbine engines where temperatures can be extremely high.

Sorry. That was (incorrectly I guess) assumed when I made my post since all of the locations on RV's that I mentioned, use nylon self locking nuts at those locations.
 
Update

Just a quick update as we were the 2nd plane to find a crack in the right elevator spar. During disassembly we found a small crack in the elevator skin so decided to replace that as well. New parts are on the way from Vans and hope to have it fixed in a week or two. Will post some pictures of the actual damage when we get it fully disassembled.
 
2nd Plane with right elevator crack at outboard attachment point

Just a quick update as we were the 2nd plane to find a crack in the right elevator spar. During disassembly we found a small crack in the elevator skin so decided to replace that as well. New parts are on the way from Vans and hope to have it fixed in a week or two. Will post some pictures of the actual damage when we get it fully disassembled.

Here are the pictures of the damaged spar. I highlighted them with red pen as they are very hard to see. The 2nd picture shows the basic design of the doubler we elected to install on the new elevator. It is all back together now and at the painters. Hope to have it installed and rebalanced this weekend.

You can see that our crack is pretty much identical to Mark's.

IMG_0521.jpg


IMG_0522.jpg
 
I still suspect loose jam nuts caused these cracks, both yours and Mark's were at the nutplate attach rivets. These 2 rivets will be trying to transfer all the load to the spar if the jam nut is loose, a load they were not designed to take.
 
I still suspect loose jam nuts caused these cracks, both yours and Mark's were at the nutplate attach rivets. These 2 rivets will be trying to transfer all the load to the spar if the jam nut is loose, a load they were not designed to take.

Respectfully, Walt, "in God we trust, all others show show their data"

What is the factual basis of this conclusion? Is it shown in earlier posts?
 
Respectfully, Walt, "in God we trust, all others show show their data"

What is the factual basis of this conclusion? Is it shown in earlier posts?

I don't suspect God had anything to do with it and I have no facts or data to prove it, I suspect thats why I said "suspect". :D

Suspect:
1. have an idea or impression of the existence, presence, or truth of (something) without certain proof.

synonyms: have a suspicion, have a feeling, feel, (be inclined to) think, fancy, reckon, guess, surmise, conjecture, conclude, have a hunch
 
Last edited:
Semantics

No facts or data, I suspect thats why I said "suspect". :D

Suspect:
1. have an idea or impression of the existence, presence, or truth of (something) without certain proof.

synonyms: have a suspicion, have a feeling, feel, (be inclined to) think, fancy, reckon, guess, surmise, conjecture, conclude, have a hunch

"Surmise" - would be an adequate explanation here. Nonetheless, Walts contributions herein are adequate without further defense regardless of the aforementioned soliloquy.
 
I don't suspect God had anything to do with it and I have no facts or data to prove it, I suspect thats why I said "suspect". :D

Suspect:
1. have an idea or impression of the existence, presence, or truth of (something) without certain proof.

synonyms: have a suspicion, have a feeling, feel, (be inclined to) think, fancy, reckon, guess, surmise, conjecture, conclude, have a hunch

Fair enough, Walt, I was just wondering if I missed some additional information.:) I should have deburred the edges of that question prior to submission.

The quote was one that I was introduced to in my first engineering assignment.

Moving along, we have several good, theories for what has precipitated the loading, and for why it fractured in THIS area. Is there anything we can do to get to a more definitive conclusion short of instrumentation and FEA? I will be triple checking my alignment when this gets reassembled on my bird.


Thanks,
 
The spar cracked because it could not bear the load or repeated load imposed by aerodynamic forces, loose jam nuts, improperly rigged or aligned rod-ends or a combination of all the above. I do think that the loose jam nut would be enough to crack the spar. However, I also think the spar should be strong enough to bear that load. To me, the plans rivet spacing on the plans doubler is too much. The plans doubler should also have cracked if it was sufficiently mated with the spar. Without actually measuring it myself, from the picture it appears to be more than 8xD, I am thinking less, perhaps 6xD would be better and more sufficient. What your picture shows as your planned "custom" doubler is way too much. A smaller doubler (original size), 1 gauge thicker than the original spar material, riveted with closer rivet spacing would be a much better plan.

Additionally, while it is great that everyone is checking their jam-nuts, it should also be noted that the jam nut really is designed to mate with an actual "rod". I am not surprised that they come lose. the mating surface of the nut-to-spar is only about 1/8" at most. Once any surface treatments wear, there's not much there to keep it tight. Thus my conclusion above.

If mine cracked, I would repair it as I described and would never think twice about it again. I suppose in my life I have repaired a hundred or more similar cracks. I can't recall ever seeing one "re"-crack after doubler/repair had been installed.
 
......

Additionally, while it is great that everyone is checking their jam-nuts, it should also be noted that the jam nut really is designed to mate with an actual "rod". I am not surprised that they come lose. the mating surface of the nut-to-spar is only about 1/8" at most. Once any surface treatments wear, there's not much there to keep it tight. Thus my conclusion above.

.....

It sounds like a washer under the jam nut might be a good idea.
 
It sounds like a washer under the jam nut might be a good idea.

I like the washer idea, spread the load out from the bending moment of the rod? The outer edge of the washer would have less consentrated force on the spar compaired to the smaller dia underside of the nut.
 
Thanks for inputs

The spar cracked because it could not bear the load or repeated load imposed by aerodynamic forces, loose jam nuts, improperly rigged or aligned rod-ends or a combination of all the above. I do think that the loose jam nut would be enough to crack the spar. However, I also think the spar should be strong enough to bear that load. To me, the plans rivet spacing on the plans doubler is too much. The plans doubler should also have cracked if it was sufficiently mated with the spar. Without actually measuring it myself, from the picture it appears to be more than 8xD, I am thinking less, perhaps 6xD would be better and more sufficient. What your picture shows as your planned "custom" doubler is way too much. A smaller doubler (original size), 1 gauge thicker than the original spar material, riveted with closer rivet spacing would be a much better plan.

Additionally, while it is great that everyone is checking their jam-nuts, it should also be noted that the jam nut really is designed to mate with an actual "rod". I am not surprised that they come lose. the mating surface of the nut-to-spar is only about 1/8" at most. Once any surface treatments wear, there's not much there to keep it tight. Thus my conclusion above.

If mine cracked, I would repair it as I described and would never think twice about it again. I suppose in my life I have repaired a hundred or more similar cracks. I can't recall ever seeing one "re"-crack after doubler/repair had been installed.


Great input Tony, thanks but the repair is in and finished. The doubler design was discussed with US Air maintenance/repair engineers and our A&P. I am not a structural engineer but it looks great to me! We will look at the washer idea when we put it back together.

From all the posts and the history of our plane (no known storm events), we will check the alignment of our hinge line very carefully for binding during re-assembly. I know that Mark suspected this also but said his checked out perfectly straight.

More as I have it.

It will be fine. The US Air (American) folks know how to engineer a repair. Just don't let them tell you to use any Mastinox (Airbus guys love that stuff, YUCK!) LOL :)
 
I suspect calculation would show the most significant load applied to that hinge point is not aerodynamic. Besides, the aero loads are not very cyclical.

Instead, take a look over your shoulder the next time you light off the engine, and later when you pull the mixture for shutdown. You'll see the tip of the elevator containing the heavy lead mass do a hard, wet-dog shake. It probably oscillates 2" or more at 3 to 5 hertz.
 
Possible cause of damage?

I haven't seen or have over-looked any comments on the damage being caused by wind or prop wash from another aircraft. I have seen many aircraft with their flight controls being blown into the stops by wind and now I wonder what type of damage this might be causing, which could be not readily visible.

I'm not an engineer and the questions I have ask are just that, questions!:confused:
 
I suspect calculation would show the most significant load applied to that hinge point is not aerodynamic. Besides, the aero loads are not very cyclical.

Instead, take a look over your shoulder the next time you light off the engine, and later when you pull the mixture for shutdown. You'll see the tip of the elevator containing the heavy lead mass do a hard, wet-dog shake. It probably oscillates 2" or more at 3 to 5 hertz.

That sounds like a good (likely, possible?) forcing function for the cyclic load in both directions. How about idling, Dan? The feel in the seat is significant between 6-700 rpm and 1000 rpm, but have not looked at the back.

I have been thinking about a test rig to apply an oscillating load to some test pieces to cycle them to failure. The issue is what loads to apply, and what the success criteria would be for number of cycles. Several design fix options could be compared at the same time. Standard, loose jamb nut, etc. If I drag my feet long enough an official solution may appear for us.
 
Back
Top