Van's Air Force

The definitive Van's Aircraft support community! Buying, building or flying an RV? Join our exclusive family of mentors and enthusiasts!

12iS fuel-plumbing testing

BryanStearns

Active Member
Benefactor
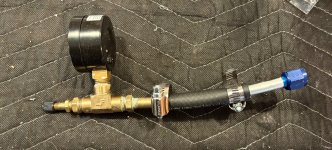
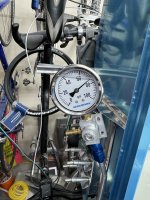
I'm about to hang my engine, then attach my tailcone. First, I decided to re-pressure-test my fuel system before I make it any harder to get to the connections to tighten them. After connecting the firewall supply and return lines together, and capping the tank return line connection, I applied 40 psi to the tank drain connection and soap tested almost* all the connections, tightening a couple. (The fuel tank isn't involved in this test - it's not in the airplane.) After a couple of days, it leaks down to 20 psi.

*I can't get to the two connections under the firewall shelf behind the rudder pedals, to either soap ‘em or tighten them. I’m thinking of removing the pedals to gain access; this would also make it much easier to get a good paint job on the inside fuse walls and center console, since the pedals would partly be in the way. Not sure I’ll be able to remove the pedals after the harness goes in; it’s relatively easy now, 30 minutes out and maybe an hour to get 'em back in; I haven’t filled the brake lines yet.

So, advice please: did you pressure test your lines? What’s “good enough”? Another builder told me not to worry about this - “there’ll be leaks no matter what; just fix them when you find them.” After trying to get to those two connections under the shelf, I dread having to fix a leak there. Also, any pointers to good tools (beside crowfoot wrenches, which I have, but barely fit) for tightening those fittings? Thanks!
 
Hi Bryan - I just did this a week ago after installing the fuel pumps/filters and while I had the tank out to install wiring. I pressurized to 50 psi, and went through every connection (there are many in the pump/filter assembly) and found a couple of tiny leaks that were resolved by tightening fittings. I was able to squirt the soap solution on those two fittings above the pedals, and watch them with a mirror and a bright light (luckily no leaks there; you’re correct, the pedal assembly would have to be removed to tighten them). I had problems getting a good seal around the Shrader valve I used to pressurize the system, so the pressure dropped over the course on an hour or so, but I was happy with the bubble test at 50 psi and am calling it done. As an aside, I used Del seals from Spruce on all the fuel line connections, which I think might have helped.
 
Hi Bryan - I just did this a week ago after installing the fuel pumps/filters and while I had the tank out to install wiring. I pressurized to 50 psi, and went through every connection (there are many in the pump/filter assembly) and found a couple of tiny leaks that were resolved by tightening fittings. I was able to squirt the soap solution on those two fittings above the pedals, and watch them with a mirror and a bright light (luckily no leaks there; you’re correct, the pedal assembly would have to be removed to tighten them). I had problems getting a good seal around the Shrader valve I used to pressurize the system, so the pressure dropped over the course on an hour or so, but I was happy with the bubble test at 50 psi and am calling it done. As an aside, I used Del seals from Spruce on all the fuel line connections, which I think might have helped.
Agree with John, view those two hidden fittings with a mirror, and only remove the rudder pedals if you have to. Also, get some Snoop leak detector. It will pick up the tiniest leaks. Once the system is pressurized start testing. Doesn't matter if it slowly leaks from your Shrader as long as you have pressure to test the fittings. As I recall I used a crowfoot on those fittings, and maybe a flare nut wrench that was modified.
 
I used a pressure gauge and made test set up. If it’s holding pressure then you know all the fittings are ok. Took a few tries to get it to hold pressure. It held pressure for a week once I got all the leaks. I’ve marked all the involved fittings with torque seal to remind me they were tested as I’ve added the rest of the system since.
 

Attachments

  • IMG_1064.jpeg
    IMG_1064.jpeg
    1.5 MB · Views: 57
Hi Bryan, I share your dread of having to do any work in that center column.

My tech counselor suggest that I torque, loosen, and retorque each fitting when initially assembling my fuel lines. Even so, when I first tested my fuel lines the pressure dropped from 60 to 40 psi over 24 hours. I tried the soap test, but with such a slow leak I didn't see anything. Since I couldn't do the soap test on those firewall fittings, and because those were the most difficult connections to make, I assumed the leak must be there and I tried to use a crow's foot wrench to turn them. I think I got a 16th of a turn with a half hour of contortions -- neither easy, nor confidence building, so I set the problem aside to think about it for a week.

I used the valve and hose from my fuel tank tests along with a pressure gauge and some extra parts from Home Depot as my testing rig, and since I really wasn't sure where the leak might be I figured the easiest and least risky thing I could do was aggressively tighten the hose clamps on the testing rig. The first attempt greatly reduced the leak, so I tightened them as much as I could and repeated the test. It held pressure for over a month, and even showed pressure changes related to temperature (I have an unheated garage) that matched my calculations.

For my comfort, the only acceptable leak in the fuel system is none. For one thing, there's very little between me and the fuel lines in the RV-12. Even if there is a level of leaking that is general acceptable (I'm skeptical), I don't want to become complacent about the smell of fuel in the cockpit. And I certainly don't want to try to reach any of the fuel fittings after all the cables and pushrods are installed over them. It's much easier to fix any problems while I still have access to the fittings.

Since you say you "decided to re-pressure-test [your] fuel system", I assume you successfully tested it before? Before pursuing those difficult to reach fittings, I'd check anything that changed since that last test, including your testing rig, the plugs, and the bypass line you attached for the test.
If you haven’t put the landing gear on yet, it’s much easier to deal with those firewall mounted fittings if you roll the fuselage onto its side. At least for me.
 
Hi all,
I just finished rudder pedals at weekend. Before I fit them, I'd like to do the fuel line testing like you guys. I don't have the fuel pumps + filters yet but it's those connections inside the fuse I'd like to know are okay before moving on. I'm not sure how to do that, could you please share a little of what you did? How do you cap off ends etc would be really appreciated. Thanks :)

I started with the hose and fittings that come with the fuel tank testing kits. I put the cap on the return fitting in the firewall, and the hose on the supply fitting. I purchased some additional AN fittings (AN926-6 caps and AN806-6D plugs) to cap the fuel tank end of the return line and the fuel pump end of the supply line. I picked up an inexpensive pressure gauge and some miscellaneous parts from the local hardware store to attach between the hose and the valve that came with testing kit, then pressurized the whole thing to 60 psi and left it over night. Initially I had some leaks which I tracked back to the hose clamps clamping the fittings into the hose. They had to be much tighter than when testing the fuel tank. Once those were tweaked, the pressure held at 60 psi for over a week, changing only with the temperature.

My testing setup may have been overkill, but it was worth a few dollars to be certain I wouldn't have to get at those firewall fittings again.
 

Attachments

  • IMG_9014.jpg
    IMG_9014.jpg
    3.6 MB · Views: 36
I started with the hose and fittings that come with the fuel tank testing kits. I put the cap on the return fitting in the firewall, and the hose on the supply fitting. I purchased some additional AN fittings (AN926-6 caps and AN806-6D plugs) to cap the fuel tank end of the return line and the fuel pump end of the supply line. I picked up an inexpensive pressure gauge and some miscellaneous parts from the local hardware store to attach between the hose and the valve that came with testing kit, then pressurized the whole thing to 60 psi and left it over night. Initially I had some leaks which I tracked back to the hose clamps clamping the fittings into the hose. They had to be much tighter than when testing the fuel tank. Once those were tweaked, the pressure held at 60 psi for over a week, changing only with the temperature.

My testing setup may have been overkill, but it was worth a few dollars to be certain I wouldn't have to get at those firewall fittings again.
Perfect, thank you :)
 
I started with the hose and fittings that come with the fuel tank testing kits. I put the cap on the return fitting in the firewall, and the hose on the supply fitting. I purchased some additional AN fittings (AN926-6 caps and AN806-6D plugs) to cap the fuel tank end of the return line and the fuel pump end of the supply line. I picked up an inexpensive pressure gauge and some miscellaneous parts from the local hardware store to attach between the hose and the valve that came with testing kit, then pressurized the whole thing to 60 psi and left it over night. Initially I had some leaks which I tracked back to the hose clamps clamping the fittings into the hose. They had to be much tighter than when testing the fuel tank. Once those were tweaked, the pressure held at 60 psi for over a week, changing only with the temperature.

My testing setup may have been overkill, but it was worth a few dollars to be certain I wouldn't have to get at those firewall fittings again.
I did essentially the same, using AN caps I got from ACS.
 
Bubble blowing solution that your kids use works better than soapy water. It is more viscous so it stays where you put it and makes better more easily seen bubbles.
 
I started with the hose and fittings that come with the fuel tank testing kits. I put the cap on the return fitting in the firewall, and the hose on the supply fitting. I purchased some additional AN fittings (AN926-6 caps and AN806-6D plugs) to cap the fuel tank end of the return line and the fuel pump end of the supply line. I picked up an inexpensive pressure gauge and some miscellaneous parts from the local hardware store to attach between the hose and the valve that came with testing kit, then pressurized the whole thing to 60 psi and left it over night. Initially I had some leaks which I tracked back to the hose clamps clamping the fittings into the hose. They had to be much tighter than when testing the fuel tank. Once those were tweaked, the pressure held at 60 psi for over a week, changing only with the temperature.

My testing setup may have been overkill, but it was worth a few dollars to be certain I wouldn't have to get at those firewall fittings again.
When I made assembly to test the fuel tank, I had trouble getting the hose clamps tight enough to stop all leaks. I wound up slathering the joints with Proseal as a final measure
 
Back
Top