Van's Air Force

The definitive Van's Aircraft support community! Buying, building or flying an RV? Join our exclusive family of mentors and enthusiasts!

Leaky Fuel Tank Plug

enigmakv

Well Known Member
I posted a photo of this on another thread about multiple issues a while back and wanted to start a new thread for this specific issue.

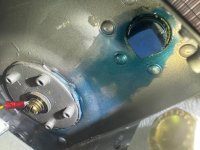
Chapter 18 identifies the AN913-3D plug install. Chapter 41 page 41-03 begins with a caution to make sure the plug is installed since it will not be possible to install it once the wing is installed. Other threads on this forum have included comments where different builders had forgotten to permanently install the plug for one reason or another. I suspect that the builder of my airplane may have forgotton as well to install the plug before attaching the wing and had to do so in the confined wing root area after wing install.

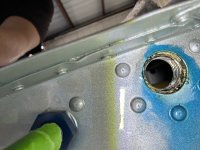
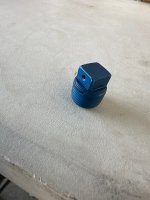
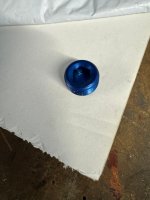
The plug has a square head and I was able to get it out with an open wrench but it was a tight fit. I have found similar plugs with an "innie" hex head that could be done with an allen wrench and will go with that kind of plug moving forward. While I was able to remove the plug, the hole looks like maybe leak repair was attempted a couple of times based on all the gunk in the hole.

I am seeking suggestions and advice regarding plugging this port with the wing attached...

1) Any suggestions for cleaning the hole? I am planning to use a 1/2" wire brush (the port is 3/8") but its gonna be difficult to get a lot of rotation.
2) I am concerned that there might be thread damage. Thoughts/suggestions appreciated.
3) How would you all go about reinstalling a new plug (which sealant, etc.).

The tank on the other wing is being removed to isolate and repair a small leak. That tank had been pulled before so the paint is already cut. I have noticed on that tank that the AN913-3D plug ALSO has a small blue stain around it. Since that tank will be off the plane we will be able to replace the square head with the "innie" head and properly seal it. We'll even be able to chase the threads if necessary so when I put that tank back on there will be no question as to its integrity.
 

Attachments

  • IMG_0228.jpeg
    IMG_0228.jpeg
    2 MB · Views: 119
  • IMG_0517.jpeg
    IMG_0517.jpeg
    2.3 MB · Views: 122
  • IMG_0520.jpeg
    IMG_0520.jpeg
    1.8 MB · Views: 119
  • IMG_7033.jpeg
    IMG_7033.jpeg
    1.3 MB · Views: 116
Always difficult to pinpoint the exact origin of the leak.
From the pictures it is hard to tell whether the leak stems from the threads or perhaps from a leak in the flange.
Since you mentioned fuel tank repair on the other wing, you'll probably need some proseal.
After cleaning the thread, I would use a generous helping of proseal on the plug threads as well as around the thread plug/intersection and seal it shut.
If you want to clean up the blue stain you'll need to use avgas, it will disolve the blue stain and clean it right up. MEK would be a good solution for final thread clean up before permanent installation with pro seal. The "innie" plug is just fine if it is easier to install and if you are concerned about removing the plug again some day in the future , it can be done without damaging the threads.
 
My guess is that there is a good chance that the leak is from the flange to skin interface and not the plug threads. It is certainly possible that they used an incompatible thread sealant and that was the cause, but NPT threads usually seal up pretty well with most any sealant and correct tightening, so this seems a bit less probable. That said, many builders treat NPTs like AN3's from a torque perspective and this WILL cause leaks. NPTs require slight thread deformation to work and therefore need a good amount of torque, especially when non PTFE sealants are used.
 
My guess is that there is a good chance that the leak is from the flange to skin interface and not the plug threads. It is certainly possible that they used an incompatible thread sealant and that was the cause, but NPT threads usually seal up pretty well with most any sealant and correct tightening, so this seems a bit less probable. That said, many builders treat NPTs like AN3's from a torque perspective and this WILL cause leaks. NPTs require slight thread deformation to work and therefore need a good amount of torque, especially when non PTFE sealants are used.
Or they used a straight thread fitting on an NPT flange and tried to seal it with thread sealer.
 
I have to agree with Larry. The leak stain looks more like it originated between the skin and the flange.
Looking at the rivet pattern of the flange, it appears to be a standard Vans drain flange and all of those are NPT, as are the plugs, both "innie and outie".
If you use pro seal as I explained, your leak will be sealed no matter where the leak came from.
 
So the original photos are up in post #1. One with the plug still installed and one after removal. Today I finally got back to the hangar with a brush and did my best to clean up the hole and threads. I didn't have MEK available but used some Acetone on cotton swaps to clean as much gunk away as I could. There is a difficult to remove dark gunk that goes from about 11 o'clock clockwise around to about 7 o'clock.

I'm attaching several photos of the after-cleanup. I'd appreciate further opinions... Is the cleanup sufficient? Do the threads look okay? Is the flange a primary suspect here? Etc.

If the flange is the problem do I just goop a lot of proseal all the way around the outer edge? Before inserting the plug or after?

I will never in my ownership need the use of this hole. I wish the tanks came from Vans without it, allowing for those who do need a return line (not many I imagine) to drill it and seal it themselves.

Again, I am not the builder and am a total newbee riding on a very steep learning curve right now. I want to do this correct, one time.

thanks.
91637459-8839-46BD-970D-1C50F3D32202_1_201_a.jpeg61FB0387-17D0-4067-A97C-6790328FD5B4_1_201_a.jpeg6EB048E0-3200-42E9-A661-4CFCC94DDE60_1_201_a.jpeg
 
Your threads look clean enough to install a plug.
As has been mentioned by more than one poster, your leak is most likely around the flange not the threads.
There is nothing wrong with installing a plug and seal it all up with proseal, especially if you never plan to open it again.
You must seal the area including the plug with a generous amount of sealant and before you do that it needs to be bare metal.
As I mentioned, avgas will clean up that blue stain and then scratch it up with a red scotch brite pad. Clean with acetone or MEK and seal it shut.
No need to remove the visible pro seal around the flange.
The return port is a very convenient feature on tanks delivered by Vans, quite simple to install when the tanks are open but very difficult when the tanks are sealed up.
+1

If you are a novice in this area, it is definitely worth the effort to attempt an external seal as described here. Sometimes it works and sometimes it doesn’t. Worse case, it doesn’t work, then cut open the tank.

Abrasion and cleaning are vital to this effort, so follow directions above.
 
I would use the hex socket NPT plug you mentioned. Seal it with Loctite 567. Clean up the area, scuff and wipe with acetone. Apply a uniform layer of proseal. Let it cure before filling with fuel. If you need to use the hole someday, it may be possible to use the hex hole to back the plug out, but it probably will open the proseal to leakage.
 
It looks like they have used Permatex on the original plug which does not do nearly as good of a job as some other sealant. If it was me, I would use Loctite 565 and wouldn't put too much force when putting in the plug back in. The threaded side is aluminum and there is not too much meat surrounding the thread. With NTP type thread, this could crack the insert (VA-141) if forced too far in. The alternative and more sure way is to use Proseal on the thread as a sealant. Both Proseal and Loctite are very good lubricants and that is what you need when installing a NTP they thread. With Proseal, even if the leak is from the flange, the Proseal should cover it and seal it but the downside is that it makes it semi permanent install.
 
It looks like they have used Permatex on the original plug which does not do nearly as good of a job as some other sealant. If it was me, I would use Loctite 565 and wouldn't put too much force when putting in the plug back in. The threaded side is aluminum and there is not too much meat surrounding the thread. With NTP type thread, this could crack the insert (VA-141) if forced too far in. The alternative and more sure way is to use Proseal on the thread as a sealant. Both Proseal and Loctite are very good lubricants and that is what you need when installing a NTP they thread. With Proseal, even if the leak is from the flange, the Proseal should cover it and seal it but the downside is that it makes it semi permanent install.
I REALLY like this solution, thanks!

This is what I will do. Seems like only a major modification (different engine/fuel system) would dictate the use of this hole and I do not forsee such an expense in the future I have with the airplane (unless i won a Deltahawk lottery).

If the leak continues after the ProSeal as thread sealer then I will clean and scuff around the plug and ProSeal the outside. Having never used ProSeal I did not know it was possible to screw in the plug with the sealant on the threads. Your solution really puts my mind at ease. Thanks.
 
Strip that paint well back from that hole.
Use a pick to clean every hint of exposed sealant around the opening.
Clean threads.
Clean & rough up the aluminum surface with scotch-brite.
Apply Proseal to plug threads & tighten in place.
Apply a smooth thick layer of Proseal over the whole area as well encapsulating the plug.
Let the repair cure for at least 4 days, a week would be better before you introduce any fuel in that tank.
You will probably get a couple years leak free with this repair before fuel seeping through the old leak site contaminates the new sealant from the inside out (turning it into goo) after which you will have to do a more thorough repair by cutting an access hole & resealing the tank inside surfaces.
 
If the leak continues after the ProSeal as thread sealer then I will clean and scuff around the plug and ProSeal the outside. Having never used ProSeal I did not know it was possible to screw in the plug with the sealant on the threads. Your solution really puts my mind at ease. Thanks.
I have used this method to repair the nearly exact same issue successfully.
 
Strip that paint well back from that hole.
Use a pick to clean every hint of exposed sealant around the opening.
Clean threads.
Clean & rough up the aluminum surface with scotch-brite.
Apply Proseal to plug threads & tighten in place.
Apply a smooth thick layer of Proseal over the whole area as well encapsulating the plug.
Let the repair cure for at least 4 days, a week would be better before you introduce any fuel in that tank.
You will probably get a couple years leak free with this repair before fuel seeping through the old leak site contaminates the new sealant from the inside out (turning it into goo) after which you will have to do a more thorough repair by cutting an access hole & resealing the tank inside surfaces.
+1

Your pic shows pretty clear evidence that the leak is not from the threads, but the flange/skin interface.
 
Much thanks everyone. I feel more confident in what to do now. I know the best option would be to pull the tank and repair from the inside. But the left tank is currently off and cut open for a small leak it had. I'd like to not cut the paint and remove this tank for a while.

Again, I really see no reason this hole (leak point) needed to be "standard" on these tanks. Let the (<20??) guys who need it drill a hole and install the flanges.
 
You will probably get a couple years leak free with this repair before fuel seeping through the old leak site contaminates the new sealant from the inside out (turning it into goo) after which you will have to do a more thorough repair by cutting an access hole & resealing the tank inside surfaces.
I agree with the rest of your suggestions but I see no reason why the cured pro seal would turn into goo after a couple of years??
It does not turn into goo inside the tanks or outside. It is a semi permanent fix with a 100% success rate.
In fact, you don't even need to make that plug "monster tight". Proseal will keep it from leaking and keep it in place.
Apply proseal to the plug , install and immediately follow up by sealing the plug/flange rib intersection with a generous helping of sealant.
I agree that the leak is between the rib and the flange, making this repair properly will be more important than what kind of thread sealant you'll apply.
 
If the original leak is in fact between the flange & skin, fuel will still migrate through (note the fuel stain, that's a pretty good leak) and that fuel will attack any new Proseal applied externally, hence my 2 year prediction.

Of the 20 or so tanks I've repaired (& actually dealing with 2 more this afternoon...), Proseal turning to 'goo' is the most common malady.
My theory is that if fuel has a chance to get through or under a layer of Proseal, the resulting chemical reaction turns it into goo.
My process is to open the tank up, remove all traces of sealant from the aluminum surfaces surrounding the leak area & at least 3" either side, create as perfect a working surface as I can & apply a generous new layer of sealant.

Second most common tank failure cause is not enough sealant was used originally.

& I advise the owns - I view tanks as 'ongoing maintenance items'! Working through access holes, you can't ever be sure the sealant bonding surfaces were absolutely clean and free of all traces of the old contaminated sealant & you definitely can't tell if there isn't more contaminated sealant along the riveted flanges that will react later, so be prepared to possibly finding a leak sometime in the future. Think Piper, Mooney & any other similarly built tanks & their issues.
 
Last edited:
The leak is not guaranteed to be from the flange, so nothing to lose by applying the proseal to the plug and try it. If that didn't work, one can move to a more drastic measure and seal it from the inside. But it would suck majorly to open it from the back if the problem wasn't from the flange.
 
Back
Top