Van's Air Force

The definitive Van's Aircraft support community! Buying, building or flying an RV? Join our exclusive family of mentors and enthusiasts!

Cowl front alignment 45-07 (Fiberglass)

I have read a bunch of threads and I’m still concerned I’m going to start sanding away fiberglass that I will need later.

I have some gaps by the center backplate sides of both half of the cowls. I am assume I am supposed to start relieving the area in my pointer finger to bring that together?

Here’s some photos.

I hate fiberglass
 

Attachments

  • IMG_3595.jpeg
    IMG_3595.jpeg
    1.7 MB · Views: 63
  • IMG_3596.jpeg
    IMG_3596.jpeg
    1.8 MB · Views: 63
  • IMG_3597.jpeg
    IMG_3597.jpeg
    1.8 MB · Views: 63
I focused on the outer edges, but it all will need some fixing before paint, so I’d just get it close and move on.
 
Your looks pretty close, I worked to get the two half’s even across horizontally.
 
If you move on, and start the fitting on the plane, you’ll see where to work better. Yes this part isn’t fun, on and off, sand, on and off sand a bit more, and on and on.
 
Don't worry about minor gaps till you have the cowls mounted and fitting the fuse and spinner. Once you're happy, apply heavy packing tape to the edges you don't want changed (top or bottom). Wax the tape. Apply a bead of flox and mount the cowl. Cure. It will fill the void. Then you can sand it purdy.
 
West Systems epoxy and some cotton floc can fill in those areas. Use some clear packaging tape with some mold release and you can fill in those areas when you get everything else fitted up. Right when it gets firm, I take a razor blade and or a thin piece of metal and create my separation line so it looks really tight. All cowlings are "bash to fit, paint to match". That's why a good fitting cowling takes a month or so to do and a very "tight" fitting cowling takes about two months. It really depends on how much you want to back fill gaps and cracks.
 
I remember around the spinner. All those surfaces needed to be thinned out, with nice tight radius's. Lot of excess FGlass in there.
 
I hate fiberglass

Doesn't matter. You still need to do it well, with detailed fit and finish. Very few painters will rebuild a badly fitted cowl, and it has an effect on resale....pretty paint on ugly glass.

Break.

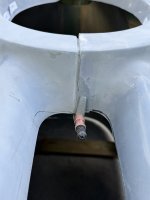
The problem you're having is caused by a trim here and a cut there without any real guidance. The glass, as removed from the crate, is just a template. Forget the scribe lines. Work from fundamental dimensions; trim and fit as necessary for a circle of the correct diameter with equal inlets. Flanges are wrong? Sometimes it's easier to just cut them off and add new flanges. Make sure you set the gaps wide enough, or you'll have paint chipping problems later. How wide? The minimum is the width of a hacksaw blade, but they can be 1/8" wide and still look good, the key being consistent width.

Cowl Initial Trim.jpg

Cowl Trim.JPG

Don't be afraid to jig parts into exact relationships. In this example, the cleco holes took about five minutes to fill with micro later. The jigging fixated gap width and equal surface plane so I could add a new full length flange on the inside.

Cowl Flange Jigging.jpg

Cowl Flange Layup.jpg


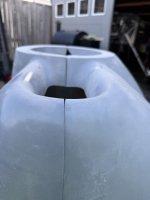
The depth of the inlets is up to you, but generally deeper is not better. A shorter bottom is fine, because you later bridge the gap between cowl and inlet ramp with rubber sheet, and more gap means the lower cowl is easier to remove and install. Shortening the upper cowl moves the ramps forward, reducing the pinch between the forward cylinders and the ramp.

Inlet Flange Trim.JPG


Sometimes the forward face isn't parallel to the spinner and backplate. After the cowl is entirely fitted and mounted, the flange face is easily corrected with some flox.


Spinner Gap.jpg

Spinner Gap Fill.jpg
 
Last edited:
Printing and saving Dan's info for later. Thanks Dan.
On my -7 project, almost all the cowl work was done in place around the engine.
Do the -14 plans have fitting work done off the plane?
Seems like a recipe for errors.
 
Printing and saving Dan's info for later. Thanks Dan.
On my -7 project, almost all the cowl work was done in place around the engine.
Do the -14 plans have fitting work done off the plane?
Seems like a recipe for errors.
The initial fitting steps call for the front halves of the cowl to be roughly matched while the cowl is on the ground sitting on a couple of 2.x 4s to help aft edge alignment. This is the step I am on now.

As others have pointed out the plans are working better as a guideline here, with some suggesting I start fitting my top cowl at this point and go to matching the lower cowl from there. There are a few ways to skin the cat.
I recommend following Dan's advise above and maybe also a shameless plug for using David Howe's EZ-Cowl jig and reading the Cowl Articles (3) in Kitplanes. Vans manual is not real clear on the cowl. You really don't want to cut or grind anything till you have at least some idea of how it fits on the airplane. The cowl jig really helps slide that thing exactly in place. Then you can see how the split may need to be adjusted.
I followed the manual and ended up needing to add material to make up for the cut off edge.
The bowl is an easy adjustment later.
Cowl Pt 2
Cowl Pt 3
 
Last edited:
Back
Top