Got a Service bulletin in my email today. I will be starting this part of the build soon, so nice that the SB came before I started. Now I have to get the kit.

Van's Air Force
You are using an out of date browser. It may not display this or other websites correctly.
You should upgrade or use an alternative browser.
You should upgrade or use an alternative browser.
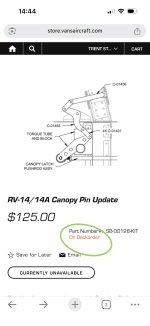
SB-00128 RV14 & 14A Side Canopy Pins Lengthened, and Rear Canopy‑Latch Pin Engagement Depth Increased
- Thread starter mstrauss
- Start date

I was able to order online.I checked the store and this is another one of their items where you are forced to call to order it. So weird.
Same.... pretty timely too since I'm working the canopy now.I was able to order online.
I just did as well. When I first got the email and checked, it wouldn't allow me to order online. Said to call. Oh well...glad the web store is working "correctly" now.I was able to order online.
Not anymore. It is now showing "Add to Cart". Just placed my order without calling.I checked the store and this is another one of their items where you are forced to call to order it. So weird.
Flight Chops
Member
This is interesting...
For the past few years I've been competing (at the Sportsman level) in the RV-14.
This past season I started to intermittently get the "canopy" CAS message occasionally during low G figures.
I actually found myself confirming the latch was in fact locked after kicking over during a hammerhead in September.
I assumed it had to be just an issue with the sensor...
I've either got better situational awareness to be able to notice this brief CAS message now during figures, or it is a newly developed problem over time.
The airplane now has about 100 hours of aerobatics. It passed a very thorough airframe inspection in January.
I searched briefly to see if I could find the "plans" for what this modification would require, but wasn't successful
- if anyone has more insights on that, please share.
Hi Steve - love your videos. I can see the plans here: https://www.vansaircraft.com/service-information-and-revisions/sb-00128/This is interesting...
For the past few years I've been competing (at the Sportsman level) in the RV-14.
This past season I started to intermittently get the "canopy" CAS message occasionally during low G figures.
I actually found myself confirming the latch was in fact locked after kicking over during a hammerhead in September.
I assumed it had to be just an issue with the sensor...
I've either got better situational awareness to be able to notice this brief CAS message now during figures, or it is a newly developed problem over time.
The airplane now has about 100 hours of aerobatics. It passed a very thorough airframe inspection in January.
I searched briefly to see if I could find the "plans" for what this modification would require, but wasn't successful
- if anyone has more insights on that, please share.
Flight Chops
Member
Thanks!Hi Steve - love your videos. I can see the plans here: https://www.vansaircraft.com/service-information-and-revisions/sb-00128/

EDIT:
I am currently distracted with other work, so haven't studied the plans in detail yet, but at a glance this looks to be the start to finish assuming building a canopy from zero.
I'm curious to learn what the "modification" to an existing / installed canopy process is.
Last edited:
funny that you mention it. I have also had "canopy" CAS message occasionally during turbulent rides. not doing aerobatics. I also thought it was an issue with the sensor. I repositioned the sensor and so far no issues. but haven't had a lot of turbulent flights recently...This is interesting...
For the past few years I've been competing (at the Sportsman level) in the RV-14.
This past season I started to intermittently get the "canopy" CAS message occasionally during low G figures.
I actually found myself confirming the latch was in fact locked after kicking over during a hammerhead in September.
I assumed it had to be just an issue with the sensor...
I've either got better situational awareness to be able to notice this brief CAS message now during figures, or it is a newly developed problem over time.
The airplane now has about 100 hours of aerobatics. It passed a very thorough airframe inspection in January.
I searched briefly to see if I could find the "plans" for what this modification would require, but wasn't successful
- if anyone has more insights on that, please share.
I think it is a modification guide - the first two steps start with "remove". I wish they'd provide both though - if your haven't built the thing the SB is talking about, it can be difficult to figure what you're supposed to do differently. Maybe not for this one, but I know the one about aileron attach brackets was confusing.Thanks!
EDIT:
I am currently distracted with other work, so haven't studied the plans in detail yet, but at a glance this looks to be the start to finish assuming building a canopy from zero.
I'm curious to learn what the "modification" to an existing / installed canopy process is.
Edit: Also not thrilled at having to pay $125 to replace parts that I haven't even used yet.
It shoudl be a pretty simple modification, taking an afternoon (easier if you do not have the rear window installed). Some of those bolts are a pain to get to, but none are impossible.
It's only a couple dozen rivets, and 4 holes to be enlarged. I think it will take more time for shipping of the parts, than the modificaiton.
Gregmarlow
Well Known Member
Okay!? Who did this? Who over g'd the plane and is causing this pain?
Mikejetstream
Member
I too have ordered the parts to undertake the actions of the SB. However, with the aftermarket latch installed I have had no indication of pin release in either aerobatics, recovery from VNE or flight in moderate turbulence. The discrete canopy warning is set up to be sensitive on the ground and has not activated in flight. My question is what is aggressive aerobatics or aggressive recovery? I do not undertake any flick or pronounced -ve g manoeuvres. In my aerobatic approval testing I did not go beyond 5g or -ve 2g! and up to 2 rotation spin recovery at mid c of g.. Beyond this: In the UK this part of the additional envelope was undertaken by a fully qualified test pilot?
Shows currently unavailable on Vans website.
I emailed them, and they added them to my cart. I have paid them, but they are showing as “backordered” so who knows how long before they get sent.Shows currently unavailable on Vans website.
i ordered my SB kit the first day i got the email. I received my kit in the mail today. You have to drop the bearing blocks holding the cross shaft to replace the parts. It is hard to get hands and wrenches in there. I remember saying to myself when I installed the system "I'm glad I won't have to do this again"!
I ordered mine on Friday ( day email was sent) also. They sent the kit out via USPS also. USPS is playing pool with my shipment. It’s just bouncing around Oregon and California via Globalpost( whoever they are). Hopefully USPS will receive my shipment today and provide me with a delivery date.i ordered my SB kit the first day i got the email. I received my kit in the mail today. You have to drop the bearing blocks holding the cross shaft to replace the parts. It is hard to get hands and wrenches in there. I remember saying to myself when I installed the system "I'm glad I won't have to do this again"!
USPS out from Van’s is always the same shipping to Canada ( might be different domestically), it takes longer to get it to the border in Washington state than to ship across the continent. Oh well, we’re having a long winter.
That didn’t take long. They really shouldn’t send out an SB until they have parts to supply all the flying aeroplanes plus a good portion of the kit numbers being built.
I'd rather know about a safety issue ASAP and have to wait for parts, then something happen to someone because the manufacturer was just waiting to share when they had gobs of parts.
I was told about this problem by a Van's employee at the Van's booth at Oshkosh last year. When it didn't happen for several months, I figured he was mistaken or Van's decided it wasn't an issue.
If they knew about this in July of 2025, why would they take so long to publish the SB? An argument can be made that they didn't want to put it out there until they had a fix, but from a safety standpoint, why wait unless profit is more important than safety?
Now, they come out with a Service Bulletin and the part/kit sells out in 1 day?
This is not good business.
UghI was told about this problem by a Van's employee at the Van's booth at Oshkosh last year. When it didn't happen for several months, I figured he was mistaken or Van's decided it wasn't an issue.
If they knew about this in July of 2025, why would they take so long to publish the SB? An argument can be made that they didn't want to put it out there until they had a fix, but from a safety standpoint, why wait unless profit is more important than safety?
Now, they come out with a Service Bulletin and the part/kit sells out in 1 day?
This is not good business.
When I made the web order for the backordered parts they charged me $144 for the SB parts plus some pull rivets. They never quoted me shipping only “cheapest”.
Today I get an email saying my card declined for $187 of shipping! On $144 of parts, which I’m betting are TINY!
I’m glad I didn’t have much left in the USD account or they would have charged me without asking me first.
This is their issue with their design. I was a bit miffed that these parts were not supplied free to builders - the builders did not cause this - but said nothing and paid for it in good faith. But $187 of shipping is a real slap in the face. At work, with a Canadian aeroplane manufacturer, the SB parts are always free - they even cover some of the labour.
That makes this “problem” a $500 fix in my currency. The same as a dishwasher.
For reference, a 4lbs envelope is $32.
IMHO the parts for this should be free - with the builder paying shipping. But a reasonable rate for the shipping, not FedEx Sterling.
Attachments


Gregmarlow
Well Known Member
What caused this sb is what I want to know. Did anyone ever lose their canopy? I don't see how that's possible even if these pins weren't even there. I think someone needed to adjust the sensor.I was told about this problem by a Van's employee at the Van's booth at Oshkosh last year. When it didn't happen for several months, I figured he was mistaken or Van's decided it wasn't an issue.
If they knew about this in July of 2025, why would they take so long to publish the SB? An argument can be made that they didn't want to put it out there until they had a fix, but from a safety standpoint, why wait unless profit is more important than safety?
Now, they come out with a Service Bulletin and the part/kit sells out in 1 day?
This is not good business.
.jpeg")
.jpeg")
I started doing this SB today. You will drill out a total of 16 rivets, 4 per canopy side pin, 2 pull rivets per side pin sill plate, and 4 for the new switch mount brackets. The side pins and switch brackets are easily accessible and straight forward. Moving to the back, there's a lot to disassemble and many of the bolts and screws you thought you would never need to remove need to be removed, it's a pain.
There is also a discrepancy between the original canopy plans and this SB. Figure 12 of the SB shows reassembly of the rear canopy pin assembly and shows a washer on the clevis pins before the cotter pins, and the washers are not in the parts that come with the SB. The original plans do not have any washers in this location. Also, if you do add a washer, the clevis pin becomes too tight and binds on the links, reassembly without the washer works just fine and freely.
Clrd4apprch
Member
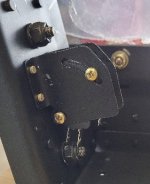
I also started mine yesterday. I don't see how the micro switch is supposed to fit and work? The wire pins hit the nut which is conveniently not shown in Fig. 14. Were you able to make it work? If so, how?View attachment 113600View attachment 113601
I started doing this SB today. You will drill out a total of 16 rivets, 4 per canopy side pin, 2 pull rivets per side pin sill plate, and 4 for the new switch mount brackets. The side pins and switch brackets are easily accessible and straight forward. Moving to the back, there's a lot to disassemble and many of the bolts and screws you thought you would never need to remove need to be removed, it's a pain.
Also, I was sent the wrong pull rivets, they were not CS4-4.
I haven't finished the rear pins yet but I also see that interference with the switch terminal. I was going to wait until rear pins are done to see where the switch needs to be but much of the travel will cause interference with that nut.I also started mine yesterday. I don't see how the micro switch is supposed to fit and work? The wire pins hit the nut which is conveniently not shown in Fig. 14. Were you able to make it work? If so, how?
Also, I was sent the wrong pull rivets, they were not CS4-4.
What's the community consensus here on already built airplanes that are not flow in aerobatics? I'm strongly considering skipping this since we've never seen a canopy latch annunciation in flight.
I guess this is not about consensus. The Service Bulletin has its restrictions if not complied with for not only aerobatics but also cruise speed.. As long as you comply with the restrictions, you would be okay. but limited.What's the community consensus here on already built airplanes that are not flow in aerobatics? I'm strongly considering skipping this since we've never seen a canopy latch annunciation in flight.
If folks aren't aware, Service Bulletins are not mandatory for compliance in the USA, even on certificated aircraft. EAB's certainly not, so it is the builder/owner's job to evaluate and comply or not as they see fit. Vans language is most likely written by a lawyerI guess this is not about consensus. The Service Bulletin has its restrictions if not complied with for not only aerobatics but also cruise speed.. As long as you comply with the restrictions, you would be okay. but limited.
")
This is not to suggest I'm telling anyone not to do this SB, just what the rules require.
-G
I can definitively say, there is zero reason not to do the available SB's on an unbuilt kit.I know how I would feel if I chose not to do the SB and someone got hurt because of a canopy unlatching event. Haven’t received my kit yet but everything is disassembled ready for it. Hopefully it will show up next week.
Almost finished the SB, Additional notes, the canopy latch pushrod will need to be adjusted for the new length rear pins, they stick out when retracted and won't let you close the canopy . Next, expect the pins to not fit into the canopy itself. Mine wouldn't move very far into the canopy so I removed the black nylon pin blocks on the rear of the canopy and just ran the pins without the blocks to check interference. The instructions mentions that you may need to file the canopy holes some to fit the pins since they travel much deeper into the canopy itself, and you will need to do this. Hopefully all I have left is to make this adjustment and set up the switch placement and it will be done, but not happening today. (Let me add that the pin blocks have to be reinstalled when the canopy holes are opened slightly, the way it reads implies I just took them off for good)
Last edited:
I haven't completed my install yet, still sanding and painting parts, but I can say that the new side pins do fit with the Classic Aero interior. I also received the incorrect pull rivets with my kit so you might want to source the four CS4-4 rivets if you don't already have some laying around.
Juliette
Juliette
Thanks for letting us know about classic aero interior integration!I haven't completed my install yet, still sanding and painting parts, but I can say that the new side pins do fit with the Classic Aero interior. I also received the incorrect pull rivets with my kit so you might want to source the four CS4-4 rivets if you don't already have some laying around.
Juliette
I don't plan to implement this bulletin. As the manufacturer of the plane, I don't think it's necessary. It looks like a revenue enhancement project for VansWhat's the community consensus here on already built airplanes that are not flow in aerobatics? I'm strongly considering skipping this since we've never seen a canopy latch annunciation in flight.
Clrd4apprch
Member
I finished mine yesterday except the position of the mini switch. Were you able to get it to work with the pins hitting the nut?Almost finished the SB, Additional notes, the canopy latch pushrod will need to be adjusted for the new length rear pins, they stick out when retracted and won't let you close the canopy . Next, expect the pins to not fit into the canopy itself. Mine wouldn't move very far into the canopy so I removed the black nylon pin blocks on the rear of the canopy and just ran the pins without the blocks to check interference. The instructions mentions that you may need to file the canopy holes some to fit the pins since they travel much deeper into the canopy itself, and you will need to do this. Hopefully all I have left is to make this adjustment and set up the switch placement and it will be done, but not happening today.
Clrd4apprch
Member
Almost finished the SB, Additional notes, the canopy latch pushrod will need to be adjusted for the new length rear pins, they stick out when retracted and won't let you close the canopy . Next, expect the pins to not fit into the canopy itself. Mine wouldn't move very far into the canopy so I removed the black nylon pin blocks on the rear of the canopy and just ran the pins without the blocks to check interference. The instructions mentions that you may need to file the canopy holes some to fit the pins since they travel much deeper into the canopy itself, and you will need to do this. Hopefully all I have left is to make this adjustment and set up the switch placement and it will be done, but not happening today.
Were you able to get the wires attached and working with the nut in the way?
Attachments
I did notice the diagram for adjusting the switch shows the aft connecting tab (unused) trimmed off so it doesn't hit the nut. I'll revisit when I get back to the hangar later this week. I still need to file the holes a bit first.Were you able to get the wires attached and working with the nut in the way?
Finished the SB and signed off now. To finish up, the holes in the canopy need to be opened up slightly so the rear pins can move their full travel forward. The switch is pretty simple once everything else is done, the rear switch terminal needs to be removed for clearance as it will interfere with the nut behind it. This terminal is for operating the switch in "normally closed" operation and isn't used anyways. The switch in the final position is close to mid point in the mounting arc so there is plenty of adjustment either direction.
Trim off the rear terminal, it's not needed anyways. Bend the remaining tabs forward slightly for better clearance and shrink wrap the installed connectors.Were you able to get the wires attached and working with the nut in the way?
Finished mine yesterday. Many ugly words were said while removing all those cotter pins. Regarding the "5-hours" labor required, my response is a great big eye-roll. I wish I could work as fast as Vans believes I can.
1. On step 5 the instructions omit the requirement to remove the canopy pin block on the left side. This is required to drill out the four rivets holding the switch brackets. Minor omission.
2. The original plans (section 38, page 38-05 step 12) instructions mention to not fully torque the bolts on the the canopy latch torque tube blocks. Probably obvious but not mentioned in the SB instructions.
3. I failed to compare how freely the new locking pins moved in the roll bar holes (compare to the old ones) before installing the afore-mentioned cotter pins. The left side was tight which required removing the new canopy pin to file the forward hole. More ugly words. Lesson learned was to make sure the canopy pin doesn't bind in the roll bar before fully installing the new cotter pins.
4. Canopy locking pin on the left side was also tight in canopy holes. Minor filing fixed those up. Right side worked perfectly.
5. Same issue with the canopy switch that others mentioned. I did not remove the rear tab. Just bent them all enough the clear the pin block bolt.
6. I also got four regular LP-4 pulled rivets. Fortunately I had some of the CS variety.
I’m guessing Van’s isn’t accounting for deburring, sanding, priming and painting the new parts. ( I did that today). I’m not done yet, s.s. parts are installed, aluminum parts are primed and I’m estimating another 5 hours to completion.Finished mine yesterday. Many ugly words were said while removing all those cotter pins. Regarding the "5-hours" labor required, my response is a great big eye-roll. I wish I could work as fast as Vans believes I can.
1. On step 5 the instructions omit the requirement to remove the canopy pin block on the left side. This is required to drill out the four rivets holding the switch brackets. Minor omission.
2. The original plans (section 38, page 38-05 step 12) instructions mention to not fully torque the bolts on the the canopy latch torque tube blocks. Probably obvious but not mentioned in the SB instructions.
3. I failed to compare how freely the new locking pins moved in the roll bar holes (compare to the old ones) before installing the afore-mentioned cotter pins. The left side was tight which required removing the new canopy pin to file the forward hole. More ugly words. Lesson learned was to make sure the canopy pin doesn't bind in the roll bar before fully installing the new cotter pins.
4. Canopy locking pin on the left side was also tight in canopy holes. Minor filing fixed those up. Right side worked perfectly.
5. Same issue with the canopy switch that others mentioned. I did not remove the rear tab. Just bent them all enough the clear the pin block bolt.
6. I also got four regular LP-4 pulled rivets. Fortunately I had some of the CS variety.

