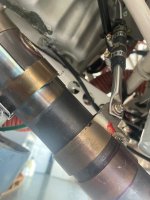
An exhaust system that is not well supported to the engine will tend to crack at the cylinder flanges.
(The entire weight of the system is being supported by the small flange welds).
‘Excercising’ the ball joints excessively will definitely tend to wear them quicker.
I agree
A properly designed exhaust installation should have the entire system connected to and moving with the engine.
This is the only way to minimize induced stress and wear.
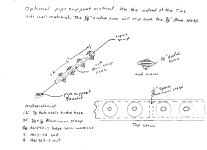
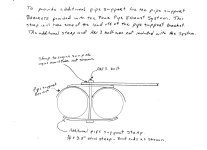
In the early years of Vetterman exhaust production, the only purpose of the ball joints was to have some adjustment factor designed into the system to allow the outlet pipes exit out of the cowling to be optimized.
During a visit to Vans, Larry V. saw the support system design using the metal tube segments I had come up with, on the new prototype RV-8, and liked the adjustability it provided. Apparently enough, that he incorporated into his exhaust kits and provided instructions showing all the exhaust supports attached to the engine.
For some reason many years later, a change was made to recommending the supports be attached to the engine mount.
In my opinion this is a very bad idea.
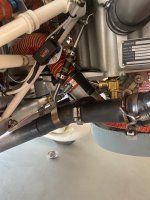
If the mounts themselves survive, it likely will lead to the ball joints becoming worn, and if that wear is allowed to become excessive enough, it could possibly result in a failure such as occurred here
I wish we new more details about how the exhaust was suspended on this accident airplane.
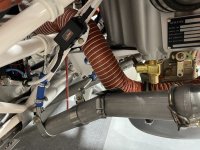
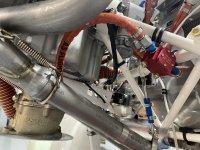
There is not enough evidence in the docket photos to say with any certainty, but there is one clamp attached to an engine mount tube in a location that would be typical if the exhaust was supported from the mount, but it is not obvious in the photo what was actually attached at that point.
None of the engine sump bolts that are typically used for attachment of exhaust supports, appear to have any brackets, so I think there is at least some evidence to indicate that the exit pipes were supported by attachment to the engine mount.
I know people will say that the ball joints should be lubricated regularly with mouse milk, etc.
This would slow down the wear problem, but supporting from the engine mount is still a poor choice in my opinion. If nothing else, because there is typically a much higher rate of failure of the supports themselves, requiring constant inspection and repair.


 It's the only reason I learned to fly - so I could look cool in a flight suit, and get all the girls!
")
 the way Vetterman recommended hanging his 4-pipe exhaust for the RV-4! (Granted that was YEARS ago!) Logic would tell one that the ENGINE moves independently from the ENGINE MOUNT and if you want to break an exhaust system, suspend it from something ridged, like the engine mount!! And that


 From the original exhaust kit issued in....what 1992?.....by High Country. Also quite unambiguous....except for the attaching it 'to the engine pan or airframe' part in the letter. Mine are attached to the oil pan bolts as per the plans.... Which, again, to me makes more sense as the exhaust support system is moving with the engine. But I digress.......