I’m wanting to install a second battery on the firewall.
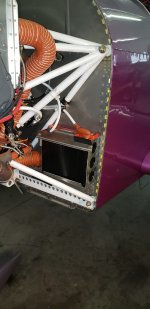
The best location I can find is above the left hand firewall pass through (above the battery and starter contactor location). Behind this location is the big rib where the canopy gas struts mount.
I looked at using the earth x battery box but this is not going to work here - the battery needs to slide out of that vertically, and it will hit the firewall flanges. The battery needs to tip forward to get out.
So I think the best bet is to mount a Van’s battery box, but since there is a bend in the firewall at the top, mount it using 4 or 6 x an3 bolts into nutplates on a doubler on the aft side. I can align a bit of angle against the firewall, and rivet this at an angle on to the battery box to deal with the angle change in the e firewall.
What is everyone’s opinion of this location? Is it too close to the top cowl?
I could potentially move it lower if I relocated and blanked off the existing pass through (which is doable).
Thanks in advance. Any pics of where others have put their second batteries would be very helpful.
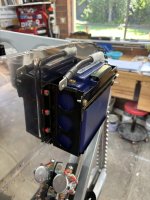
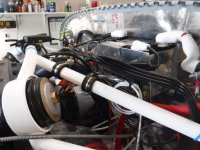
This is an overall location pic - I’ve measured and there will be about an inch between the front of the battery box and the engine mount, at the closest (outboard) point.

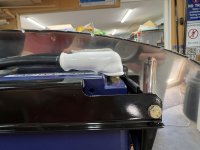
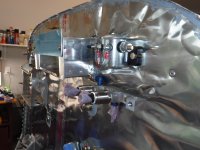
This shows the distance from the lug to the cowl / hinges / flanges. The lug on this side will be negative. I could potentially also use one of the 90 degree lugs here and have the cable come off the front? (Not sure if this would interfere with the hold down bar).


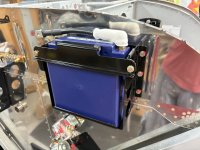
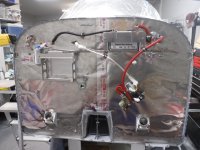
This shows how low I can go without having to move the existing firewall pass through (which I can do if need be):

This shows the angle created due to the bend in the firewall top

I would use a bit of angle like this - riveted to the battery box and bolted into nutplates / doublers on the back side.

There is even the potential to put a relief cut in the angle, and bend it to allow a bolt to go through the cross-bar underneath the bend where the firewall sheets join. But I think this is probably overkill?

The best location I can find is above the left hand firewall pass through (above the battery and starter contactor location). Behind this location is the big rib where the canopy gas struts mount.
I looked at using the earth x battery box but this is not going to work here - the battery needs to slide out of that vertically, and it will hit the firewall flanges. The battery needs to tip forward to get out.
So I think the best bet is to mount a Van’s battery box, but since there is a bend in the firewall at the top, mount it using 4 or 6 x an3 bolts into nutplates on a doubler on the aft side. I can align a bit of angle against the firewall, and rivet this at an angle on to the battery box to deal with the angle change in the e firewall.
What is everyone’s opinion of this location? Is it too close to the top cowl?
I could potentially move it lower if I relocated and blanked off the existing pass through (which is doable).
Thanks in advance. Any pics of where others have put their second batteries would be very helpful.
This is an overall location pic - I’ve measured and there will be about an inch between the front of the battery box and the engine mount, at the closest (outboard) point.
This shows the distance from the lug to the cowl / hinges / flanges. The lug on this side will be negative. I could potentially also use one of the 90 degree lugs here and have the cable come off the front? (Not sure if this would interfere with the hold down bar).
This shows how low I can go without having to move the existing firewall pass through (which I can do if need be):
This shows the angle created due to the bend in the firewall top
I would use a bit of angle like this - riveted to the battery box and bolted into nutplates / doublers on the back side.
There is even the potential to put a relief cut in the angle, and bend it to allow a bolt to go through the cross-bar underneath the bend where the firewall sheets join. But I think this is probably overkill?
Last edited:


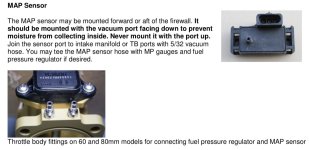
 Somehow, I doubt moisture is an issue with temps operating in the 160 F (20 mins after engine shutdown) range plus a blast tube. To date over 700 hrs. and 6 years no issues with these sensors. (Checked every run-up preflight)