

Good Day All!
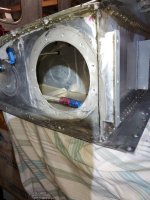
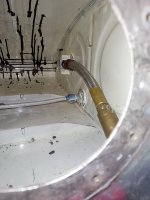
My 1982/88 RV-4 developed a fuel leak in the LH tank at the Sump and near the Forward attach point. Skipping the interesting bits, we were able to remove the tank and confirm the location of the fuel leaks via the ballon/bubble test. I removed the Fuel sending unit cover panel, stuck a borescope and located a literal hole in the sealant exactly at the spot where the leak was evidenced near the FWD attach point. I scraped away the bad sealant, and now I’m ready to apply my B2 to the spots needing attention.
[REQUEST]
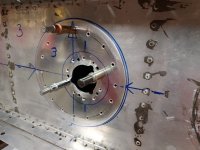
The Sump re-seal is a no brainer and should be extraordinarily easy to fix due to accessibility. But the FWD attach point internal to the tank is more tricky, as I’m doing this through the sender access hole. What are the best ways to get sealant to the location? My main limitation is that I would be limited to applying via feel, one dab at a time. How do I keep the mess down? Should I apply copious amounts of masking tape to areas I dont want to seal.
Appreciate any assistance.
My 1982/88 RV-4 developed a fuel leak in the LH tank at the Sump and near the Forward attach point. Skipping the interesting bits, we were able to remove the tank and confirm the location of the fuel leaks via the ballon/bubble test. I removed the Fuel sending unit cover panel, stuck a borescope and located a literal hole in the sealant exactly at the spot where the leak was evidenced near the FWD attach point. I scraped away the bad sealant, and now I’m ready to apply my B2 to the spots needing attention.
[REQUEST]
The Sump re-seal is a no brainer and should be extraordinarily easy to fix due to accessibility. But the FWD attach point internal to the tank is more tricky, as I’m doing this through the sender access hole. What are the best ways to get sealant to the location? My main limitation is that I would be limited to applying via feel, one dab at a time. How do I keep the mess down? Should I apply copious amounts of masking tape to areas I dont want to seal.
Appreciate any assistance.


")
