
Van's Air Force
You are using an out of date browser. It may not display this or other websites correctly.
You should upgrade or use an alternative browser.
You should upgrade or use an alternative browser.
Static port proud of skin
- Thread starter Blain
- Start date

This is the correct static port. Leave it alone.
Carl
Carl
I Replaced the open rivet with ports from another project. I think its from Cleveland. Didnt think about skin thickness when I installed it.This is the correct static port. Leave it alone.
Carl
I thought the Cleveland port sat fairly flush? (When properly installed and skin thickness was within design parameters)I Replaced the open rivet with ports from another project. I think its from Cleveland. Didnt think about skin thickness when I installed it.
I'm not sure why this becomes so complicated and random for a vital instrument.

Last edited:
I thought the Cleveland port sat fairly flush? (When properly installed and skin thickness was within design parameters)
I'm not sure why this becomes so complicated and random for a vital instrument.
View attachment 100539
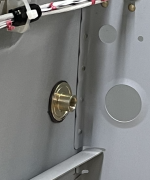
Yes I agree. If it’s the Cleveland version then it should look like this.
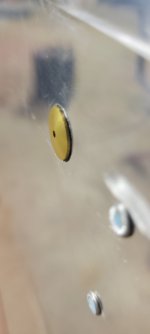
IMHO a 032 square edge protruding will be inaccurate. Maybe a little. Maybe a lot.
Port is .032” proud. Should I blend a ramp around it or does it matter?
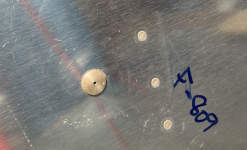
I think mine are about like yours. I did not try to blend them in. This is what mine look like on the inside. Are yours the same? Mine is not flying yet. But, I've been told this is the correct way to install them.
Attachments
It's not what the inside looks like it's the outside. Pics? This is NOT a Cleveland static port. Whose static port is this? Cleveland, Flyboys or a rivet all ok. Why do we complicate this simple and important function?I think mine are about like yours. I did not try to blend them in. This is what mine look like on the inside. Are yours the same? Mine is not flying yet. But, I've been told this is the correct way to install them.
Last edited:
Tbh I don’t think the OPs ports are Cleveland’s. They remind me of someone else’s from another post a while back that had them stuck on the exterior of the fuse.
They too were anodized gold and designed for a much thicker skin - perhaps even a composite skin.
They too were anodized gold and designed for a much thicker skin - perhaps even a composite skin.
There is a style of static port that frequently gets installed, incorrectly, from the outside. It has caused severe problems with airspeed calibration. My pic was mean to assure the OP that if the inside looks like mine, they are installed correctly IMHO. But, whatever! That's why they call it "Experimental Aviation" after all.It's not what the inside looks like it's the outside. Pics? This is NOT a Cleveland static port. Whose static port is this? Cleveland, Flyboys or a rivet all ok. Why do we complicate this simple and important function?
Attachments
Yes, no question about the install. I bought Cleveland once but I can’t say for sure if these came from them. Maybe these were for composite. I think I’ll blend these in so there won’t be a question about the accuracy. Still better then vinyl tubing glued to a hollow rivet.
Thousands out there per plans and no issues. Sometimes simple is better.Still better than vinyl tubing glued to a hollow rivet.
How does “blending” the shape of an incorrectly made part, to try and make it mimic a correctly made part, guarantee that there won’t be any question about the accuracy????I think I’ll blend these in so there won’t be a question about the accuracy. Still better then vinyl tubing glued to a hollow rivet.
The blind rivet with vinyl tubing might seem stupid….. but there is no question about the accuracy

An incorrect port installed correctly is just as bad as the correct port installed incorrectly.
Both cases are still surprisingly common.
I understand why people got it wrong or decided to experiment 20y ago. But after 11,000 of them flying there should be no debate about static ports on RVs.
If I was you I’d check the hole diameter. If it’s 1/2” then just remove what you’ve got and stick the right one in. Will be the best $50 and 20min you’ll ever spend.
Of the "thousands" of RVs out there with the 3 most common types of static ports (BSLF Rivet, Cleaveland, Showplanes), and the half-dozen or so different versions of screwed up installations of the former, I submit that a very small number of any of them have actually done the flight testing to determine the accuracy of the static system. A 14 CFR 91.411, 43 Appendix E inspection will NOT find non-optimal location or shape errors in the static system.
...It's perfect -- I followed the plans...
Good for you, did the plans consider 3+ coats of paint over/around the port? Might explain why your new RV with a tricked out IO-390 only turns in 165Ktas....
...Ok, I admit, I screwed up -- how bad is it?
Google search "4 Leg GPS Static Calibration". You'll find more than a few links on this subject. Go collect some data and make adjustments thusly.
...Why deviate from the plans?...
The Van's Static Port kit is cost effective, not stupid, but a bit of a kludge, I don't recommend it (ed. who cares, I know...I know...). The good thing out of their static kit is the shape of the BSLF rivet and transition profile from the plateau to the orifice. As we've seen in other threads, the vinyl tubing seems prone to failure, the attachment of the rivet tail to vinyl tubing takes a set and leaks, and, more recently, can allow mold growth (...eeewwww...Sidebar: another way mushrooms can kill you...).
The Showplanes and Cleaveland ports are excellent and allow for a more leak proof/age proof plumbing installation. However, after tinkering with both, do not get married the final mounting position. Both versions needed shimming (.016" - .032") on my RV-7 projects due to paint thickness.
Didn't mean to offend, just there a probably several types of static ports that look like this from the inside but are incorrectly made or installed so need to see what is on the outside. I also have seen the Cleveland static with the hole cut to large with the middle ring protruding through which is better as you pointed out mounting the entire port on the outside.There is a style of static port that frequently gets installed, incorrectly, from the outside. It has caused severe problems with airspeed calibration. My pic was mean to assure the OP that if the inside looks like mine, they are installed correctly IMHO. But, whatever! That's why they call it "Experimental Aviation" after all.
Last edited:
Wow, this looks like primer wars.
Scott, I understand what you point out about blending it in might not produce accurate results. Scratch that plan. I did some searching for replacements and realized these were probably from a Dynon kit I purchased for a previous project. Problem is their literature doesn’t give a protrusion dimension. I used a similar port on my -8 that was flush but have no idea where it came from.
Yes we call it experimental but making an upgrade from the factory design shouldnt be looked at as some kind of dangerous excursion from the plans. Vans builds light and inexpensive which they certainly did in this case. I’m willing to invest a few bucks to make the improvement.
So, where am I going to find a replacement with the correct protrusion?
Yup, that’s what mine are.I think mine are about like yours. I did not try to blend them in. This is what mine look like on the inside. Are yours the same? Mine is not flying yet. But, I've been told this is the correct way to install them.
I didn’t mean to imply that I think everyone should use the pop rivet and vinyl tubing (even though it does work well and is reliable if actually installed per the instructions….. all of the ones I have ever seen details of the failure weren’t).Wow, this looks like primer wars.
Scott, I understand what you point out about blending it in might not produce accurate results. Scratch that plan. I did some searching for replacements and realized these were probably from a Dynon kit I purchased for a previous project. Problem is their literature doesn’t give a protrusion dimension. I used a similar port on my -8 that was flush but have no idea where it came from.
Yes we call it experimental but making an upgrade from the factory design shouldnt be looked at as some kind of dangerous excursion from the plans. Vans builds light and inexpensive which they certainly did in this case. I’m willing to invest a few bucks to make the improvement.
So, where am I going to find a replacement with the correct protrusion?
But if I had a dollar for every alternative used that isn’t accurate…

Unfortunately the trap that many RV builders get caught in…. If it is more expensive and looks more high tech than what Vanss supplied, it must bet a lot better right?
Some times it is….. and some times it isn’t.
This particular part happens to be one that is a huge pain to correct once you finally have the answer to that question.

Is the Avery port one of the ones that will give accurate readings? https://www.aircraftspruce.com/catalog/avpages/averyefistoolkit.php?clickkey=3199067
Is the Avery port one of the ones that will give accurate readings? https://www.aircraftspruce.com/catalog/avpages/averyefistoolkit.php?clickkey=3199067
No. I had them on my 7 and they were 10kts off. Ended up making them flush to the skin and drilling them out for the Vans rivet, which I installed with a little tank sealant and a slight pull on the rivet and then punched out the stem. Accurate after this with the benefit of a nice threaded boss for the fitting to attach the tubing.
What Al ^ said.No. I had them on my 7 and they were 10kts off. Ended up making them flush to the skin and drilling them out for the Vans rivet, which I installed with a little tank sealant and a slight pull on the rivet and then punched out the stem. Accurate after this with the benefit of a nice threaded boss for the fitting to attach the tubing.
Install the fancy flange inside. Drill for the Vans rivet. Assemble with a little proseal to insure against leakage. Best of both worlds. Accurate static port with NPT fitting for plumbing.
Location probably more important than port design. Great article in Kitplanes discusses this.
Thanks, that's my article! https://www.kitplanes.com/static-port-location-and-altitude-calibration/
And I agree with [B]bjdecker[/B] post 15, most folks probably have no idea how accurate their static system really is. Regarding the Cleveland ports, they will be accurate if installed the right way - edges flush with the skin on the outside - and in the right place, i.e. where the in flight surface static pressure is neutral, i.e. on the line that marks the transition from higher pressure to lower pressure along the side of the fuselage. Where vertically on that line they are also plays into the accuracy v.s. speed, although not as critical if close to the middle vertically.
The Cleveland ports have an approx. 1/16th step which works conveniently with composite skin, mounting from the inside, but requires some inside shimming for aluminum. The critical factor is location, and for all we know the Van's prescribed locations are in fact optimal, but I've never seen any testing data (has anyone, is it out there?) that confirms it. In the certified world, the effort and testing to determine static port location is elaborate and makes the Van's locations seem a bit cavalier without any data. In the article I described a method by which you can do your own test to zero in on an optimal static port location. The ideal would be to start out with a surface pressure simulation, which might actually be out there for some of the Van's planes.
In any case I would suggest it's a good idea to do some test flights to see how accurate your altitudes and speeds really are. The methods I used are in the article (mostly using outstanding spreadsheets devised by Kevin Horton.)
Great article. I remember reading it when you wrote it.Thanks, that's my article! https://www.kitplanes.com/static-port-location-and-altitude-calibration/
And I agree with [B]bjdecker[/B] post 15, most folks probably have no idea how accurate their static system really is. Regarding the Cleveland ports, they will be accurate if installed the right way - edges flush with the skin on the outside - and in the right place, i.e. where the in flight surface static pressure is neutral, i.e. on the line that marks the transition from higher pressure to lower pressure along the side of the fuselage. Where vertically on that line they are also plays into the accuracy v.s. speed, although not as critical if close to the middle vertically.
The Cleveland ports have an approx. 1/16th step which works conveniently with composite skin, mounting from the inside, but requires some inside shimming for aluminum. The critical factor is location, and for all we know the Van's prescribed locations are in fact optimal, but I've never seen any testing data (has anyone, is it out there?) that confirms it. In the certified world, the effort and testing to determine static port location is elaborate and makes the Van's locations seem a bit cavalier without any data. In the article I described a method by which you can do your own test to zero in on an optimal static port location. The ideal would be to start out with a surface pressure simulation, which might actually be out there for some of the Van's planes.
In any case I would suggest it's a good idea to do some test flights to see how accurate your altitudes and speeds really are. The methods I used are in the article (mostly using outstanding spreadsheets devised by Kevin Horton.)
However I do believe there’s no issue with the position of vans ports. There’s enough fleet data to validate it now. I’m personally aware of one RV with the pop rivet port one full bulkhead further aft that is accurate as well. Hence my view that people fixing egregious port shape issues just repair the hole start again and drill a new hole nearby in the same lateral plane.
The Cleveland ports dont require shimming. They have a 025 lip then a further joggle to accept adhesive. Installed as intended the edges are flush with an 025 skin.
You may be thinking of another port. Perhaps the dynon one? The gold anodized one depicted in the OP? That appears to have a 1/16 or so total lip.
Edit- if you want to see some real conjecture talk to a sling builder/pilot/owner. Low fleet numbers. Static ports literally from nose to tail
Last edited:
The Cleveland ports don't require shimming. They have a 025 lip then a further joggle to accept adhesive. Installed as intended the edges are flush with an 025 skin.
You may be thinking of another port.
You're right! It's been a while since I installed the Clevelands, and they do work directly with .025 aluminum, as well as the outer skin of a 2core2 composite.
Low Tailwheel rider
Member
What is the preferred adhesive to use for the static port to Aluminum skin.
What is the preferred adhesive to use for the static port to Aluminum skin.
I used tank sealant. RTV or epoxy would probably work just as well.
Wow, this looks like primer wars.
Scott, I understand what you point out about blending it in might not produce accurate results. Scratch that plan. I did some searching for replacements and realized these were probably from a Dynon kit I purchased for a previous project. Problem is their literature doesn’t give a protrusion dimension. I used a similar port on my -8 that was flush but have no idea where it came from.
Yes we call it experimental but making an upgrade from the factory design shouldnt be looked at as some kind of dangerous excursion from the plans. Vans builds light and inexpensive which they certainly did in this case. I’m willing to invest a few bucks to make the improvement.
So, where am I going to find a replacement with the correct protrusion?
Dynon also doesn’t show you how to install them. Good thing we have this site.
My experience with static ports:
1. First build (26 years ago) I used a popular aftermarket nicely milled port (no longer sold) as I thought the per plans pop rivet process was inferior. This port yielded a 200+ foot altitude and several knot air speed error, confirmed with data taken during Formation flight with other ships. This port was flush with the fusleage outside skin. I got a couple 3/16” round head rivets, drilled a 1/16” hole in the middle, cut off the rivet heads and epoxied them onto the outside hole of these static ports (the port diameter and rivet head diameter matched - so a easy mod). This mimicked the per plans pop rivet approach. Problem solved.
2. Second build I just started with a couple of round head rivets with 3/4” shanks. It took serveral tries but finally managed to drill a straight hole through the center of the rivet. The rivet was inserted into a 3/16” hole in the proper place on the fuselage with a touch of epoxy under the rivet head. I let this set. To reenforce the rivet shank I took a 1” diameter piece of scrap ~1/8” thick aluminum, drilled a 3/16” hole in the middle and then pro-sealed this on the rivet shank inside the fuselage. After set the static line (3/16” inside diameter) was slid over the rivet shank and then a little RTV over the outside to hold it in place.
3. Third build I used the Dynon heated pitot/AOA kit that included the two static ports. No errors in altitude or IAS.
4. Fourth build is be the same as the third.
Carl
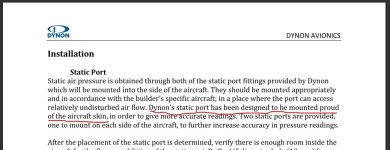
Thought I'd go back through my notes and read up on which static ports I installed and why I installed them that way. Here's an interesting blurb from the instructions that came with my Dynon install kit. I guess I'll have to wait till this bird is flying to see if its accurate like the instructions say:Port is .032” proud. Should I blend a ramp around it or does it matter?
Attachments
I wouldn't be so quick to show the Avery static port out. I have them on my new 14. Last week a buddy with a very similar 14 and Stein static ports was on my wing. Our indicated speeds matched to the knot. He flys with a local formation group and his indicated speeds match others in the group.No. I had them on my 7 and they were 10kts off. Ended up making them flush to the skin and drilling them out for the Vans rivet, which I installed with a little tank sealant and a slight pull on the rivet and then punched out the stem. Accurate after this with the benefit of a nice threaded boss for the fitting to attach the tubing.
I'm certainly not the expert and there is room for error but my experience, so far, is that if the Avery static port is off, it is not by much at all.
