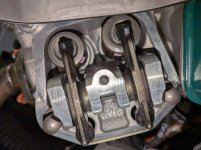
I put the CPS wires and knock wire back in the connectors and tied them with zip ties then put the fuel system and injectors back with new O-rings and lithium grease. I had a bit of a time with the pilot side heat shield and getting the shield between the fuel pressure regulator and case, and then getting both the banjo bolt and 50 mm Allen screw to line up but I worked through it.
I pressurized the system, turning on both fuel pumps and checked for leaks and did not find anything.
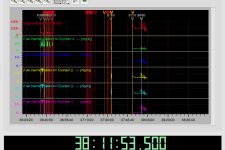
The weather wasn't great; the rain had stopped but it was still windy, but surmised the plane would be fine attempting an engine start. The engine started somewhat hesitantly but then smoothed out a bit. I didn't have headsets on so it was a bit of a racket. I was able to get it to 3900 rpm (Van's recommends 4000) for a few seconds. I did get a flashing Lane B so shut it down after a minute, feeling that I had accomplished what I set out to do: see if the cleaning of the injectors solved the problem.
No leaks discovered afterward and I confirmed that the 2/4 cylinders had finally come alive. I'm still tempted to replace all the spark plugs and just start fresh. Why not?
I didn't have a dongle to download the ECU file but I'll download the log and repeat the test with the laptop showing the health page and see what the flashing Lane B was all about. There might be other issues lurking about so I'm not declaring victory just yet.
I also got a warning via the G3X that there was a short in the pilot side headset jack that went out when I pulled the headset. I'll deal with that later.
I pressurized the system, turning on both fuel pumps and checked for leaks and did not find anything.
The weather wasn't great; the rain had stopped but it was still windy, but surmised the plane would be fine attempting an engine start. The engine started somewhat hesitantly but then smoothed out a bit. I didn't have headsets on so it was a bit of a racket. I was able to get it to 3900 rpm (Van's recommends 4000) for a few seconds. I did get a flashing Lane B so shut it down after a minute, feeling that I had accomplished what I set out to do: see if the cleaning of the injectors solved the problem.
No leaks discovered afterward and I confirmed that the 2/4 cylinders had finally come alive. I'm still tempted to replace all the spark plugs and just start fresh. Why not?
I didn't have a dongle to download the ECU file but I'll download the log and repeat the test with the laptop showing the health page and see what the flashing Lane B was all about. There might be other issues lurking about so I'm not declaring victory just yet.
I also got a warning via the G3X that there was a short in the pilot side headset jack that went out when I pulled the headset. I'll deal with that later.