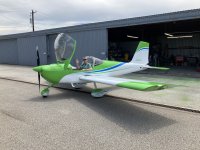
This is how you take your build to the next level. If you don't have a pop-riveted kit you should probably click the back button now.
If you've ever looked closely at a Sling TSi built by Midwest SkySports you will notice that they fill EVERY pop rivet mandrel hole before they paint the plane. I've issued A/W Certificates to a few Slings they've built (assisted building") ) and I'm always amazed at how great their paint jobs look.
) and I'm always amazed at how great their paint jobs look.
So I got a few pointers from them to share if you want to take your pop-riveted RV-12 (or 15) to the next level of perfection. Maybe you don't need to use flush solid rivets on the RV-15 to get a beautiful paint job after all.
Here is the list of items that I'm using to fill all of the exposed rivet holes on the exterior of my RV-12 before John Stahr comes up to paint it later this month.
Automatic glue dispenser controller https://amzn.to/3Vyo3Z1 This thing is amazing once you get it set up!
10cc syringes, https://amzn.to/45TCBZi buy a couple packs.
10cc syringe air tube https://amzn.to/3Ib6n2D get 1.
14ga plastic dispenser needles https://amzn.to/489mXua get 1 (box of 100 will be plenty)
Epoxy gun https://amzn.to/4mNGHYO get 1.
extra mixing nozzles https://amzn.to/46nGO7E 1 or 2 packs should be enough
and finally, the 3M 08115 Panel Bonding Adhesive used to fill the rivet holes, https://amzn.to/47p6xxE I bought 1 but may need another.
I have to warn you, this is a tedious, time consuming and wasteful endeavor. But the results after painting will be your reward!
I first tried doing this using only a syringe and soon found out that when the epoxy starts setting up it takes a ton of effort to push it out of the 14ga needle! My hands were killing me after only a couple syringes of sealant. I also discovered that the pot-life is only about 25 to 30 minutes before it gets too thick to dispense, and most of what I put in the syringe was wasted. So I regrouped and looked for a better, less wasteful (and less painful) application solution.
I've been using this automatic dispenser for a couple days and this thing ROCKS! It's hard to believe how well it works and it was only about $70!
You can precisely control the dispense time with a couple clicks of the timer control, and I adjust it up a couple tenths of a second about every 3 or 4 minutes as the sealant in the syringe starts to get thicker. When the sealant is fresh it only takes a 0.1 second pulse, and by the end of the pot life I'm up to about 1.5 seconds per pulse. I also use the back-suction vacuum feature that pulls a little suction after the dispense pulse to prevent oozing between rivets.
I also use smaller 10cc syringes, not the big 30cc syringes that come with the dispenser, because you only need a tiny squirt of sealant for each rivet, and even with the dispenser you only need to put 1 or 2 CCs of sealant in the syringe.
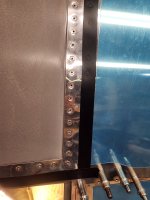
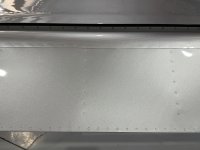
The epoxy also sets up in the mixing nozzle while you are filling rivets, so when you go to fill a new syringe you will need to pump out a big glob (scientific term) of sealant to flush out the mixing nozzle. Notice the globs on the paper towel in the photos. Once you get fresh epoxy coming out of the mixing nozzle you only need to put a couple CCs in the syringe. This is the wasteful part, as is putting too much sealant in a syringe because it will set up before you can use all of it.
You quickly get into a rhythm and I can fill a rivet about every 2 to 3 seconds with a single click of the dispense button attached to the syringe. It's harder to explain it than it is to do it!
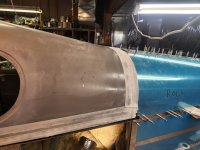
One side of a wing only takes about an hour and I did the upper surfaces of the tailcone, stabilator, VS and rudder in about two hours. All my parts are attached to the plane and it was gusting to 40 kts today, so I stayed in the hangar and filled rivet holes all afternoon.
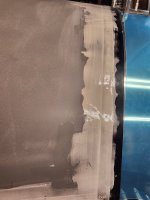
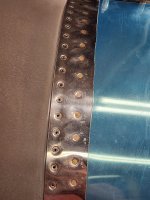
This stuff sets up hard so try not to get it where you don't want it. I'll sand all the filler down flush with the rivet head with a few swipes of 120 grit on a long sanding block.
I'm more than half done and I'm trying to be less wasteful but I still may need to buy another tube of sealant. YMMV.
Let us know if you find this useful.


If you've ever looked closely at a Sling TSi built by Midwest SkySports you will notice that they fill EVERY pop rivet mandrel hole before they paint the plane. I've issued A/W Certificates to a few Slings they've built (assisted building
) and I'm always amazed at how great their paint jobs look.So I got a few pointers from them to share if you want to take your pop-riveted RV-12 (or 15) to the next level of perfection. Maybe you don't need to use flush solid rivets on the RV-15 to get a beautiful paint job after all.
Here is the list of items that I'm using to fill all of the exposed rivet holes on the exterior of my RV-12 before John Stahr comes up to paint it later this month.
Automatic glue dispenser controller https://amzn.to/3Vyo3Z1 This thing is amazing once you get it set up!
10cc syringes, https://amzn.to/45TCBZi buy a couple packs.
10cc syringe air tube https://amzn.to/3Ib6n2D get 1.
14ga plastic dispenser needles https://amzn.to/489mXua get 1 (box of 100 will be plenty)
Epoxy gun https://amzn.to/4mNGHYO get 1.
extra mixing nozzles https://amzn.to/46nGO7E 1 or 2 packs should be enough
and finally, the 3M 08115 Panel Bonding Adhesive used to fill the rivet holes, https://amzn.to/47p6xxE I bought 1 but may need another.
I have to warn you, this is a tedious, time consuming and wasteful endeavor. But the results after painting will be your reward!
I first tried doing this using only a syringe and soon found out that when the epoxy starts setting up it takes a ton of effort to push it out of the 14ga needle! My hands were killing me after only a couple syringes of sealant. I also discovered that the pot-life is only about 25 to 30 minutes before it gets too thick to dispense, and most of what I put in the syringe was wasted. So I regrouped and looked for a better, less wasteful (and less painful) application solution.
I've been using this automatic dispenser for a couple days and this thing ROCKS! It's hard to believe how well it works and it was only about $70!
You can precisely control the dispense time with a couple clicks of the timer control, and I adjust it up a couple tenths of a second about every 3 or 4 minutes as the sealant in the syringe starts to get thicker. When the sealant is fresh it only takes a 0.1 second pulse, and by the end of the pot life I'm up to about 1.5 seconds per pulse. I also use the back-suction vacuum feature that pulls a little suction after the dispense pulse to prevent oozing between rivets.
I also use smaller 10cc syringes, not the big 30cc syringes that come with the dispenser, because you only need a tiny squirt of sealant for each rivet, and even with the dispenser you only need to put 1 or 2 CCs of sealant in the syringe.
The epoxy also sets up in the mixing nozzle while you are filling rivets, so when you go to fill a new syringe you will need to pump out a big glob (scientific term) of sealant to flush out the mixing nozzle. Notice the globs on the paper towel in the photos. Once you get fresh epoxy coming out of the mixing nozzle you only need to put a couple CCs in the syringe. This is the wasteful part, as is putting too much sealant in a syringe because it will set up before you can use all of it.
You quickly get into a rhythm and I can fill a rivet about every 2 to 3 seconds with a single click of the dispense button attached to the syringe. It's harder to explain it than it is to do it!
One side of a wing only takes about an hour and I did the upper surfaces of the tailcone, stabilator, VS and rudder in about two hours. All my parts are attached to the plane and it was gusting to 40 kts today, so I stayed in the hangar and filled rivet holes all afternoon.
This stuff sets up hard so try not to get it where you don't want it. I'll sand all the filler down flush with the rivet head with a few swipes of 120 grit on a long sanding block.
I'm more than half done and I'm trying to be less wasteful but I still may need to buy another tube of sealant. YMMV.
Let us know if you find this useful.