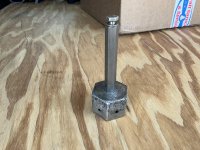
Tire, tube, and brakes worked on by a very experienced mechanic. He was unable to get the cotter pin through the pictured part, said to gently bend the pin, get it mostly though, then finesse through the final holes. He said not to hammer as it would bend the pin. So for now the cotter pin is through just the axle. Note: wheel pants off for a while now. I’ve been told to get the pictured part installed with a good cotter pin prior to flying.
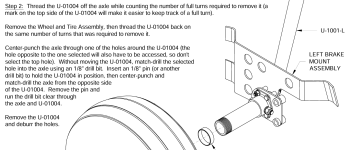
Does this part keep the wheel on in some fashion or is it just for attaching the wheel pants?
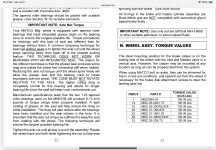
Does anyone have the cotter pin part number or exact dimensions for me to order? I need to overnight it due to scheduling hence am asking instead of spending hours searching old responses.
Any tips or tricks to get the pin installed?
I might visit big box hardware store also.
Picture attached might show one hole through IS bore larger.
RV 10, stock.
Does this part keep the wheel on in some fashion or is it just for attaching the wheel pants?
Does anyone have the cotter pin part number or exact dimensions for me to order? I need to overnight it due to scheduling hence am asking instead of spending hours searching old responses.
Any tips or tricks to get the pin installed?
I might visit big box hardware store also.
Picture attached might show one hole through IS bore larger.
RV 10, stock.