Van's Air Force

The definitive Van's Aircraft support community! Buying, building or flying an RV? Join our exclusive family of mentors and enthusiasts!

RV-7A rebirthing

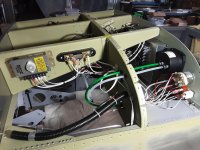
...I have to find a suitable place for the B&C regulator. Any Ideas?...

I was really running out of room so I ended up putting mine upside down on the fwd face of the sub panel on the r/h side. The reason it's upside down is so that the adjustment screw points down, allowing me to reach it by going straight up with a screwdriver from under the panel.

I left plenty of service loop so once I'm up and running, and verify that I don't need to tweak the voltage adjustment I might flip it around so the terminal block is down.

I say I installed it upside down, because there's a "this side up" arrow on the case. Seemed to me like it shouldn't care which way it was pointed so I called B&C and they said that arrow is on there to keep the terminal block down and somewhat protect it from water and stuff falling on it and shorting it out. As long as thats not a consideration they didn't care which way I mounted it.
 
B&C regulator

I placed the B&C LR3 regulator on the fwd end of the rib that supports the panel. It was installed when the top skin was off and is still accessible from under the panel but I'm hoping it never needs any maintenance.
 

Attachments

  • 20230812_112705.jpg
    20230812_112705.jpg
    341.7 KB · Views: 225
Stacking the regulators

Just getting into this. It has taken me a bit of time to wrap my head around the integration of some of these components.

53194158895_8069565758_b.jpg
[/url]panel wire by Kent Luttrell, on Flickr[/IMG]

53193768044_91318b12d2_b.jpg
[/url]sticks by Kent Luttrell, on Flickr[/IMG]

I have to find a suitable place for the B&C regulator. Any Ideas?

It sounds like you only have one but for those who need 2 they are easy to stack on top of each other to save space.
 
I placed the B&C LR3 regulator on the fwd end of the rib that supports the panel. It was installed when the top skin was off and is still accessible from under the panel but I'm hoping it never needs any maintenance.

Paul,
I'm glad to see your setup as this is the area I had loosely staked out for it.
A bouns is seeing your shunt there too. I used an extra shunt I had and converted it for a LV(5v) power Bus. I will post a pic if I can get one.

My forward top skin is on so all this work is vertigo-inducing on a good day for me...hit my head one too many times.
 
Thank you Terry for the insight. I may add the Vans access panels to the top forward skin. I really need a little easier access to this part of the plane.
I have not looked forward to this upside-down back-wrenching work.
 
Dwight,
I was going to have two but I am going with the Monkworkz generator. John Bright has been hand-holding me through much of this if not all and we are going with the Monk. Alleviates the need for a second regulator.
I have one for sale if anyone needs one.
Thanks Dwight!
 
Monkworkz MZ-30L

You'll be really happy with the Monkworkz - just one box: automatic everything, dual modes of operating (primary and standby). Great little unit.

...and Bill's a solid guy as well :)
 
You'll be really happy with the Monkworkz - just one box: automatic everything, dual modes of operating (primary and standby). Great little unit.

...and Bill's a solid guy as well :)

Thanks, Brian, I am sure I will be. I've heard good things about it!
 
So, any idea how I can rescue my older photos in this thread, again? Thanks... [ed. Adding to list, Ken. You can attach them to the posts from now on if you'd like. v/r,dr]
 

Attachments

  • IMG_4552.jpeg
    IMG_4552.jpeg
    2.1 MB · Views: 46
No surprise your Windshield fairing is very nice. How you going to attach it to the front deck skin? I was going to do mine in metal, but was feeling the fiberglass. Retired from the day job last month so mine should fly this year???
Looking good!
I'm going to rivet and use Sika for a good measure. I believe it will be a sound attachment.
 
Looking good!
I'm going to rivet and use Sika for a good measure. I believe it will be a sound attachment.
I did some test samples alum to alum and alum to plex. The Sika bond is almost indestructible especially if you rough up the plex in the bonding area. My fiberglass fairing is all Sika to hold it on. I did use 4 clecos to locate it in place. Those holes got filled before prime and paint. Call me sometime, dealing with intake pipe issues on my hangar partners RV7 that may apply to you.
 
A non-counterweighted angle-valve? Never seen one of those in the wild.

Nice job converting the sump to forward induction. On your new rear blank-off plate, you could add a 1/8 NPT hole to use as a manifold pressure source. That way you'll get a better average MP reading without the pulsing you typically get from tapping into #3 primer port. Did that on mine when I built the engine.
 
I did some test samples alum to alum and alum to plex. The Sika bond is almost indestructible especially if you rough up the plex in the bonding area. My fiberglass fairing is all Sika to hold it on. I did use 4 clecos to locate it in place. Those holes got filled before prime and paint. Call me sometime, dealing with intake pipe issues on my hangar partners RV7 that may apply to you.
That does apply to me! Can't determine what the correct bolt is! HAHA
 
A non-counterweighted angle-valve? Never seen one of those in the wild.

Nice job converting the sump to forward induction. On your new rear blank-off plate, you could add a 1/8 NPT hole to use as a manifold pressure source. That way you'll get a better average MP reading without the pulsing you typically get from tapping into #3 primer port. Did that on mine when I built the engine.
Awesome idea! I will do just that. I have a friend and former employee in Idaho going to CNC one up for me.
 
Hands down, I think this is going to be one of the nicest RV7, I can't wait till I see the report of first flight.
 
Hands down, I think this is going to be one of the nicest RV7, I can't wait till I see the report of first flight.
I appreciate your kind words! Not sure this will meet those standards by a long stretch but it will be a sound airplane to be sure.
Thank you!
 
No idea how I missed this thread over the last 9 years or so, but glad I found it - very impressive project and very nice work! And I'm glad you can post photos - I hope you can eventually recover the photos from the other photo sharing service. There are a lot of interesting things for us to learn from your journey - thanks for sharing it!
 
No idea how I missed this thread over the last 9 years or so, but glad I found it - very impressive project and very nice work! And I'm glad you can post photos - I hope you can eventually recover the photos from the other photo sharing service. There are a lot of interesting things for us to learn from your journey - thanks for sharing it!
Thank you!
This project has been a journey. A lot has happened with the plane and my life in the last 8 years.
Regarding the pictures, at least for the last 5 or 6 pages, you can click the number or name next to the "URL" letters and it takes you to my Flickr page hosting the pictures.
 
Hung the motor yesterday by myself. It wasn't terrible. You will see no sump. That is a bummer. I had to order the proper fitting one. Sad it was.
Fairing is decent, but not great. The top targa band I made some calculated mistakes. Will have to revisit some remedies to that in the future. Also sad.
 

Attachments

  • hungmtr.jpg
    hungmtr.jpg
    420.1 KB · Views: 50
  • mtrhung.jpg
    mtrhung.jpg
    308.1 KB · Views: 49
  • fairng.jpg
    fairng.jpg
    200.2 KB · Views: 48
More motor pictures. Working on hanging various componentry.

Old sump, bummer. It didn't fit.
1000010717.jpg1000010733.jpg

1000010737.jpg

New sump, Ya! It does fit!
 
Just a heads up. If you plan to add a sump heater, now is a good time to prep the sump. It's a huge pain to do when all that stuff is installed.
 
Just a heads up. If you plan to add a sump heater, now is a good time to prep the sump. It's a huge pain to do when all that stuff is installed.
Thanks Larry. Hadn't thought about it. At what temperature do you think it is necessary? I live in Portland OR. Doesn't get all that cold. And when it does I'm on the sofa. 😁
 
Thanks Larry. Hadn't thought about it. At what temperature do you think it is necessary? I live in Portland OR. Doesn't get all that cold. And when it does I'm on the sofa. 😁
I'm in SoCal but the mornings can still get in the 40's. While my hangar-neighbor scoffs at the idea, it sure cuts down on warm-up time.
-Marc
 
Thanks Larry. Hadn't thought about it. At what temperature do you think it is necessary? I live in Portland OR. Doesn't get all that cold. And when it does I'm on the sofa. 😁
Like Marc said. It speeds up the prep to start and less stress on the engine. Lycoming recommends 60 for start. If you don't plan to fly early, maybe it's not an issue.
 
Back
Top