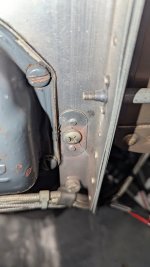
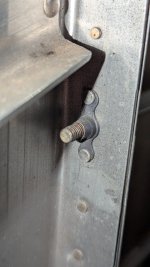
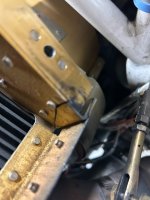
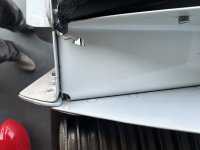
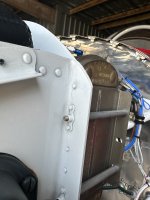
discovered today, ~350 hours TT RV-6. crack in baffle flange at nutplate, and also a cracked doubler for the baffle cyclinder attachment? Planning to beef up affected area, any advice appreciated for a second owner/non builder.

Van's Air Force
You are using an out of date browser. It may not display this or other websites correctly.
You should upgrade or use an alternative browser.
You should upgrade or use an alternative browser.
baffle/Oil Cooler Crack
- Thread starter echostar7
- Start date


Lots of discussion about this problem on the forum - the solutions are either:
Based on later models of RV, it seems the factory recommends #3 - move the oil cooler off the baffle.
- replace those parts as-is and accept future cracks
- beef up everything with stronger angle and bracing between the #4 cylinder and the baffle
- move the oil cooler off the baffle to reduce the weight carried by the baffle
- some combination of the above
Based on later models of RV, it seems the factory recommends #3 - move the oil cooler off the baffle.
Not uncommon - if it happens this early may well be too tight a fit.
Make sure the outboard corner of the baffle isn’t impacting the cowl. Look for witnesses marks in the cowl.
Also tie the baffle seal together in the corner to make sure the fore-aft seal material doesn’t pucker above the baffles effectively transferring all the vertical shock at startup/shutdown into the cowl - same as the alu hitting it.
I like what rzbill did. His photos got deleted but I had saved them.
Bill is at 1100 hours as of June 2025 with no cracks.
The j channel is a beam to stop the oil cooler flapping back and forth.
Others have used a brace to the engine spine.
 photos.app.goo.gl
.
Bill is at 1100 hours as of June 2025 with no cracks.
The j channel is a beam to stop the oil cooler flapping back and forth.
Others have used a brace to the engine spine.
Airplane RV oil cooler support rzbill VAF https://vansairforce.net/threads/oil-cooler-bracket-separated.73707/#post-556594 · Mar 19, 2011 – Dec 17, 2025 📸
Shared album · Tap to view!
photos.app.goo.gl
Oil Cooler Bracket Separated
What would be the best way to repair this. The bracket that attaches the oil cooler has separated. Actually the baffles on both sides were cracked in a couple of places because they were joined together at both cylinder heads, and there was no expansion joint. Any ideas on a sturdier way to...
vansairforce.net
Last edited:
Very common find on your aircraft. Whole lot of torsional shake and loads going on there. I have same set-up on my RV-4, and I built that area a bit more rigid and supported the load with tie rods connected to the case. No cracks in 400 hrs.
Attachments
This worksOthers have used a brace to the engine spine.

I should have added to my original post that my 7 did the same thing at around 200h back in 2011.
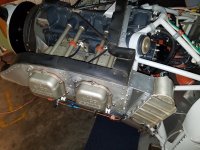
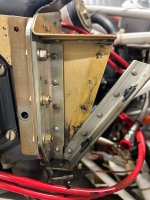
Here’s the replacement: 1/8 angle plus an extra tie piece. I also installed a diagonal brace from the forward edge of the #4 cylinder to the inboard edge of the oil cooler mount.
My memory is stretching for this but I also seem to remember that that particular baffle piece was or should have been 6061 not 2024.
Dean Pichon
Well Known Member
I have almost 1300 hours on my -4 and oil cooler installation. I just found some significant cracking on the current mounting bracket. This is the second iteration and has about 900 hours on it. I beefed up the angles after the first sign of cracks. Now, I have sheared rivets and cracked sheet metal. The angle has survived. I replaced all cracked sheet metal and used ProSeal in addition to the rivets. A previous baffle reinforcement that used both rivets and ProSeal seems to be doing well, so I used the sealant on all joints. (I hope I don't have to take it apart again!).
The best solution, of course, is to mount the cooler on the firewall, but that is hard space to find on a -4. My strategy is to iteratively improve the mount as cracks appear. I hope this version will be good for more than 1000 hours... Here is a photo of the failed bracket. (The structure held and the cooler remained attached, but as I started to disassemble it, things came apart rather easily.)
The best solution, of course, is to mount the cooler on the firewall, but that is hard space to find on a -4. My strategy is to iteratively improve the mount as cracks appear. I hope this version will be good for more than 1000 hours... Here is a photo of the failed bracket. (The structure held and the cooler remained attached, but as I started to disassemble it, things came apart rather easily.)
Attachments
The #4 bulkhead was changed to 6061 or 5052 in the last 8 years or so...I should have added to my original post that my 7 did the same thing at around 200h back in 2011.
Here’s the replacement: 1/8 angle plus an extra tie piece. I also installed a diagonal brace from the forward edge of the #4 cylinder to the inboard edge of the oil cooler mount.
My memory is stretching for this but I also seem to remember that that particular baffle piece was or should have been 6061 not 2024.
View attachment 75604
Norman CYYJ
Well Known Member
I mount the oil coolers on the firewall with an air duct going to it isolated from the engine movement, no cracksThe #4 bulkhead was changed to 6061 or 5052 in the last 8 years or so...
So do I...I mount the oil coolers on the firewall with an air duct going to it isolated from the engine movement, no cracks
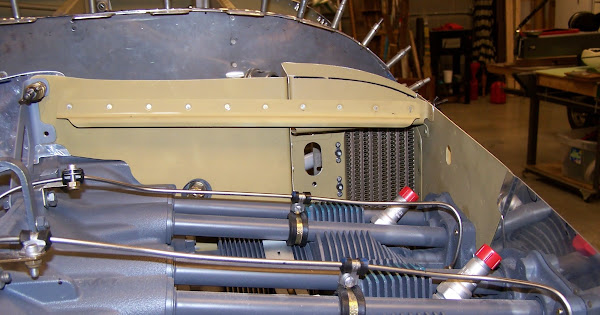
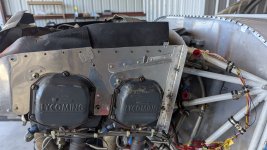
The repair we decided to go with was replacing the cracked baffle for #4 with a new one from vans and adding an additional .032 angle to stiffen the #4 baffle, crossing my fingers that the repair lasts. It was not possible to use all solid rivets for the repair due to access issues.
Attachments
Last edited:
So do I...crossing my fingers that the repair lasts.
Following plans is usually a good thing. Unless it ain't.
As we have all learned over time, a Lycosaurus is, seen as a whole, a moving mass. An unbalanced, irregular moving mass, mostly active during start up and shut down phases of operation. Vibration affected during the whole time it is operating. One's goal should therefore to diminish that unbalanced mass, and certainly not increase it by attaching items which can perfectly well be located on the firewall.
Attaching an oil cooler to an engine baffle can hardly be considered good practice, as has been demonstrated once more here.
Good luck indeed. I replaced my (cracked) original bent baffle angle + doubler with a .063 angle which lasted a couple of years. Then that cracked plus the outboard cooler flange. I mounted the new and larger cooler remotely and haven't had a problem since (15 years ago?).additional .032 angle to stiffen the #4 baffle, crossing my fingers that the repair lasts........
See post #7. There is a reason I mounted it to a solid piece of STEEL! No problems since original installation.Good luck indeed. I replaced my (cracked) original bent baffle angle + doubler with a .063 angle which lasted a couple of years. Then that cracked plus the outboard cooler flange. I mounted the new and larger cooler remotely and haven't had a problem since (15 years ago?).
")
Lots of baffle photos on my build log site.
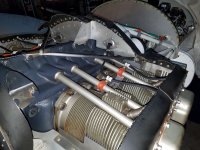
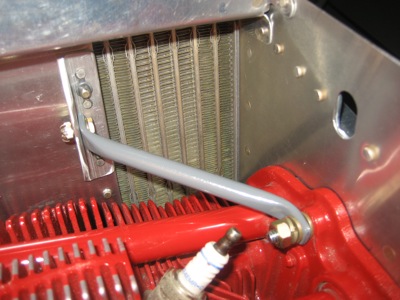
I've now got 1250 hours and no cracks with my installation. I did add the aluminum angle piece along that vertex, and most importantly a brace between the cylinder head and the oil cooler mounting bolt.

This prevents the relative motion along that edge of the #4 baffle. If you can prevent the movement, no cracks will form.
I've now got 1250 hours and no cracks with my installation. I did add the aluminum angle piece along that vertex, and most importantly a brace between the cylinder head and the oil cooler mounting bolt.
This prevents the relative motion along that edge of the #4 baffle. If you can prevent the movement, no cracks will form.
Bruce,Lots of baffle photos on my build log site.
I've now got 1250 hours and no cracks with my installation. I did add the aluminum angle piece along that vertex, and most importantly a brace between the cylinder head and the oil cooler mounting bolt.
This prevents the relative motion along that edge of the #4 baffle. If you can prevent the movement, no cracks will form.
You wouldn't happen to recall where you found the screw long enough to go through the #4 cyl, rocker cover and brace? I looked all over and could only find one long enough for the threads to barely clear the nut.
Indeed - it seems Van's has learned this on the newer models. If you are still building, I'd recommend copying the RV-14 or another model with remote mounted oil cooler. Mine's on the baffle, and I think that was a mistake.Attaching an oil cooler to an engine baffle can hardly be considered good practice, as has been demonstrated once more here.
I bought the screw at Marshall's Industrial Hardware in San Diego. Just about any Ace or True Value store should have coarse thread 1/4" hardware in various lengths.Bruce,
You wouldn't happen to recall where you found the screw long enough to go through the #4 cyl, rocker cover and brace? I looked all over and could only find one long enough for the threads to barely clear the nut.
Chalk up another cracked baffle on an RV-8. Same location as the other posters. Had same oil cooler setup on an RV-6 but with plenum cover, had no problems. Van's needs to fix this. 4+ inch crack was discovered yesterday after 140 flight hours on new baffle. Thanks to those who posted solutions.I bought the screw at Marshall's Industrial Hardware in San Diego. Just about any Ace or True Value store should have coarse thread 1/4" hardware in various lengths.
Marshall's - best all round hardware store (not big box) ever!!I bought the screw at Marshall's Industrial Hardware in San Diego. Just about any Ace or True Value store should have coarse thread 1/4" hardware in various lengths.
HFS
Cut a piece of 1/4x20 all thread to the length you want. Then just use washers and a nut on the rocker cover end so you can take the cover off without disturbing the brace end.Bruce,
You wouldn't happen to recall where you found the screw long enough to go through the #4 cyl, rocker cover and brace? I looked all over and could only find one long enough for the threads to barely clear the nut.
You wouldn't happen to recall where you found the screw long enough to go through the #4 cyl, rocker cover and brace? I looked all over and could only find one long enough for the threads to barely clear the nut.
I used a MS51957-85, which I think you can find online. I happened to find them in stock at B&B, although that was a long time ago.
(this photo is from fitting-up so not all the hardware is final)
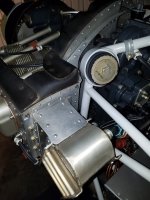
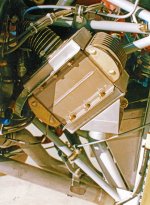
This is what I did on my 7 when it cracked after 100 ish hours and what I did on my 8 so I wouldn't have any BS with it. Sorry for the lousy pic but all I had. You can see the one angle p-clamped to the mount. The other is behind and 2 glass transitions connected with 4" scat. The AntiSplat shutter has been mostly closed to keep oil temps in the 185* range so far.

This is what I did on my 7 when it cracked after 100 ish hours and what I did on my 8 so I wouldn't have any BS with it. Sorry for the lousy pic but all I had. You can see the one angle p-clamped to the mount. The other is behind and 2 glass transitions connected with 4" scat.
I think the remote oil cooler is the best solution, and I will (maybe) change to that. I zoomed in your picture and used a web AI to sharpen it - hope you don't mind.


I certainly don't mind. I only wish I was tech savvy enough to do that!I think the remote oil cooler is the best solution, and I will (maybe) change to that. I zoomed in your picture and used a web AI to sharpen it - hope you don't mind.
View attachment 86634
It looks like your engine mount puts the engine farther fwd than mine (O320, rv-6) would be hard to do something similar with the space available
Just showing an option/concept. Remote is remote as long as the air can get out. Placement will a vary on most any installation; engineer mount, firewall, whatever. Follow the King’s advice. Make yours the same, ‘cept different.It looks like your engine mount puts the engine farther fwd than mine (O320, rv-6) would be hard to do something similar with the space available
rzbill
Well Known Member
Thanks John. 1100 hrs on that oil cooler install. No issues so far. My pics went away when Expercraft went belly up. Still have them but the chore to restore to VAF posts is too much. Take care.I like what rzbill did. His photos got deleted but I had saved them.
The j channel is a beam to stop the oil cooler flapping back and forth.
Others have used a brace to the engine spine.
Airplane RV oil cooler support rzbill VAF https://vansairforce.net/threads/oil-cooler-bracket-separated.73707/#post-556594 · Mar 19, 2011 – Dec 17, 2025 📸
Shared album · Tap to view!
.Oil Cooler Bracket Separated
What would be the best way to repair this. The bracket that attaches the oil cooler has separated. Actually the baffles on both sides were cracked in a couple of places because they were joined together at both cylinder heads, and there was no expansion joint. Any ideas on a sturdier way to...vansairforce.net
Bill Pendergrass
Any suggestions on how to fab the tubular brace? Are these available for purchase and/or do users just fan/bend one on their own? What stock do inputchase? Thanks for any help.Lots of discussion about this problem on the forum - the solutions are either:
- replace those parts as-is and accept future cracks
- beef up everything with stronger angle and bracing between the #4 cylinder and the baffle
- move the oil cooler off the baffle to reduce the weight carried by the baffle
- some combination of the above
Based on later models of RV, it seems the factory recommends #3 - move the oil cooler off the baffle.
Any suggestions on how to fab the tubular brace? Are these available for purchase and/or do users just fan/bend one on their own? What stock do inputchase?
Steel, fire, hammer, and strong language. Details here: https://www.rv7blog.com/2011/06/21/oil-cooler-brace/
Did something very similar at initial build. 1500 hours with no cracking.I should have added to my original post that my 7 did the same thing at around 200h back in 2011.
Here’s the replacement: 1/8 angle plus an extra tie piece. I also installed a diagonal brace from the forward edge of the #4 cylinder to the inboard edge of the oil cooler mount.
My memory is stretching for this but I also seem to remember that that particular baffle piece was or should have been 6061 not 2024.
View attachment 75604
Did a similar thing early-on but attached to the angle stock stiffener on the baffle instead of the cylinder--same results with no cracks! Seems that keeping this corner from cycling with engine vibration prevents cracks in that corner of the baffle. I made my brace from a section of angle-stock but same idea.Lots of baffle photos on my build log site.
I've now got 1250 hours and no cracks with my installation. I did add the aluminum angle piece along that vertex, and most importantly a brace between the cylinder head and the oil cooler mounting bolt.
This prevents the relative motion along that edge of the #4 baffle. If you can prevent the movement, no cracks will form.
The beefy vertical and diagonal braces were a common reinforcement modification circulating on VAF in 2006 when I installed my baffle & oil cooler, 1500+ hours ago.
One other area prone to cracking is the flange on the oil cooler. If you look closely you can see washers at each end of the oil cooler aluminum spacers. A lot of folks leave these out. Placing a washer between the spacer and the oil cooler flange will distribute the clamping force over a larger area and help prevent cracking.

One other area prone to cracking is the flange on the oil cooler. If you look closely you can see washers at each end of the oil cooler aluminum spacers. A lot of folks leave these out. Placing a washer between the spacer and the oil cooler flange will distribute the clamping force over a larger area and help prevent cracking.
