Van's Air Force

The definitive Van's Aircraft support community! Buying, building or flying an RV? Join our exclusive family of mentors and enthusiasts!

CeraKote C series (cold application)

Freemasm

Well Known Member
Patron
I’ve had the baked version professionally applied to FAs before. Amazing finish and tough as nails

Disclaimer = I suck at painting. I suck at painting. I suck at painting.

I’m trying the cold process on some cockpit interior pieces to see if it might be the way to go.

Expensive coatingbut:
Limited surface prep. No etch. No conversion coat
No primer required
No thinning
VERY high solids

I sprayed two floor panels with Brilliant White and Hidden White. Coating/liquid is surprisingly thin for such heavy solids. Only surface prep was a scuff with scotchbrite (suitable per their tech support when a blast profile isn’t do-able) and a solvent wipe. Both were shot with a cheap, POS HVLP gun. The coating lays down very smooth and seems to be equally forgiving. Fast drying, but relatively slow full cure. Within two hours, I was seriously flexing the panels.

My worse-than-amateur self got a pretty dang good finish. The time/money saved by getting to omit a lot of prep work common to most paint apps will more than easily offset the high cost. So, if you prefer something else/never heard of it/your Dad never used it/painted your interior with something else/, great. This is a review, not a debate. Another option for people looking for such.

BTW, is the whiter of the two too much for (the majority of) a cockpit? These are before final coat. Canopy bow and panel will both be an appropriate gray.
 

Attachments

  • IMG_0106.jpeg
    IMG_0106.jpeg
    2.4 MB · Views: 274
I recently coated a control yoke for another project with this and am similarly impressed with how nicely it laid down. Wonder how well it will hold up…. Color choice is a very personal choice; I’m going to the other end of the spectrum with a dark interior.
 
Im curious how much it weighs. Any chance you could weigh a part before then after it cures and measure dimensions for ft²?
Just curious so no big deal.
 
I don’t think I could get meaningful number but can try. I only have 4 fl.oz tester sizes of coating. I’m afraid the before/after 1-3 mil total DFT for such a small sample would be too in the mud instrument error wise; electronic scale near the bottom of its range. Will let you know.
 
I'm on the same path. I haven't painted anything, yet, but I've got a set of 6 pints and the Iwata brush they recommend. I came to the same conclusion regarding costs when you look at the total cost and total labor. Quality over quantity.

The weldments are the main subject right now. But I have this thought living in the back of my mind that wonders why you couldn't paint the whole plane with it, including the outside. One layer of Cerakote vs primer + x layers + clear coat. There's got to be a weight advantage there, I would think.

The downside is that additional coats (not recommended) must be applied within a 2-hour window. If you run out of time, you're done unless you want to media blast it all off and start over. I guess that makes touch-ups impossible, but if it's as durable as it seems, perhaps touch-ups aren't a concern.

I wouldn't attempt to do a multi-color exterior due to that two-hour window, but I wonder if it would make a good single-color base for vinyl-wrap.

I haven't been able to find any examples of exterior paint outside of motorcycle exhaust tubes. They seem to stand up pretty well.
 
FWIW. I applied some over various spots of primer and primer filler. Per their tech support, this is OK but success depends on primer/base coat adhesion. I “scuffed” the surface and applied a second layer earlier today. I’ve bent the panel but will wait a few days for fuller cure before I do an adhesion test with some various tapes. As a matter of necessity, there was no coating transfer when I cleaned a tape residue finger smudge off the surface with acetone. Fingers crossed but impressive so far.

Sorry for the poor light but about to be hit with a thunder storm here. It looks good and is very smooth.

IMG_0119.jpeg
 
ooooo... I finally found someone who painted their Jeep Cherokee and heard that it's still holding up well after 3 years. Motorcycle further down in the thread as well.

Not sure how much paint was used, but on another website that posted this particular link, another very experienced Cerakote C-Series guy was going to paint his truck body (not the roof) and he was pretty adamant it would only take 4 pints of C-Series.

 
I did some reading out of curiosity. Apparently Ceracote works really well on aluminum.
Here's a thought. Just thinking outside the box. No flames. I'm just thinking outloud.
Instead of primer.
Shoot Ceracote on both inside and outside of parts during the build.
Parts that don't get exposed only get a minimal protective coating.
Parts that show get some extra while the sprayer is going within the 2 hour window.
I looked at the color chart. There's quite a lot of colors.
Should be pretty solid. Maybe not the super shiny paint job, but I bet it would look cool.
 
For small parts you can accelerate the cure time by baking in your oven (send the wife to the spa) at 250 for 30-45 minutes, do it all the time on gun parts.
 
Spraying parts vs assemblies - I think you would have to spray the inside parts BEFORE you rivet them together, then paint the outside parts AFTER you rivet them together. I'm thinking wing/fuselage/tail skins in particular. Otherwise, you'd end up with a painted panel with unpainted rivets.
 
I did some reading out of curiosity. Apparently Ceracote works really well on aluminum.
Here's a thought. Just thinking outside the box. No flames. I'm just thinking outloud.
Instead of primer.
Shoot Ceracote on both inside and outside of parts during the build.
Parts that don't get exposed only get a minimal protective coating.
Parts that show get some extra while the sprayer is going within the 2 hour window.
I looked at the color chart. There's quite a lot of colors.
Should be pretty solid. Maybe not the super shiny paint job, but I bet it would look cool.
I've used it on some Aluminum FA parts and steel knives. It seems to be a powder coat substitute for aluminum (maybe better than powder coat). Very hard and wear resistant. It has rubbed off or chipped the finish on other items I carried in the same container. It covers well in thin coats. If I were to spray a plane, it would be the only coating. I haven't weighed it but I suspect its heavy compared to primer or paint, maybe heavier than both.

Someone else commented on the 2hr window for additional coats or touch- ups. I used it in the Wyoming winter. So if you don't mind spraying in the cold that window is dramatically longer haha.
 
Spraying parts vs assemblies - I think you would have to spray the inside parts BEFORE you rivet them together, then paint the outside parts AFTER you rivet them together. I'm thinking wing/fuselage/tail skins in particular. Otherwise, you'd end up with a painted panel with unpainted rivets.
Funny. My entire interior was painted so the rivets and fasteners show. The outside of my airplane is vinyl wrapped so it wouldn't matter.
Interesting.
 
An update for anyone that cares. Not completely scientific but very telling IMO.

I pushed every boundary that I thought of.

The test piece was a piece of scrap 2024. Entire piece had some slight surface oxidation. Laid down a single coat of the subject coating, purposely uneven, fingerprinted, smudged, etc. Half had the surface prepped/scuffed with Scotch-brite (nothing else, no etch, no conversion coat etc) the other was left in its virgin state with only a solvent wipe.

24 hours later (OEM states 2 hour max), I applied a second coat (1/4 brilliant white added for differentiation). Part of the first layer was scuffed with scotch-brite, the other got zero prep. This coating was continued onto the bare aluminum; 1/2 scuffed, 1/2 not. See the pattern? Everything also got a solvent wipe.

A three day cure (vs OEM five for full cure) was allowed. All sections got a strip of duct tape and gorilla tape. Allowed to heat in the sun for a couple and the back to hangar shade temp.

Yank test followed. Zero xfer of any coating(s) applied under any of the aforementioned. I continue to be impressed.

Once again, this isn’t a “my approach is better than yours” debate. Some observations/options for anyone that cares.
IMG_0144.jpeg
IMG_0145.jpeg
 
Interesting. I see a fingerprint at the top of the "R" in "After." That was before you painted it, correct? If so, it's interesting that the paint is so thin that it just sat on top of the fingerprint "material."

So, it looks like red scotchbrite and solvent wash give you the ideal finish. (That's the middle third above the "A?")
 
Fingerprint, smudges etc were intentionally added after first layer applied and before cure.

Don’t pay particular attention to the finish. It was erratic and uneven on purpose. The appearance wasn’t part of the intent/goal.

This product doesn’t appear to use methylene chloride like a lot of other coatings; so, after a layer cures any additional coat will only have a mechanical bond vs any chemical linking. Getting the right surface tooth would seem to be paramount for achieving good adhesion. My pseudo test hints that the product application is more forgiving than stated by the manufacturer.

Bottom line = very good adhesion no matter what I didn’t do.

That said, a good scotch-brite scuff and solvent wipe will be my planned prep for any application (initial or additional) going forward. YMMV

Side note and probably no longer relevant. I wonder if this product would have been a good candidate for Rocket interiors that came from the Czech Rep with anodized parts. Heard of lots of issues getting good adhesion on those.
 
I'm curious what about it makes the adhesion to aluminum so good? (Assuming it is). What are the possibilities for corrosion between the coating and the aluminum and because the coating is so tough, you might not know it? It seems like a very appealing option, just need more info on long-term adhesion and health of the aluminum under the coating.
 
The OEM only rates the cold app as OK for corrosion resistance versus their hot apps IIRC. I’m only considering this for my cockpit interior. This after some phenomenal performance of their hot app on some firearms I’ve customized going back many years. Once their cold app came out, I was curious to see how it compared to their other products. So far I’m impressed.

Been around too long to believe in magic bullets; MMO, Slick50, dozens more. They all revealed their true selves in time.

I do know one thing. Never using powder coat on anything of mine going forward.

No clue on the chemistry behind it. I’d suggest ordering a tester size of theirs and play with it. Only $35. Could be another arrow in your coating quiver. Others would like to hear your results/opinions.
You are 100% correct about magic bullet coatings.... Been there and done that. I'm curious why you are so against powder coating?

Cerakote, when new, was very specific about the cleaning and prepping procedure. With time (and experience) they have become more flexible about what procedures are considered acceptable. I'm sure that is, at least in part, due to trial and error lessons learned out in the field.
 
... Been there and done that. I'm curious why you are so against powder coating?
I've had PCing done on several thing in the past. My Mooney yokes got a top notch black crinkle job a couple of decades back. Looked good until I sold it a couple of decades later. Since then, it's been inconsistent to say the least. Yes, I'm aware that prep and workmanship greatly influence the outcome. That said, the cold CK app is tougher than the PC on my engine mount and stick. Also more chemical resistant which is very important for areas that need solvent cleaning, like FWF.

I'm not against PC; but why pay someone when I can get near of better performance for less money with a different product? To each his own but this is my current experience and reality.
 
Another "discovery" or data point per se'. None of the common commercially accessible paint/urethane/epoxy strippers are having any success on this fully cured product. Acidic nor caustic nor methylene chloride based have even softened it. To be fair, the MC based one was old and had been opened. The active ingredient could have flashed away. The overall matrix was still fluid so guessing mostly not. This wasn't a test. I want it off one of the parts. Mechanical removal and blasting has been very successful but has been slooow going without a blast cabinet and/or compressor limited by a 15 amp CB.

Was surprised by the lack of success of the methylene chloride based stuff. In retrospect, I shouldn't have been. As I understood it decades ago, MC keeps the paint in solution and flashes as it cures. (Re)application of such in a stripper puts it back in solution for removal. No evidence of it's presence/use in CK so in retrospect, I didn't think that one through.

MC based products are nasty stuff BTW if you've never used it. I burns like a fiend if you get it on unprotected skin and even with immediate dilution, it still scars. Guessing it's one of the reasons it's been banned in a lot of commercially available products. Looked at the SDS for the old standby and oddly named "Aircraft Remover". Appears to have been removed from that product as well.

Edit = @ ZephyrSurfer. My collection of related carcinogens is extensive. Never-not been able to chemically attack-> remove something. Maybe the subject product has a strange Achilles heel like dew or sweat or artificially sweetened soft drinks.
 
Last edited:
Another "discovery" or data point per se'. None of the common commercially accessible paint/urethane/epoxy strippers are having any success on this fully cured product. Acidic nor caustic nor methylene chloride based have even softened it. To be fair, the MC based one was old and had been opened. The active ingredient could have flashed away. The overall matrix was still fluid so guessing mostly not. This wasn't a test. I want it off one of the parts. Mechanical removal and blasting has been very successful but has been slooow going without a blast cabinet and/or compressor limited by a 15 amp CB.

Was surprised by the lack of success of the methylene chloride based stuff. In retrospect, I shouldn't have been. As I understood it decades ago, MC keeps the paint in solution and flashes as it cures. (Re)application of such in a stripper puts it back in solution for removal. No evidence of it's presence/use in CK so in retrospect, I didn't think that one through.

MC based products are nasty stuff BTW if you've never used it. I burns like a fiend if you get it on unprotected skin and even with immediate dilution, it still scars. Guessing it's one of the reasons it's been banned in a lot of commercially available products. Looked at the SDS for the old standby and oddly named "Aircraft Remover". Appears to have been removed from that product as well.

I would think this is a fantastic property if it's what you intended. Otherwise, it's like putting 5200 on a boat part expecting it to only be semi-permanent. :ROFLMAO:
 
I used Cerakote C series to spray my instrument panel and am very very happy with the results. I have since fantasized about painting the entire exterior of the plane with the same C series.

But it's just such a huge risk. The C series is tough as nails and lightweight but my concern is its just simply doesnt have the longevity and could possibly be unrepairable/ irreversible. The way it adheres to the scuffed aluminum...i just don't believe that youd ever really be able to undo the application and paint/repair if it turned out that it didn't respond well to water/moisture/ corrosion (referencing the "OK" Corrosion performance on the actual Cerakote description)

If you think about aviation grade paint technology, it's just so well vetted and high quality. I'm not sure if C series has the LONGEVITY of a PPG Aerospace grade paint.

Again, i fantasize about doing it, and maybe i will....My Rv-12 could be the perfect VAF test bed i reckon. But id want some kind of a Cerakote application expert to make sure the actual spraying was done as well as could be done. With a single coat only, the C Series could be like 50% lighter than even the lightest 2K aerospace grade paints...

Also im curious how well the C series would handle Seams. Overlapping Aluminum panels like the wings on my 12. It seems like its rock solid on flat panels or on Rifle barrels, but relatively sharp angles on seams is another question.
 
I'm curious as well.

Maybe shoot a few test panels and leave them outside?

I have had vinyl samples outside for years. One bare, one primed with P60G2 and one Alodined. Every year or two, I score a 1" strip and peel it off. So far none show any sign of corrosion.
 
For me it's performed well on the sharp angles of handguns and rifle chassis. It is very tough (like crazy ex girlfriend with a key resistant tough). I'd think the only chance of corrosion would come from bad prep. I think the concern about getting it off if needed is real. Pretty sure its a lifetime coating on a piece of aluminum lol. Maybe use it on easy to rebuild/ replace parts like control surfaces haha?
 
For me it's performed well on the sharp angles of handguns and rifle chassis. It is very tough (like crazy ex girlfriend with a key resistant tough). I'd think the only chance of corrosion would come from bad prep. I think the concern about getting it off if needed is real. Pretty sure its a lifetime coating on a piece of aluminum lol. Maybe use it on easy to rebuild/ replace parts like control surfaces haha?

I have been testing it on parts to possibly use it on the rollbar, seatbar, and armrails (high touch surfaces). I ran into an issue with wetting it to much and created little bubbles. The only option to fix it is to sandblast down those parts :eek:. As I changed my technique I was able to fix it and it goes on great.

I really like the idea of something super durable but the permeance of it makes me a bit nervous...
 
I Cerakoted my entire cockpit on my Rocket and would do it again. Looks awesome and is crazy tuff. Points worth noting. Paint does not stick to Cerakote. Corrosion resistance is amazing check You Tube where they do salt spray test. No chemicals will soften it or remove it. How this stuff can stick to my chrome paint gun and not be removed is beyond me. For those that are having there panel Lazer engraved it did not work well for a multitude of reasons. I ended up just painted the panel to match.
 
I Cerakoted my entire cockpit on my Rocket and would do it again. Looks awesome and is crazy tuff. Points worth noting. Paint does not stick to Cerakote. Corrosion resistance is amazing check You Tube where they do salt spray test. No chemicals will soften it or remove it. How this stuff can stick to my chrome paint gun and not be removed is beyond me. For those that are having there panel Lazer engraved it did not work well for a multitude of reasons. I ended up just painted the panel to match.
Pictures would be great if you would, please.

Some paint must stick to it. CK recommends one type of clear(MC-161) to be applied over a wet base coat. When I told them I needed to apply over graphics first over the base, they recommended a scuff and their MC-2200. Just one data point.
 
So thanks to OP--Freemasm--and his quote "I suck at painting x 3"! I read that and was like--hey, that's me! I spent weeks researching and trying to decide on interior paint for my RV-14, and went from SW Jetflex WR to SW Polane to Kirker Enduroprime + topcoat, and finally settled on Ceracote C Series. I just finished painting my interior and brake parts and I am genuinely happy with the results. The paint takes 5 days to fully cure, so I cannot comment on durability, etc at this time.

I have sprayed lots of stain, varnish, poly, and paint on my woodworking projects, but never something like Ceracote. I used a $30 touch up HLVP gun from HFT w/ 0.8 mm tip, and it did very well. I re-learned (and re-learned again) that taking a few minutes to mark and set up your spray gun is time well spent, and can also reduce all those errors that make me 'suck at painting'. Get the pressure, flow, and pattern knobs set and don't be afraid to tweek them/change them when needed! (For my HFT sprayer I used 30psi, 3/4 to 1 1/2 turns on the flow knob, and only 1/4 to 1/2 turn open on the pattern knob).

For someone on the fence, I'd definitely recommend it, but with some caveats. I use my one-car garage/shop as my paint booth and just put drop cloths over everything. I'll crack the garage door open and set up a box fan for exhaust, then turn my ceiling mounted heater up to create some airflow through the space. I don't always need to do this when spraying stain or poly, but it was an absolute necessity for the Cerakote! A good respirator and good ventilation is an absolute must before you spray!

I chose Metallic Cobalt color and bought 1 quart for $150 and their plastic strainer for $20. My interior and all parts were pre-primed with self etching primer and/or Vans primer. Cerakote recommends machine shaking or hand shaking for at least 15 minutes. The paint is very thin/low viscosity and mixes quite easily, however, you can see it start to separate again after only 5-10 minutes. I agitated my spray cup (finger over vent hole) and remixed my strained paint at every cup fillup. The HFT spray cup is only 4oz, but this stuff goes on so thin that that was plenty to force me to take a break and not spray too much at one time. One quart was plenty to spray 2-3 coats on the brake parts and 2 coats in the cockpit. I have enough left over to spray the roll bar and floor access panels, but will likely buy another quart just to make sure and to have enought for other parts in the engine compartment, etc.

Initially, I set up all my brake parts hanging from thin wire to try out the spayer and hone my technique before attempting the whole cockpit. I was immediately impressed by both my cheap $30 sprayer and the paint. I set the flow 'low' and had lots of control to put on a see-through base coat, then followed up with another top coat pass while still wet. I had a few sags but mostly because my glasses got fogged and I couldn't see well enough. Taking a break to clean my glasses and lower the pattern knob helped immensely. 24 hours after initial application, I riveted the brake pedals together, gave them a light solvent wipe, then rehung/recoated them the next day. That does not follow Cerakote's recoat recommendations, but I do not anticipate any adhesion/durability issues (but we'll see).

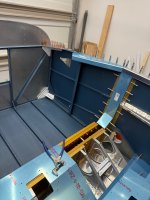
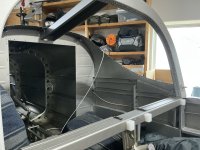
My big panic moment came when trying to spray the interior. I started in the footwell area and tried to just paint the firewall. My flow was set too low (afraid of drips/sags) and pattern set too high for the enclosed area. I rapidly had a thick fog I could not see through (nor breath in)! After setting up/turning on my airflow ventilation, i tried again, but had similar results. I wondered if/how I would be able to paint over a partially cerakote-painted interior if I quit now! I finally spent some time retweeking my sprayer--increased fluid flow with matching pattern--and I was able to paint like I was doing a TV commercial! Smooth even see through strokes over a large panel, take a short break to let the fog clear, then repeat with a second top coat with plenty of visibility to see the full coverage. Another break, then move to the next panel. The entire cockpit took about 60 minutes to spray in this manner. (2 hours total, gloves on to gloves off). My fuse is on a rotisserie, so I did the first coat on my knees with the fuse "sideways", then rotated 180 degrees and waited 24 hrs for the second coat.

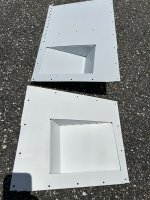
So far, everything looks great! My big regret is that I sanded out some of the runs and few paint drips after the first coat (24 hours after application). I used 100 grit paper and a solvent wipe on those areas. While they looked "plenty smooth" to recoat, unfortunately, the sanding marks are still visibile after the final coat. I should have wet-sanded/used 400 or better on those areas. Most will be under carpet/upholstery, so I am not in a hurry to fix them now, but I DO have a plan to touch up some areas after I install the roll bar and paint that and the access panels. Before starting this project I was VERY apprehensive about having to strip, sandblast, sand, and otherwise prep the cockpit for Ceracote application. After using this and understanding how different this sprays/lays down/finishes, I am MUCH less paranoid! I will have to wait and see if there are any durability or adhesion issues, but frankly I will be very surprised if those occur...

Hope this helps someone else get off the fence. Ceracote works great, needs lots of ventilation, and is comparable/less expensive than other paint options out there! Best of all, it looks great!
 
I've been using cerakote for my interior parts painting before riveting so i can get the rivet color contrast. Initially I was scuffing with scotchbrite and have scratched a few panels so I either did something wrong, or the surface prep is not up to snuff. I have since picked up the cheapie harbor freight hand held blaster and blasted my canopy rails, arm rests and F-705 cross bar parts prior to coating. I let them sit for 6 days and hoping they are more durable esp seeing as they are higher wear contact points.
We'll see. But i do like how easily it sprays.
 

Attachments

  • paint.jpg
    paint.jpg
    1,005.4 KB · Views: 83
I used the burnt bonze on the push rod tubes and the steel exhaust on my Tailwind. The stuff applies nicely to a sand blasted surface.
I have had to re-touch the exhaust at condition inspection, especially where there was a little blow-by at the slip joint.
 
Hi all,

I've settled on using Cerakote to paint the interior of my -8, but as I want to paint the parts before riveting I need to order quite early in the process.

I have some samples but they're really small, so for those who already started, have you got any picture of your interior you'd like to share so I can have an idea about what's too dark or not compared to what I have in mind?

For now my choice would be between Tactical Grey C-228, Sniper Grey C-239 and Sig Dark Grey C-209.

Thank you!
 
The Cerakote works well on small parts. I consider myself a good painter and have done beautiful candy paint jobs. On big flat panels it can be difficult. I did some walk in industrial doors in white Cerakote. It does not leave a good wet edge and even had to pull out every trick to keep it from streaking.
 
Thank you both for your replies.
There are a lot of pictures of different projects on their online gallery, but it never renders the same depending on the surface, lighting etc...

Probably I'll end up selecting one to try with their Tester size (118 mL), and adjust if needed when ordering the Quart.

I'm considering painting the whole interior the same color, except the front side consoles and the instrument panel to allow for laser engraving, maybe with one of the H Series colors that permit it.
 
I ordered several free swatches, then a few testers and then a pint of the main color I wanted for my interior. I also bought a tester in one of their flat blacks for the glare shield. A pint plus a tester was enough for my entire interior, though I may need another tester as what remains of my pint is past useable (out of date).
 
Back
Top