Just put the wings on for the last time with the close tolerance bolts at the airport. The top row of bolts are no problem. The bottom row of bolts are a piece of engineering nobody could be proud of. There are major interference issues with the gear leg support weldments that prevent getting a wrench on the nut to do anything other than stop the nut turning. You have to insert the bolts with just a couple of threads through, get the nut started, tap the bolt in, turn the nut a quarter turn, tap the bolt and repeat until there are enough threads into the nut that the bolt can be drawn in by turning the bolt. I cooled the bolts down in the freezer overnight before inserting them in the spar fitting (with grease) but even so the bolt turning friction was significant so I don’t have a good feel for what final torque I have on the bottom bolts. More of an issue for the AN4 size bolts. Having this poor quality of engineering in such a critical area just beggers belief. I am really surprised that there hasn't been more calls for Vans to fix the design in this area. This may get a pass grade from a FEA viewpoint but is totally unacceptable from an assembly and maintenance viewpoint.

Van's Air Force
You are using an out of date browser. It may not display this or other websites correctly.
You should upgrade or use an alternative browser.
You should upgrade or use an alternative browser.
7A Wing Attach Close Tolerance Bolts
- Thread starter keitht
- Start date

I’m not looking forward to this. I’m not far behind on what you are doing. I just transported my fuselage to the airport on Monday and installed wings with temporary bolts. Going to try putting the close tolerance bolts into place tonight. Hope to maybe catch up with you one of these days since I’m not to far from you. I’m based at willapa harbor airport 2s9
wcalvert
Well Known Member
Keith
Just read your rant and feel your pain. My went on last week and there was the same issue, although I think the problem was my creation.
When the assembly of parts for the center section (F704D & F704E) are assembled, I used the small AN5 size close tolerance bolts for alignment. Looking back, that was a mistake since the long pole in the tent would eventually become the issue of getting the larger close tolerance bolts in place. Hard lesson learned and another example of an easy to add note that was omitted from the directions.
The best I could do with the issue was to use drill rod of the right size (7/16") with tapered ends in EVERY hole during assembly. Lube them up, tap them all way in, and tap them back out with the close tolerance bolt.
After torque, check the washers to make sure they don't spin. I plan to recheck the torque on those at the first condition inspection. But they are only working in shear, and the friction in the sandwich of parts only adds a little.
Down in Vernonia this week doing some flying, hoping for my first flight next week! Look forward to visiting with you soon.
The good news is that those bolts are for shear only, so torquing the nut is not a concern. The nut is just to keep the bolt from coming out  There are numerous designs (sailplanes for example) that just use a washer and cotter pin to keep the bolt in place.
I have a modified open end wrench (ground down to be able to actually fit on the nut) that a few of us at my airport used to install those bolts. Not a fun job.
There are numerous designs (sailplanes for example) that just use a washer and cotter pin to keep the bolt in place. I have a modified open end wrench (ground down to be able to actually fit on the nut) that a few of us at my airport used to install those bolts. Not a fun job.
Bill,Keith
Just read your rant and feel your pain. My went on last week and there was the same issue, although I think the problem was my creation.
When the assembly of parts for the center section (F704D & F704E) are assembled, I used the small AN5 size close tolerance bolts for alignment. Looking back, that was a mistake since the long pole in the tent would eventually become the issue of getting the larger close tolerance bolts in place. Hard lesson learned and another example of an easy to add note that was omitted from the directions.
The best I could do with the issue was to use drill rod of the right size (7/16") with tapered ends in EVERY hole during assembly. Lube them up, tap them all way in, and tap them back out with the close tolerance bolt.
After torque, check the washers to make sure they don't spin. I plan to recheck the torque on those at the first condition inspection. But they are only working in shear, and the friction in the sandwich of parts only adds a little.
Down in Vernonia this week doing some flying, hoping for my first flight next week! Look forward to visiting with you soon.
Most of the problem for me was the gear leg weldment interference issue - should have built a taildragger like you are doing. I made up 3 shop bolts for the smaller dia bolts that had tapered ends but were long enough to get the taper all the way through. I put two in the top and one in the bottom inboard. Made up a tool (modified pry bar) to be able to remove the lower shop bolt by getting under the head and levering. The big bolts lined up well and freezing them down helped get them in without the need for muscle. Then the fun started with getting the nuts on. In the end I gave up trying to use a torque wrench on the lower bolts- just tightened until resistance increased and then “felt it” from there to get it nipped up and stop the washers turning. Not what I would prefer but don’t see any other alternative.
I am really familiar with all the different methods used on sailplanes to attach wings and fuselage- mostly two much larger dia single pins in double shear to hold both wings and fuselage together in an easy to assemble and dis-assemble arrangement- nothing I have seen on sailplanes compares with the RV- 7A arrangement which is a major assembly challenge and likely to be impossible to dissassemble without damaging something.
Had two guys that had both built RV-6s helping me put the wings on - both were shaking their heads at the arrangement for the lower wing bolts on the RV-7A.
I had a quantity of cheap wrenches I collected from yard/garage sales. I than cut, ground, or bent them to shape specifically for each nut around the gear weldment. Remember, you need a Left & Right version of each custom shaped wrench.
LarryMyers
I'm New Here
A rivet gun will make quick work of installing close tolerance bolts.
wcalvert
Well Known Member
Bummer ... well, good news is that it'll be done soon and I'm sure your wings will stay on just fine!
Of course, you say you should have built a taildragger ... now I'm trying to learn how to LAND a taildragger!!
Lots of new stuff in the GA world to wrap my head around. Feel like the FNG again!
Hang in there!
Of course, you say you should have built a taildragger ... now I'm trying to learn how to LAND a taildragger!!
Lots of new stuff in the GA world to wrap my head around. Feel like the FNG again!
Hang in there!
Raymo
Well Known Member
A rivet gun will make quick work of installing close tolerance bolts.
Not the ones he's having issues with. They have to go in slowly to allow the nut to be screwed on a few threads at a time. They then have to be torqued from the bolt head with run-on torque added.
Last edited:
Rob Rickards
Active Member
RV 14 much better
Was watching you Tube channel Flight Chops where he was putting the wings on his RV14.
WHAAAT?
The carry through spar goes outside the fuse and putting the bolts in looks soooo much easier.
Found this pic on a builders log.
https://www.myrv14.com/buildlog/20141119/RV14141116-171600-033.html
Was watching you Tube channel Flight Chops where he was putting the wings on his RV14.
WHAAAT?
The carry through spar goes outside the fuse and putting the bolts in looks soooo much easier.
Found this pic on a builders log.
https://www.myrv14.com/buildlog/20141119/RV14141116-171600-033.html
BoydBirchler
Well Known Member
You can go to your local welding shop and purchase dry ice; Dry ice is substantially colder than your freezer (-109F). I have used it replacing valve guides in a flat head water cooled engine on one of our forklifts: worked well and the dry ice lasted a few days in our foam cooler.
Last edited:
It is one of the worst jobs on the build, it took us three weekends to get all the bolts in and nuts on, using freezing spray helped by chilling the bolts and using lube but what a total pig of a job. I cannot see any way that we would ever get the wings removed if we had a forced landing in a field somewhere as there is no way that you could get to drift the lower bolts out and it would be impossible to pull them. The RV14 has a much better design with the bolts OUTSIDE the fuselage.
Nige
Ivybridge, Devon UK
RV9A G-CSAM
Nige
Ivybridge, Devon UK
RV9A G-CSAM
You can go to your local welding shop and purchase dry ice; Dry ice is substantially colder than your freezer (-109F). I have used it replacing valve guides in a flat head water cooled engine on one of our forklifts: worked well and the dry ice lasted a few days in our foam cooler.
Dry ICE AND 91% Isopropyl alcohol slurry is even better, -78C (acetone also same temp).
I used burnishing plugs to pre-size the holes - it only addressed the tiny misalignment of spar layers. (RV7)
Aero_Octaveus
Well Known Member
I've heard liquid nitrogen is even better than dry ice. You can buy it from a gas supplier from Linde/Praxair and Air Liquide. Some ice cream shops even use it.
Just need a dewar container to put it in. They sell them on Amazon.
That's my plan (as well as the modified tools as suggested) for installation.
Just need a dewar container to put it in. They sell them on Amazon.
That's my plan (as well as the modified tools as suggested) for installation.
I've heard liquid nitrogen is even better than dry ice. You can buy it from a gas supplier from Linde/Praxair and Air Liquide. Some ice cream shops even use it.
Just need a dewar container to put it in. They sell them on Amazon.
That's my plan (as well as the modified tools as suggested) for installation.
I’d urge a little caution here. You can ‘burn’ (actually freeze) your skin if there’s a spill. There’s also the possibility of asphyxiation if in a closed space. Finally, I don’t know enough metalargy to know if the steel bolt loses its properties and becomes brittle, but I’d check.
Liquid nitrogen is colder than dry ice. But given the precautions you would need to take to handle something at -150f I’m thinking it may not make things easier.
Boiling point for liquid nitrogen is more like -320 F - it’s really cold!
PilotjohnS
Well Known Member
LN2
I see a potential problem with using liquid nitrogen (LN2). Since the bolt is shrinking in both dia and length, I am curious if using LN2 would cause the bolt to shrink too much in length. The scenario is that the bolt shrinks too much in length, and when it goes back to room temperature, there develops a gap between the head and the spar. since it is very tight bolt, and the nut is in a tight space, it might be very hard to draw the bolt in by torquing the nut. If this happens, now what? Trying to re cool the bolt wont help since it is now in contact with the spar.
I see a potential problem with using liquid nitrogen (LN2). Since the bolt is shrinking in both dia and length, I am curious if using LN2 would cause the bolt to shrink too much in length. The scenario is that the bolt shrinks too much in length, and when it goes back to room temperature, there develops a gap between the head and the spar. since it is very tight bolt, and the nut is in a tight space, it might be very hard to draw the bolt in by torquing the nut. If this happens, now what? Trying to re cool the bolt wont help since it is now in contact with the spar.
Aero_Octaveus
Well Known Member
Gezz guys get real. You don't work with liquid nitrogen with no protective equipment and gloves. Also you don't think dry ice will freeze your skin if your not careful? Always work with protective equipment and precautions accordingly. The bolt doesn't shrink to raisin if you cool it down. Typical shrinkage on steel is about 0.003" per inch diameter of the bolt. This is a common process called - Shrink Fitting. It's often used in machining and fabrication shops. Why do you think you can buy this stuff from welding supply shops?
You don't need to bath the bolt in -320deg liquid overnight if you don't want to. You can pour it on the bolt, or dip it in the nitrogen just enough to help get it pretty cold just before you slip it into an aligned hole. And the bolt isn't so tight you won't get the head tight to the spar. If your having those problems your using the wrong size bolt or you have done something wrong.
https://www.youtube.com/watch?v=y2fctNYMRoE
https://www.alliedpipefreezing.co.uk/services/shrink-fitting/
Last edited:
There is a reason that the construction manual doesn’t mention using any special process to freeze the bolts. It’s just not necessary.
A little bit of lube on the bolt and driving them in with a heavy plastic mallet or a rivet gun works just fine. If you want a little extra help then removing them one at a time quickly from a freezer will help a little.
A little bit of lube on the bolt and driving them in with a heavy plastic mallet or a rivet gun works just fine. If you want a little extra help then removing them one at a time quickly from a freezer will help a little.
Aero_Octaveus
Well Known Member
Now you're just taking the fun out of it Scott. How are we supposed to 'mad-scientist' this now? I mean locked down and bored out of our tree...I had some real ideas going. I didn't even get to mounting the flux capacitor on the baggage bulkhead yet, or how to place the Mr Fusion on the slider canopy. Roads?!....where we are going we don't need roads!.
I mean locked down and bored out of our tree...I had some real ideas going. I didn't even get to mounting the flux capacitor on the baggage bulkhead yet, or how to place the Mr Fusion on the slider canopy. Roads?!....where we are going we don't need roads!.Spar bolts
Scott,
I would agree that serious freezing shouldn’t be necessary. You are missing the main point of the thread. The design of the gear leg support bracket and the serious interference with the installation of the lower spar bolts was the point. This area of the design is not worthy of Vanns and shouldn’t even have got to the point of cutting metal for the prototype aircraft let alone become the standard for the 7A kit design. There are many ways to solve the challenges posed by the need to have the undercarriage weldment where it is and make the installation, retention and extraction of the lower wing spar bolts conform to normally accepted aircraft engineering standards. I understand the need for “ inexpensive”, “simple” “reliable” when it comes to homebuilding a kit airplane - just designing and manufacturing a set of two part expanding bolts installed from the rear of the lower spar would have provided dual load path and an easy acceptable way to meet the challenge. You guys have FEA models already in place (I hope) so it just needs somebody with production engineering design skills to flesh out the bolt design, run the numbers and contract with a machine shop to produce the bolts. Too late for those of us that have already followed the existing drawings - not to late to fix some unacceptable amateurish engineering.
KT
There is a reason that the construction manual doesn’t mention using any special process to freeze the bolts. It’s just not necessary.
A little bit of lube on the bolt and driving them in with a heavy plastic mallet or a rivet gun works just fine. If you want a little extra help then removing them one at a time quickly from a freezer will help a little.
Scott,
I would agree that serious freezing shouldn’t be necessary. You are missing the main point of the thread. The design of the gear leg support bracket and the serious interference with the installation of the lower spar bolts was the point. This area of the design is not worthy of Vanns and shouldn’t even have got to the point of cutting metal for the prototype aircraft let alone become the standard for the 7A kit design. There are many ways to solve the challenges posed by the need to have the undercarriage weldment where it is and make the installation, retention and extraction of the lower wing spar bolts conform to normally accepted aircraft engineering standards. I understand the need for “ inexpensive”, “simple” “reliable” when it comes to homebuilding a kit airplane - just designing and manufacturing a set of two part expanding bolts installed from the rear of the lower spar would have provided dual load path and an easy acceptable way to meet the challenge. You guys have FEA models already in place (I hope) so it just needs somebody with production engineering design skills to flesh out the bolt design, run the numbers and contract with a machine shop to produce the bolts. Too late for those of us that have already followed the existing drawings - not to late to fix some unacceptable amateurish engineering.
KT
We admit the A model main gear attachment on the RV-7 is not as refined as it could be. As you already said, it was an engineering compromise towards simplicity which does make me take slight offense at it being referred to as amateurish. Some times simplicity and absolute priority in weight reduction causes engineering choices that may not be easy to execute but in a case where it is a one and done, like this, I think it can be justified.
Having said that, that understanding is what drove the design of the RV-10 and RV-14A, that came after the RV-7, to have a different configuration center section so that the wing attach bolts are on the outside of the fuselage and not common with the hardware for landing gear attachment.
We admit the A model main gear attachment on the RV-7 is not as refined as it could be. As you already said, it was an engineering compromise towards simplicity which does make me take slight offense at it being referred to as amateurish. Some times simplicity and absolute priority in weight reduction causes engineering choices that may not be easy to execute but in a case where it is a one and done, like this, I think it can be justified.
I think we are both entitled to our own point of view. Yours seems to me to be equal to putting lipstick on a pig and then falling in love with it. Its still a pig - you guys have demonstrated your capability to fine tune the necessary compromises and produce good engineering - you need to apply those skills to this area of the design. As one of the old sages at the big kite factory in Seattle was often heard to say to young engineers at design reviews “you can do better- we wouldn’t have hired you if we though this was all you were capable of.”
KT
I think we are both entitled to our own point of view.
That, I can agree with.
Another Guy's Opinion on Wing Installation
When reading this thread a few weeks ago, right before I started my own wing installation, I wasn't sure what to think and I was DREADING performing this task based on what I read in this thread.
I installed the wings on my own using sawhorses for supporting the wings as I positioned / inserted them. A little tricky but doable (I had a lot of wood scraps that I used to shim the horses to the proper heights). Getting the rear spar to properly engage also took a little finesse, but doable. I made drift pins using cheap hardware store bolts.
The NAS bolts were indeed a snug fit, and I'm not sure if "shrinking" them using dry ice helped, but I'll go ahead and believe it did. The top bolts / holes are a breeze. The bottom holes are certainly a challenge which required me laying down in the fuse with my head under the panel to get to the nut side, but with a crows foot I was able to get to the nuts and get everything tightened up. Of course it was a pain (literally) but doable.
I guess the point of my rambling is that while this was a bit of a challenge, it wasn't as bad (in my opinion) as previous posters made it out to be.
Good to hear a new builder isn’t having the problems of those above. I did mine on a Saturday morning with the help of a non-aviation friend as wing-wiggler. Done before lunch. (Before any internet warnings).
No ice, no nitrogen needed. That was 700 flite hours ago. Barely remember it. I’m sure most others had a similar experience.
No ice, no nitrogen needed. That was 700 flite hours ago. Barely remember it. I’m sure most others had a similar experience.
Can I see a pic of these modified wrenches?The good news is that those bolts are for shear only, so torquing the nut is not a concern. The nut is just to keep the bolt from coming out
I have a modified open end wrench (ground down to be able to actually fit on the nut) that a few of us at my airport used to install those bolts. Not a fun job.
I’m in the middle of this right now. Like others the biggest challenge is the bottom nuts. I just don’t know how to keep them from spinning. I bought a huge screwdriver to maybe press against a flat of the nut (like a crowbar action) but could not generate the torque needed at the end. I have the nut 90% on but am nowhere near fully torqued. I see a few threads for custom wrenches and would love to see some examples.
As far as bolt insertion, lifting the wings was the key. Get a sawhorse and some large shims and get the wings lifted to get the weight off the bolts. Then using both a small hammer then a rivet gun made the job not bad.
Really don’t feel great about the torque on the bottom bolts though.
As far as bolt insertion, lifting the wings was the key. Get a sawhorse and some large shims and get the wings lifted to get the weight off the bolts. Then using both a small hammer then a rivet gun made the job not bad.
Really don’t feel great about the torque on the bottom bolts though.
Buy a wrench or two from a pawn shop scrap bin. They usually cost me $1 or less. Sometimes free.
Cut, heat, grind, bend, whatever till you get something that fits. Mine was a combo cut in half then the open end ground till it fit. Grind it symmetrically so it works for both sides. Worked just fine.
Most builders torque the bolt side. Adjust for running torque. As others said, they are in shear.
I think I read one builder was able to fabricate a crowsfoot or something that worked on the nut to use a torque wrench. Maybe Antisplat needs to invent a wrench like the prop wrench. Hint. Hint.
I had no trouble driving my bolts per Vans method with a tiny bit of lubricant, a hammer and brass punch. I did have to remove one bolt because I left the washer off. I came up with a method to draw it out like a bearing. I wouldn't want to pull eight of them but it can be done without damage.
I have used the freeze/heat method on many bearings. The process has to go pretty fast or the temps stabilize and the bearing gets locked in the wrong place. Maybe aluminum behaves different from steel but I suspect the temps stabilize pretty quick since it's impossible to heat the hole to get the full effect. Ibwas concerned the bolts would change somehow.
Last edited:
I didn't end up needing any custom wrenches for my installation, but I do recall that crowfoot wrenches, swivel sockets, and wobble extensions all got used at various points. I did happen to take a photo of all the tools I used during wing installation, maybe some clues in here? (Edit: Oops, I missed that this was for a 7A, which is a trickier animal!)I’m in the middle of this right now. Like others the biggest challenge is the bottom nuts. I just don’t know how to keep them from spinning. I bought a huge screwdriver to maybe press against a flat of the nut (like a crowbar action) but could not generate the torque needed at the end. I have the nut 90% on but am nowhere near fully torqued. I see a few threads for custom wrenches and would love to see some examples.

Last edited:
This was by far the most awkward bit of my build, top tip i found was to use plumbers freezing spray to chill the bolts, plenty of lubricant, and whatever you do make sure the bottom bolts don't go too far in before you have the nuts started, then incrementally insert, tighten nut, insert, tighten nut and so on, getting a spanner on the nuts is a pig of a job and I used a combination of large flat blade screw driver and ground down spanners - access is terrible on an "A" model (RV9A). To get the bolts in involved a large club hammer and wood drifts but I have heard of people using a rivet gun on the bolt head to drift the bolt home. I don't think getting the wings off would be possible without some serious damage being done due to the inability to get access to the lower bolts easily - hopefully my wings are never needing to come off.
Agree the design is poor, especially on the "A" models.
Good luck
Nige
Agree the design is poor, especially on the "A" models.
Good luck
Nige
Having built 2 rv-9a’s, agree easier second time. Screwdriver, crows feet ground down, etc needed. Each bottom bolt nut was unique. Used drift pins (ground down bolts) in all holes and friend wiggling/lifting wing to help align. Agree just small taps and add nut once a thread or two show, as otherwise you can’t drop the nut in. Music helps. 
Cal
Cal
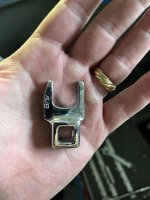
Some of the wrenches I’ve used on RV builds over the years. The bottom row are the ones (I think) used on 6A/7A/9A main gear weldments, along with a lot of choice words.

How did you get the bend in those wrenches? I can see that shape being useful.Some of the wrenches I’ve used on RV builds over the years. The bottom row are the ones (I think) used on 6A/7A/9A main gear weldments, along with a lot of choice words.
View attachment 90599
I collect odd wrenches at garage sales for this purpose.
Bernzomatic high heat propane torch, a vice and a hammer. Heat it up cherry red & tap it to desired angle. A welding torch would be quicker but I just used what I had at the time.
Bernzomatic high heat propane torch, a vice and a hammer. Heat it up cherry red & tap it to desired angle. A welding torch would be quicker but I just used what I had at the time.
Last edited:
If you think it was hard to put them in, try taking them out. I had to use a rivet gun and regular bolts to push them out. Very difficult.Just put the wings on for the last time with the close tolerance bolts at the airport. The top row of bolts are no problem. The bottom row of bolts are a piece of engineering nobody could be proud of. There are major interference issues with the gear leg support weldments that prevent getting a wrench on the nut to do anything other than stop the nut turning. You have to insert the bolts with just a couple of threads through, get the nut started, tap the bolt in, turn the nut a quarter turn, tap the bolt and repeat until there are enough threads into the nut that the bolt can be drawn in by turning the bolt. I cooled the bolts down in the freezer overnight before inserting them in the spar fitting (with grease) but even so the bolt turning friction was significant so I don’t have a good feel for what final torque I have on the bottom bolts. More of an issue for the AN4 size bolts. Having this poor quality of engineering in such a critical area just beggers belief. I am really surprised that there hasn't been more calls for Vans to fix the design in this area. This may get a pass grade from a FEA viewpoint but is totally unacceptable from an assembly and maintenance viewpoint.
Buy something that will burn MAP gas. Same size bottles but hotter flame.Is there a cheap torch I can buy at harbor freight that will heat up the wrenches so I can get a bend in them?
For anyone reading who has not made it to this point in the build yet, here is a tip for the close tolerance wing bolts.
Go find the bolts right now wherever they are. Immediately put them in the nearest available freezer you have. Leave them there until the very day, hour, minute you intend to put them in the plane permanently. I have kept bolts in the freezer in the kitchen in the house for up to 2+ years on past builds.
When the time comes when you think you have to test fit wings for whatever reason, but not for the final fitting, buy some cheap bolts that can easily fit in the holes. You do not need to insert bolts in every hole for these test fits. Do your fitting, then remove the bolts when you are done. All this time leaving the close tolerance bolts alone in the freezer.
When you are ready for the final assembly use a rivet gun to tap the close tolerance bolts in. As for tightening the nuts, well, all of those tools shown above will come in handy. Forget the idea of getting a torque wrench on those nuts though.
These bolts are a real pain, the nuts even more so, but doing the above will decrease the amount of curse words you will be using. There are thousands of RV planes out there that have made it work somehow. You can make it work too.
My friend and A&P helped me put the wings on. He pulled out a can of assembly lube and greased the bolts and the bolts slipped right in with a little persuasion. No dry ice or bolts in the freezer. He commented on the number of bolts and there were many more than certified planes he had worked on. I put the bolts in cold but no lube on my 7. The 8 was lubed. No comparison.
Also make sure there is no overspray in the holes from painting the cockpit.
Also make sure there is no overspray in the holes from painting the cockpit.