What's new
Van's Air Force

Don't miss anything! Register now for full access to the definitive RV support community.

RV-7 #74017

Return line swivel fitting - hope the line is well stabilized between that & engine as there is only an o-ring inside that fitting & wouldn't do well if line vibration is present.
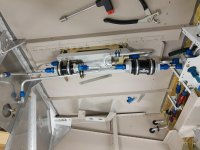
Good point on the vibration. I may yet (probably will) revise this concept a little more. I wish I had some hoses to play with but until I nail down where this regulator is going I?m sort of trying to eyeball it.

I guess one thing I could do would be to put a little bracket with a bulkhead fitting on the firewall and run the hose to that, then hardline to the regulator. Will have to look at that.

I?ve also found some fittings with instrumentation taps: https://www.anplumbing.com/adapters/gaugesandadapters.html

With the bulkhead fitting and bracket idea this might be a little more secure. I?d probably fit a restrictor from McMaster on the port.

Wiring bundle for SDS systems is about same diameter as EGT/CHT wiring bundle, plus the odd wire for engine sensors. Battery cable penetrations will probably be as big or a bit bigger. Caution on having a penetration above the battery tray, might be tough to get battery in & out.
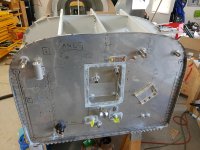
Good to know on the wiring bundles. With the stacked battery the lower one won?t come straight out anyway; I?m expecting to have to pull the box off to get the battery out (and/or remove the upper box). But I?ll watch out for penetrations over the batteries. (the ones in the picture I literally just plopped down semi-randomly in a few seconds?I haven?t started routing any wires yet outside the wings).
 
My latest 6A has the 2 batterys, flanking each side of the center firewall recess. The oil cooler is mounted slightly lower & about 3" from left edge of firewall, 3" scat runs up & around mount tubes to the baffle above #4 cyl. Conical fiberglass plenum fabricated on top of oil cooler to smooth air flow through it, butterfly valve controls airflow. The fuel regulator is about where you have planned yours. I have the wire bundle penetrations just above & inboard of each top engine mount bolt hole, so wiring easily runs along the mount tubes. I have one coil pack mounted on top of crank case, second coil pack mounted below the left battery on firewall. Brake reservoir is about where you have yours. Solenoids, relay & ANL fuse & shunt mounted about where you have drawn yours. I wanted as much space possible on back of engine for... easy maintenance access.
 
Last edited:
The oil cooler is mounted slightly lower & about 3" from left edge of firewall,

Unfortunately that doesn?t work on a taildragger (and it?s what?s been causing me so much grief). The A models have a lot more space on the outboard edges of the firewall for things like batteries and oil coolers. On taildraggers there?s a lot of bracing for the main gear attachment there.
 
I have mounted oil coolers on outboard tubes of engine mounts in past, one being a 8 & other 7A. I cursed at those installations because it made maintenance access a bear from that side.
 
Last edited:
Double check how easy it is to remove the batteries and to charge them... and to get to everything else, like oil filter, prop governor, wires on the mags...


Ed
 
Make a pull/carry strap for the battery removal.

Double check how easy it is to remove the batteries and to charge them... and to get to everything else, like oil filter, prop governor, wires on the mags...


Ed

I found it near impossible to get my single odessey battery out of my 7 in the standard location without the lower cowl off due to lack of anyway to hold on to the battery. The solution was a handle made from a piece of 1" nylon strap with the ends folded over and hole melted in ends with a hot nail. It can be attached to the posts and pulled from up top. Make it long to clear all the stuff in the way and reach that lower battery. It is light, cheap, and necessary. OK, necessary is my opinion.

You still need room for the battery, but maybe this will help keep your fingers full length.
 
If it wasn't clear earlier, I've been mocking this stuff up as I go. The oil cooler has a 3D printed mockup; the batteries are empty shells from EarthX, the relays and fuel pressure regulator are the real things, and all of them are taped in the place shown by the picture. As the standby alternator and governor have not yet arrived, I used surrogate items to check rough clearance (e.g. an old can of Rustoleum for the alternator and a pickle jar for the governor). It isn't perfect but close enough to make sure I can still get to things. If I get time later I can post a few more pictures.

Note, the "stock" battery location for a -7 is between the two batteries shown.

Double check how easy it is to remove the batteries
With the caveat that I don't have ducting, hoses, or wires in place yet, removal of the upper battery shouldn't be too difficult. Removal of the lower one would be more involved as I'd probably have to remove the upper battery and box, but the bolts would be reachable with extensions. I don't anticipate battery removal on a frequent basis (less than yearly).

I expect the cabin heat duct would represent the largest obstacle after disconnecting the leads and undoing the box.

and to charge them
I'm going to have dedicated charging leads on a bracket by the oil door.

... and to get to everything else, like oil filter, prop governor, wires on the mags...
Oil filter comes straight off (90° adapter), prop governor is accessible for removal though adjustment won't be fun (not that I should be doing that after it's set), and the coil packs (no mags with SDS EFI) are really easy to get to.

I found it near impossible to get my single odessey battery out of my 7 in the standard location without the lower cowl off

Why is removal of the battery without lower cowl removal important? I already know I'm going to have to pull both cowls and it's not really that much more work--just a few screws and pins. Again, I shouldn't have to do that very often.


Biggest remaining headache is the fuel pressure regulator and its plumbing. That'll probably be a roundabout loop on the firewall, but it's on the return side after the distribution block.
 
Last edited:
Pictures of the mockup:

Fuel and return lines, regulator (ignore the writing; either one can be supply or return and it'll just depend on what makes the routing easier):
7HszSCq52XNVDJSlQch3f0-h4fvkxFrF-MRLfzPD3Zqals7IA6yS48zbZnj8UuCnlSoYpYbzy_xYtItAVMBwfYzwRUC2z6pwSAuv-xKhKaHRoHR976przx2r1fXFW2Z_pfjBMAAr9Zt6ecGX9KpRWDpuVwwlmCekgBj-jitagpKH11S29NoHZeDGdFfrZB6PUOJFpWRFqtenPeAy3fO7s9iiNIIckaIWmhF21WsQM6GMGx8tbwHZ1bDwl3Qw7Jh9frIDVzo-hZ80hDQ6OiBRWkBBey9G0-50sbe-mQc81KjdiTmPkfOA8EmamuUn-mPRlfiLW28Xp5_hIPDi7oDJ2g4P82sPJuq8YDhIY1VTlBu91DFJEajcHAHR7MCCGx4ZXpooej4SCfNt59rHoAYwuz5K_Moy1d7W9wwhZ-86Z5sOyL2Q1S5qw1nh4T9Oxg-duwxGU9L9r9M7zdz2-C8TZ0rxu12iEiEQKPvBPymfcjn1yr-mRTgpAVaOwj2V1KXm_NkbyU-yx1KCI68h0wpHNOln1EtwLz_xJDuAV8S1B0W2piyfXDTat4Xm1jtkHHs_qD2LtE3QxU97uwZf4X5RoLLq2gRm7yVLUq1DABoP97yhEEwgX1aX6KeKQ6MXGuLdA1-Ewv76KdME9VKSd_XrQTNgwWd5kk7K3SWfjAzJiU3b2afSh_xCznMNRDIV=w604-h453-no


Looking down at the oil filter:
YkSk4S8CqYndYFy_F34N4haOBef0ZFFHiP_2K_FImb2-nPUdAKRpX83MWbY_-LBejojizR38zHrUCWTFWFfQNxs3qSB7daDmIg-L6n8m0pklCn815uhjq801DMLPvIey3ZIsAZSnZGkVVH8U58LIvPd0t1llmyWac-isj_HNqylGns-0gSF0VRcFIs9LMN-9Y9NGk0VwXjxpr5OYfaf5rjqyrZrWKhRinkbkTvS-55jP4MCneIatqXGx0yBbzao_eMMk8-EOu-0uPANVcZk9xG0OTXd3xHsz7rUBQRsweSwI7UDi5XYVqqPoepmccq8QIzDR6FGupLgTMNNEzni8EEWtAyeibqMB2JR8_h9m5cL-zYHAJabhkTKkbq7yOjP1hO6N7WVBwq_9w_sBYIARGNFoHZaUdfCtB_GuUwQITTVx7Sb_TVuJJIHfxNwhp3e2kL61Uh2iqAawwMY2bpIPhea-pgFkx6avQz8eKhI4CtXWfGBXWb2z4eB4_Gt_sgVWWyszf24iCw8QNrtb-514rmgEBWYMAcyIkFhqtsjB4FByhQTT8LZKnjPZbrAloH3p6loEgePxFcne-4aseIBkEdudp9UVx_VrIf0iTOzBH-8X4Hbg4768i2QzEPPRNH1rNmLrduH2qfVIUUb5Bd-g8uuc131eIYIav0G7Uu8q10P9ed07Cwsrv3QpQN23=w340-h453-no


From above (the Rustoleum can is the right size and length to be a surrogate for the aux alternator which is on backorder):
GwsOPZGsZ5fm7mw6jo3PxpIYxFnJofu1W-qC1QBRUW-gHx8XjzqVY6-1AzHqFdMzQ3_hB1bLmb1TDN1g1NvyeLyQ0eWh3BGlKgSHhH1POB7KE9HwtqY0NiU279bt3gyGU05a58vxsIzdKy0V754mMl7b9c5_lX6qywrAnT8vWKFEQlcOtn7YOjjdrRi95dXanxcuaEEjPaz5qYSzRqUJuVahfuJWZOEJyUSmHVOnr6EybQcSVipHhCs2m_nvW2cAXZLo8ZYN7Mqojcr3Z4xgYiD5LuZ5FP79emSrz6SuB3gnBVe9mNRd81q6InUECTbD0ChEsYIokMjpMo_yJ_DtF2pfRSUvzTlXi9zQnm6IFWTLU_MJvT4oO4palm8iNi06FUpLQKhsAOJpydqJ_QbqmMV2LvL-h8OKSGhlvakp_7bmh-LKS4zvRDFPNLTG3kIxgEbRMUs144QTEiHl3v5pSHrADdTbDXNxH3Kmo3jHr7_HJbNYwUjqBa_YqfQqdHQz_XIRbLYcDo9DYFxC3geBAiwi-9vkRvAFvOdyXZp5WfDeuuI_xlTIArrMv_kRIOOB3nV0uKRi_ifl0VJsyfwDySRM9Z8X6_PAqTfXT5HTvM0wTe4xnDXQE7J914KF-7fGouXFV4prEHWd8DFF3EV7vvE6d3hIsb_i-4B40FTXNLa2j-NLLI2PfQpmNKJK=w680-h906-no


Batteries and contactors taped in rough position. All terminals are accessible. My concern over the brake reservoir should be apparent.
kKMG-V077Isn4xRujgysVR9ZbtaRJcu6RmjmlR5wCwjV0F-E9RqaR8g4DbFOjEj_xxu5EP6hd7QgTdd0ImQmPGXrb2aMEItIDhM67Y-O7jIgijOBoKzNZDHTj0IkqkZnMbicZpaf-xQBbBexBBw4ew_6YZg-I2a5lbDQnN_ipqeTaAcstlXbg0skFopM_Klq1zmunvQV3nOXElh7KRE1xp2fgWEoWXM00CNXmXF_ZeE4Lfry3hlrJndjD8LMF-OjXaFjQTsPnrq1PCweshZP_8qaUgvgav-W4FXIg5OcMCd8N4u1dNGalLqM8xjsNT08iKldi0y-5eDwQcPy6bi1i1w1QZdvs7usZqGIJ8Y73bJ6whDxrAqyPjvNLJZhaqHeVz5bCTVDB0lhpq_4UCroEOBPzzbL6hFjzkNoVbeX9OcFQM_JTuyRsCuwbO40AyRCQd_AqbMuTSuTj77cR-Gp0KtVXNjl8qjR_Hu1-_1tM55nOEzfMvMGXp-nT3HKQnIfnu2YeaFbc3FV4pegTe_GAxAxC229GRoNpsMFiZV91-uOMQAevJu-0i8KvnmQdKcd6cZPSnOd-tzSkXrXXROQJyBTBeiBpOLifukH7KPQQdFPMMHWIEvRZjRzGpq600n-Ij3p6gniVMHY4EVnB9RKJlo2-2rnsFlmLtDLN_guH3RcZrTAU4cMmdlmB5Co=w680-h906-no


At this point I'm feeling good about the layout, other than that reservoir. Also thinking hard about either getting the EarthX insulated battery boxes, or insulating my own with leftover firewall batts (I ordered a big roll from McMaster and I'll have plenty). Probably going to stew on it for a few more days before settling on something; in the meantime I'll keep chugging on the electrical diagrams, panel layout, and maybe start fabbing a shelf/supports for the engine electronics. Eventually I'll have to pull the engine and the mount so I can start mounting stuff on the firewall but I'll probably wait till the alternator and governor arrive.
 
Time for another update!

I've found that keeping a running "to-do list" has really helped me organize what I need to do and what needs to be done in what order. I just created a Google doc and listed items in order; I could add/rearrange items if I think of them or discover a different order is needed. And then I also get the satisfaction of crossing items out as I finish them ;)

All of the firewall equipment (that I know of at least) has been located, doublers and nutplates installed, etc.
I've placed penetrations for wires and control runs in about the best places I can think of; hopefully I chose well. I probably have too many, but oh well.
The fuel pump module and all the filters/lines are finished (I'm going to remove the little filters and shutoff vales in front of the spar; it was a neat idea but the filters are too small) except for mounting some wiring conduit.
Penetrations, firewall recess, and "hard mounted" firewall equipment (i.e. the stuff that has to go on the firewall directly, not sandwiching the insulation) is mounted and sealed as appropriate.
Rudder/brake pedals and NACA inlets are installed.
Forward upper structure is riveted in place.
Smoke oil line is installed too. I ran a hard line from the firewall back to a sealing QD fitting behind the RH seat.

At this point the next step is pretty much insulating the firewall, then starting to mount more equipment. I'm thinking at this point that I might detour a bit and knock out the first part of canopy fitting up to gluing to the slider frame. Then I can come back to hanging the engine, fitting the cowl, and mounting equipment. At that point I might start with some avionics parts--EIS module, AP servos, radios, etc.--basically anything that doesn't go on the panel yet. We'll see. In the meantime I'm still slowly drawing out the rest of the electrical diagrams and playing around in CAD trying to plot out where everything in and behind the panel is going to go. I got out of doing design at work a few years ago and this process is reminding me of why...

Anyway, some pictures for your enjoyment... note the fuel return line has been re-bent; it was in the way of where the throttle cable will run.
 

Attachments

  • IMG_20201116_133228965.jpg
    IMG_20201116_133228965.jpg
    420.6 KB · Views: 532
  • IMG_20200917_140340863.jpg
    IMG_20200917_140340863.jpg
    299.5 KB · Views: 559
Since I hit a big milestone, time for another update... I've done some stuff in the last 15 months:
Cut canopy, Sika'ed the aft together
Done a bunch of wiring
Powered up the avionics on ground power, which went exceedingly well. GPS signal isn't great in the shop and I had one pin out of place on the com radio. Otherwise, smooth as silk.
Next is finishing the last of the wiring aft of the firewall, a few other miscellaneous tasks, forward skin installation, windscreen, and then FWF. But a progress pic:
 

Attachments

  • PXL_20220308_213357021.jpg
    PXL_20220308_213357021.jpg
    420.6 KB · Views: 297
Build sequence

Hi Bob,
I'm curious (and not critical) about the building sequence because it looks like the panel and avionics are done but there is still some sheet metal work and the wind shield and associated fiberglass etc. to be completed. Some builders advise to leave the avionics until the very end, what are your thoughts on this? Obviously access is a lot easier with the fwd skin off, but at the same time the equipment warranties are ticking away and there is still some messy construction work to do.
I'm trying to figure out what is logically next on my RV-6A project, after the sliding canopy is done, hence the question.
Thx
Paul.

I know my avionics purchase/install was a little early compared to most, but there were a couple additional factors:
- I'm using an SDS injection package, so there was more stuff to locate (both for the system itself, and the additional electrical redundancy). It's all off-plans so I wanted to make sure I did the placement/install provisions while I had access.
- I had a quote from a dealer that I was very happy with (he also makes a nice interconnect board), and when the big Van's and Lycoming price increases were announced last summer on top of the supply issues I said "well ****, I'd better go ahead and order before prices go up and I can't get parts". Yes, I'm gambling a bit on the warranty side but I figured the odds/costs of problems were outweighed by the probable price increases and shortages later on. A lot of the bad-from-stock risk has been retired at this point.
- I'd anticipated my build process going a little faster :eek:


I'd already done some of the wiring using 3D-printed dummy units and cardboard mockups, so I was half a step ahead. I'm also an aircraft systems engineer by day, so the fuel system and electrical/avionics work is just plain fun to me--I'd much rather do that than futz with the blasted canopy or try to make things pretty. There's also something a little Zen about making up wire harnesses. I have a few more wires and accessory components (interior lights, USB power outlet) to put in, but after that the forward skin can go on. I have access panels and have verified I can get to everything so I haven't boxed myself into inaccessible wiring--I won't have to remove skins to get to things.

Wiring with the fuselage level on the stand also means I don't have a slope to worry about and it should be easier to fine-tune the ADAHRS. And I can do the canopy with the airplane level and accessible, too. That'll probably be the next step once the skin is on. I might rig the gear fairings too, while things are supported level.

It's not shown in the pictures but a lot of the firewall-mounted components are in place. I think all that's left there is the adapter and "throttle" for my oil cooler, plumbing in the pressure sensor manifold, and running the brake lines to the brakes once the gear is installed. Batteries, contactors, firewall penetrations, etc. are all in place already. Then it's engine, cowl, baffles, and fiberglass.

Oh, and I have to remake the forward spar covers over the fuel lines.
 
Nice job on the panel

Bob,

You have done a very nice job on the panel. I am glad my interconnect board has made the setup easy for you.

My new slogan is, “it is so easy a cave man can do it”. Wait a min, that is already taken. Back to the drawing board. LOL

Keep up the great work.

Brian
 
Back
Top