VansAirForceForums  
Home > VansAirForceForums

-POSTING RULES
-Advertise in here!
- Today's Posts | Insert Pics

Keep VAF Going
w/a Donation


VAF on Twitter:
@VansAirForceNet


Go Back   VAF Forums > Model Specific > RV-8/8A
Register FAQ Members List Calendar Search Today's Posts Mark Forums Read

Reply
 
Thread Tools Search this Thread Display Modes
  #1  
Old 04-20-2023, 09:09 AM
Dan 57's Avatar
Dan 57 Dan 57 is offline
 
Join Date: Sep 2018
Location: LSZF
Posts: 1,262
Red face Eggshell strength? No, but a Broken Canopy

We all know about the propensity of RV-8 canopies to develop a crack... those sometimes happen for obscure reasons, sometimes due to edge tension thanks to a rivet or a screw in a hole of too small a diameter, and/or due to the expansion/retraction of that large piece of acrylic plastic.

My story of canopy breakage is a bit different, so here goes...
Took my friend's -8 for a nice flight thru the Alps 2 days ago, ending with a delicious pizza South of the Alps.
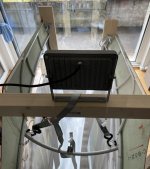
Upon returning to my base, climbed on the left wing, canopy closed and locked, with the intent of cleaning the windshield. Applied cleaner with the spray bottle in my right hand, which I then rested on the junction of the roll bar and the canopy bow. Or so I thought. Leaning forward to wipe the windshield off with my left hand, I also put some pressure with my right hand on the canopy, just behind the canopy frame, almost on top of the arc. This pressure was light, or so I thought, probably well below 1kg (2 lbs).

crack!
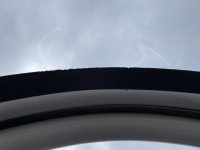
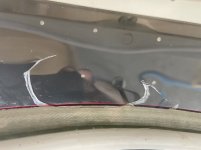
Crack? Guess I'll never forget this sound... so light in pitch I thought I had stepped onto something like a cookie. Looking at my feet nothing, but looking at where my right hand rested moments ago, a u-shaped crack.
Many strong holies whatever followed, unfortunately to no avail.

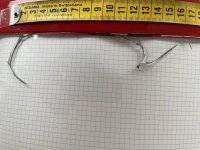
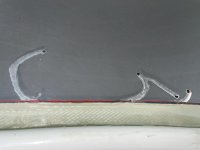
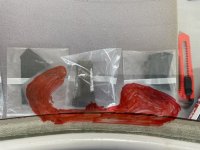
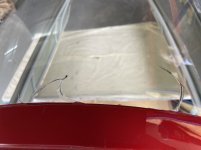
The crack is about 15cm (6") long, and about 7cm (3") wide, on the 1 o'clock position.
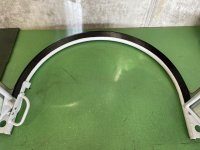
We decided to have the canopy fixed, and it has been brought to a company manufacturing/modifying and repairing canopies.

Reasons
I'm sure a zillion experts will jump in, but here are my humble observations.
- material thickness. The top part of the canopy is much thinner than the walls. Yes, it is logical and due to the forming process, but still a good thing to remember
- it seems that the forward edge of the canopy was not properly bonded to the frame. It therefore probably flexed before the acrylic itself let go

Warning
Treat your canopy with the utmost care. I never expected the canopy to be as fragile. And I pride myself on being careful... well, no more.
Clean the windshield with the canopy slid back. Also clean the canopy only when slid back (easier anyway), feet on the ground.
Do the cleaning of this expensive plastic part yourself. What happened to me, a short 171cm (5.6') and light 71kg (156lbs) individual, could easily happen to any well meaning helper...
Attached Thumbnails
Click image for larger version

Name:	IMG_5964.jpg
Views:	258
Size:	230.6 KB
ID:	41317  Click image for larger version

Name:	IMG_5965.jpg
Views:	244
Size:	320.8 KB
ID:	41318  
__________________
- ain't the Destination, but the Journey -

www.aerofun.ch
YLL On Tour... the blook:
https://vansairforce.net/community/s...d.php?t=210564

RV-6.9i #25685, slider, O-360-A3A (carb/dual Lightspeed II), MTV-12-B, HB-YLL owner & lover
RV-4 #2062 HB-YVZ airframe builder
Reply With Quote
  #2  
Old 04-20-2023, 09:16 AM
riseric's Avatar
riseric riseric is offline
 
Join Date: Oct 2011
Location: Québec, CNV9
Posts: 689
Default

Thanks Dan for your report and advice. Sad outcome.
Reminds us all to take good/kind care of our machines despite their apparent rugedness/toughness (are these correct words??).
__________________
Eric,
2023 =VAF= paid
RV-8 SB #83274
Grove Airfoiled Gear, Wheels & Brakes
VPX-Pro, EFII System 32, EarthX batteries
Aerosport IO-375, MTV-9-B/183
Skyview HDX
C-GEMQ, RV-8, "Dragonfly", flying
C-GNFJ, C72R Cutlass, flying
Reply With Quote
  #3  
Old 04-20-2023, 09:33 AM
jibby212 jibby212 is online now
 
Join Date: Oct 2014
Location: Sarasota Fl
Posts: 195
Default

When building my canopy a few years ago on my rv7, I cracked the canopy drilling a hole close to the edge so I ordered a new one.. Just a few weeks ago I decided to throw away the cracked canopy. I folded it to break it which surprisingly took very little pressure. I effortlessly broke the canopy into small pieces. I was thinking maybe I received a defective canopy but maybe not.
Reply With Quote
  #4  
Old 04-20-2023, 09:40 AM
rv8ch's Avatar
rv8ch rv8ch is offline
 
Join Date: Feb 2005
Location: LSGY
Posts: 5,249
Default

That's the stuff of nightmares. The only time I want my canopy to break easily is if I'm upside down and trying to get out. Definitely a good reminder to take care of that giant, clear, eggshell!
__________________
Mickey Coggins

http://www.rv8.ch/help-people-in-ukraine/
Reply With Quote
  #5  
Old 04-20-2023, 06:56 PM
71459 71459 is offline
 
Join Date: Jun 2019
Location: Seattle, WA
Posts: 100
Default

Quote:
Originally Posted by rv8ch View Post
The only time I want my canopy to break easily is if I'm upside down and trying to get out. Definitely a good reminder to take care of that giant, clear, eggshell!
Check out this report on using a canopy escape tool. Apparently, it's actually very easy to break through the acrylic.

https://vansairforce.net/community/s...ad.php?t=81299
Reply With Quote
  #6  
Old 04-21-2023, 02:43 AM
PaulvS's Avatar
PaulvS PaulvS is offline
 
Join Date: Aug 2019
Location: Western Australia
Posts: 1,486
Default

That was bad luck Dan and an unpleasant ending to an otherwise good day... that sounds like holies with an f.

What was the temp like at the time? Cleaned out my shop the other day and broke up some scrap plexi, which snapped very easily in the cold weather. In the warmer weather a few months back it was more difficult to break.
__________________
Paul vS (yes I'm also a Van)
Building RV-6A #22320 O-320 FP. Airframe structure 95% complete, now working on integration, plumbing and wiring.
Flying my Aeroprakt A-22 STOL and the aero club's RV-9A while I build
Reply With Quote
  #7  
Old 04-21-2023, 03:17 AM
Dan 57's Avatar
Dan 57 Dan 57 is offline
 
Join Date: Sep 2018
Location: LSZF
Posts: 1,262
Default

The Ts on the ground were in the 15°C range, probably not a major factor. Although as we know, low Ts render the stuff brittle...
I had returned from colder air at altitude, but the canopy had had about 15' time to warm up by the time I started the breaking, ooops, cleaning action.

A guess re integrity, is that the -8 is more affected than other models. Many a -8 developed a crack overnight, or during flight, most of the times in the middle or rear part of the canopy. Let's call it tension relief.
This case is different. The bend radius in the top half of the bubble is tight, so the difference in thickness of the plastic between the skirt region to the top bow is probably bigger than on the canopy of other models, and makes it de facto fragile.

Any RV-8 builder out there willing to share the thickness of the canopy at the base and at the forward top?
__________________
- ain't the Destination, but the Journey -

www.aerofun.ch
YLL On Tour... the blook:
https://vansairforce.net/community/s...d.php?t=210564

RV-6.9i #25685, slider, O-360-A3A (carb/dual Lightspeed II), MTV-12-B, HB-YLL owner & lover
RV-4 #2062 HB-YVZ airframe builder
Reply With Quote
  #8  
Old 05-19-2023, 11:35 AM
Dan 57's Avatar
Dan 57 Dan 57 is offline
 
Join Date: Sep 2018
Location: LSZF
Posts: 1,262
Default

Following the initial shock, I consulted with the owner, and decided to give it a go, and try to repair that canopy as good as I could.

The oblique and jagged meandering of this crack made it clear that the repair would be particularly challenging. Usually cracks happen in a straight or slightly curved line, and the crack itself perpendicular to the acryl surface... not this time.

I then gathered as much information as I could, as it would be the first time I would tackle such a repair.
There's a company in Germany called Acrylglasprofi, and they have published an excellent step by step repair guide, in German language, called Reparaturanleitung für PLEXIGLAS®, which can be found annexed.
Friend of mine, RV-8 builder/flyer Peter, repaired a huge crack on the rear of his canopy a couple of years ago, with amazing results. He lent me some of the tools used, and gave me plenty of tips too, all of which I used along the repair guide mentioned above. Thanks Peter!

One will need the following to perform a repair in the same way:
- a comprehensive wife since the repair was gonna take place in our living room… thanks Tina
- a carving bit driven by a Proxxon, or another brand drill/grinder
- curved and straight wooden sanding blocks
- different grades of sanding paper strips, ranging from 250 to 8000, with double-sided tape to attach them to the blocks
- a roll of polyester tape
- polishing paste, normal & extra fine
- soft polishing tissues
- last but not least, the glue itself. Whilst there are different brands of acrylic glues, I choose one which was locally available, namely the Acrifix 2R 0190 Polymerization Adhesive and its CA 0020 hardener, manufactured by the company Roehm GmbH in Germany.
Attached Thumbnails
Click image for larger version

Name:	Copy of IMG_6012.jpg
Views:	19
Size:	143.8 KB
ID:	42628  Click image for larger version

Name:	Copy of IMG_6084.jpg
Views:	29
Size:	106.2 KB
ID:	42629  Click image for larger version

Name:	Copy of IMG_6095.jpg
Views:	20
Size:	134.7 KB
ID:	42630  Click image for larger version

Name:	Reparaturanleitung-fuer-Plexiglas.pdf
Views:	34
Size:	193.1 KB
ID:	42631  
__________________
- ain't the Destination, but the Journey -

www.aerofun.ch
YLL On Tour... the blook:
https://vansairforce.net/community/s...d.php?t=210564

RV-6.9i #25685, slider, O-360-A3A (carb/dual Lightspeed II), MTV-12-B, HB-YLL owner & lover
RV-4 #2062 HB-YVZ airframe builder
Reply With Quote
  #9  
Old 05-19-2023, 11:45 AM
Dan 57's Avatar
Dan 57 Dan 57 is offline
 
Join Date: Sep 2018
Location: LSZF
Posts: 1,262
Default

The procedure was as follows:
  • stop drill each of the cracks using a 3mm unibit, and using the next size step to chamfer the hole both sides
  • grind a V-groove, e.g. chamfer the top edges of the crack using the carving bit in the drill/grinder. One must not use to high an RPM, and I found a speed of 7K just about right for the given bit. Securely hold the drill/grinder during the operation, and take your time
  • apply polyester tape leaving about 3mm space for the glue to later set on, on both sides of the crack
  • apply polyester tape on the other side of the crack to prevent the glue seeping thru
  • prepare the glue. As the amount of hardener used is small, 3%, the use of a precision (0.001g) scale is advisable. The stuff is quite thick, and care must be taken not to create too many air bubbles whilst mixing. Access to a vacuum bell jar would eliminate those pesky bubbles. And yes, the glue stinks...
  • apply the glue in several layers to fill up the gouge, and more. The glue must reach to, and overlap the tape as this will help in the first step of the sanding down task
  • once dry, turn the canopy over and repeat the last 4 steps above on this side of the crack
  • the drying time for this Acrifix is 24h. Then the sanding starts. Care must be taken not to scratch the surrounding area. The sanding is performed wet, changing the soapy water whenever changing the sandipaper grit size
  • once the vinyl tape starts being touched by the sanding, it is removed
  • the whole area is then covered by the ink of a permanent marker. This will give a precise indication as to which area is now being sanded down
  • the sanding continues using finer and finer grades of paper
  • finally the polishing starts. I used a normal and a super fine grade paste
  • ideally the repair, and the canopy as a whole should then be tempered. A sauna would make a very good oven, as the canopy should be heat treated to 80°C during some 5 hours, with a slowly rising then descending temperature. An enclosure using styrofoam could also be fabricated, as already discussed in other threads here on VAF. Since this crack was not caused by residual tension, I used an alternate procedure which resulted only in partial tempering, so we'll keep our fingers crossed for the future
Attached Thumbnails
Click image for larger version

Name:	Copy of IMG_6037.jpg
Views:	28
Size:	71.8 KB
ID:	42632  Click image for larger version

Name:	Copy of IMG_6056.jpg
Views:	25
Size:	118.4 KB
ID:	42633  Click image for larger version

Name:	Copy of IMG_6075.jpg
Views:	28
Size:	128.5 KB
ID:	42634  
__________________
- ain't the Destination, but the Journey -

www.aerofun.ch
YLL On Tour... the blook:
https://vansairforce.net/community/s...d.php?t=210564

RV-6.9i #25685, slider, O-360-A3A (carb/dual Lightspeed II), MTV-12-B, HB-YLL owner & lover
RV-4 #2062 HB-YVZ airframe builder
Reply With Quote
  #10  
Old 05-19-2023, 11:57 AM
Dan 57's Avatar
Dan 57 Dan 57 is offline
 
Join Date: Sep 2018
Location: LSZF
Posts: 1,262
Default

As stated in the first post, one should not assume that the those canopies are strong...
Comparing the plans with the canopy on the aircraft has shown some deviations made by the builder. The attached sketch shows the windscreen in dark blue, the forward bow of the frame in yellow, the sliding canopy in light blue. The red is a bead of Sikaflex which I decided to add after the repair, in the hope it will provide some support to the this area of the canopy.

The repair is done. The results are quite good, though some optical imperfection will of course remain.
Attached Thumbnails
Click image for larger version

Name:	signal-2023-05-12-203229_002.png
Views:	16
Size:	109.4 KB
ID:	42635  Click image for larger version

Name:	Copy of IMG_6103.jpg
Views:	43
Size:	130.6 KB
ID:	42636  Click image for larger version

Name:	Copy of IMG_6106.jpg
Views:	60
Size:	87.4 KB
ID:	42637  Click image for larger version

Name:	Copy of IMG_6108.jpg
Views:	50
Size:	46.3 KB
ID:	42638  
__________________
- ain't the Destination, but the Journey -

www.aerofun.ch
YLL On Tour... the blook:
https://vansairforce.net/community/s...d.php?t=210564

RV-6.9i #25685, slider, O-360-A3A (carb/dual Lightspeed II), MTV-12-B, HB-YLL owner & lover
RV-4 #2062 HB-YVZ airframe builder
Reply With Quote
Reply


Thread Tools Search this Thread
Search this Thread:

Advanced Search
Display Modes

Posting Rules
You may not post new threads
You may not post replies
You may not post attachments
You may not edit your posts

vB code is On
Smilies are On
[IMG] code is On
HTML code is Off
Forum Jump


All times are GMT -6. The time now is 06:23 PM.


The VAFForums come to you courtesy Delta Romeo, LLC. By viewing and participating in them you agree to build your plane using standardized methods and practices and to fly it safely and in accordance with the laws governing the country you are located in.