
Van's Air Force
You are using an out of date browser. It may not display this or other websites correctly.
You should upgrade or use an alternative browser.
You should upgrade or use an alternative browser.
Wing root fairing to fuse trim
- Thread starter jcbarker
- Start date

No rubber trim at all. Wouldn’t be opposed to it, just haven’t found anything I like…


None required. It fits tight against the fuselage. Just takes a little time to get it right.What is everyone using for rubber trim between the wing root fairing and the fuselage. I don't see anything in the KAI referring to that. I remember using a rubber channel with a flange against the fuse for my -8.
Thanks in advance,
Attachments
jcbarker
Well Known Member
At the risk of topic creep, Why did you choose to use torx drive screws and where did you get them?None required. It fits tight against the fuselage. Just takes a little time to get it right.
MED can jump in but Micro Fastner sells 6-32 and 8-32 SS 100 deg countersunk. The 100 deg is more difficult to find. Been using them for years. Never cams out.At the risk of topic creep, Why did you choose to use torx drive screws and where did you get them?
Last edited:
Have you done any speed check with or without? A friend of mine built one for his RV7 and it actually was slower with it. I have also read the standard VANS setup creates less drag but it was not a scientific study (as I recall)How about some real intersection fairings? Gives the airplane a "finished" look.
View attachment 92411
However, it looks very nice.
This has been proven. The "squared-off" intersection is less drag and therefore faster than the "rounded" fairing on RVs.Have you done any speed check with or without? A friend of mine built one for his RV7 and it actually was slower with it. I have also read the standard VANS setup creates less drag but it was not a scientific study (as I recall)
However, it looks very nice.
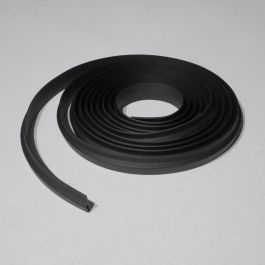
On my 7 I used plain U-channel with no lip: https://www.mcmaster.com/8507K41/
With careful trimming it's easy to get a nice-looking fit, just go slow and scribe a line you can trim to.

With careful trimming it's easy to get a nice-looking fit, just go slow and scribe a line you can trim to.
The 10/14 wings are different in this regard than the others. No rubber is used. Pic here shows std installation. However, I did add rubber on the fairing where it bends around the leading edge and is free hanging. I wanted this tight and if you get it tight to the fuse skin, it can scratch the paint.None required. It fits tight against the fuselage. Just takes a little time to get it right.
Confirmed this by you Mel, I can take this to the bankThis has been proven. The "squared-off" intersection is less drag and therefore faster than the "rounded" fairing on RVs.
")
This.
Not sure why Van’s did not do the RV-10/14 wing intersections using this seal just like on the older two place planes. On the first RV-10 build I looked at the “just butt the fairing against the fuselage” instruction and immediately discarded it as unacceptable.
Instructions on how to fit this seal can be found on RV-8 and other plans.
Carl
Your wings should not move with respect to your fuselage. YMMVThe 10/14 wings are different in this regard than the others. No rubber is used. Pic here shows std installation. However, I did add rubber on the fairing where it bends around the leading edge and is free hanging. I wanted this tight and if you get it tight to the fuse skin, it can scratch the paint.

If fitted correctly, it does not need this and doesn't serve any purpose. Many of RV6/7 drivers that has this, know that the seal has the potential of coming lose in the air and bangs around the fuselage. The noise it makes gets everyone's attention big time.This.
Not sure why Van’s did not do the RV-10/14 wing intersections using this seal just like on the older two place planes. On the first RV-10 build I looked at the “just butt the fairing against the fuselage” instruction and immediately discarded it as unacceptable.
Instructions on how to fit this seal can be found on RV-8 and other plans.
Carl
Yep, so I add a touch of RTV in the trim grove to prevent it from coming loose.If fitted correctly, it does not need this and doesn't serve any purpose. Many of RV6/7 drivers that has this, know that the seal has the potential of coming lose in the air and bangs around the fuselage. The noise it makes gets everyone's attention big time.
While it may not serve a purpose, this fairing needs to be removed at least once a year for Condition Inspection. The butt joint runs the risk of scraping paint each time and adding this trim eliminates that risk.
I also consider the trim adds to a more finished look, but others may disagree.
Carl
That is the beauty of experimental, we all can build it to the way we like it to fly or we like to look. The only wrong way is to have an attitude of 'mine looks better'Yep, so I add a touch of RTV in the trim grove to prevent it from coming loose.
While it may not serve a purpose, this fairing needs to be removed at least once a year for Condition Inspection. The butt joint runs the risk of scraping paint each time and adding this trim eliminates that risk.
I also consider the trim adds to a more finished look, but others may disagree.
Carl
Correct, but the fuse skin does flex. It is also very easy to scratch the fuse skin while installing this fairing due to its shape.Your wings should not move with respect to your fuselage. YMMV
Installing and removing does create a risk, particularly the bottom fairing. I avoid most of it by only removing the top fairing during condition inspection. I can access everything for inspection and lubrication from the top. Please don’t think I am arguing the point - only pointing out that a rubber filler is not required, because I assisted other builders who also thought there was no way to make it work. Just takes a bit of patience. Peace.Correct, but the fuse skin does flex. It is also very easy to scratch the fuse skin while installing this fairing due to its shape.
Last edited:
Installing and removing does create a risk, particularly the bottom fairing. I avoid most of it by only removing the top faring during condition inspection. I can access everything for inspection and lubrication from the top. Please don’t think I am arguing the point - only pointing out that a rubber filler is not required, because I assisted other builders who also thought there was no way to make it work. Just takes a bit of patience. Peace.
Hmm, I did put rubber on the fairing. I think it turned out well. I however only remove the bottom fairing. It is easier to get to the screws because the side of the fuselage is not in the way and I figure if I do slip with the screwdriver the scratch will be on the bottom out of site.
I know there are many ways to skin a banana, but using a long extension on the screw driver makes removing those screws next to the Fuse much easier and less risk for that kind of mishaps. And like anything else while working on the plane, a bit of care is always helpful.Hmm, I did put rubber on the fairing. I think it turned out well. I however only remove the bottom fairing. It is easier to get to the screws because the side of the fuselage is not in the way and I figure if I do slip with the screwdriver the scratch will be on the bottom out of site.
This. Plus I use torx for these sorts of non structural fasteners that require periodic R&R. Much less chance of slipping/stripping etc.I know there are many ways to skin a banana, but using a long extension on the screw driver makes removing those screws next to the Fuse much easier and less risk for that kind of mishaps. And like anything else while working on the plane, a bit of care is always helpful.
For me, I like a nice consistent 0.032 or so gap between the fairings and the fuselage skin. Shows attention to detail.
Yes it takes a few goes to get right and yes it requires care to install and remove.
If you’re going to let someone else do maintenance on your plane then it may not be appropriate.
Yes, iknew it would work. Just thought the rubber on the curved portion gave a cleaner look with less drag and no risk of scratches. Just a choice i made. Everyone has their own way of making it look and perform to their expectations.Installing and removing does create a risk, particularly the bottom fairing. I avoid most of it by only removing the top fairing during condition inspection. I can access everything for inspection and lubrication from the top. Please don’t think I am arguing the point - only pointing out that a rubber filler is not required, because I assisted other builders who also thought there was no way to make it work. Just takes a bit of patience. Peace.
Hi Richard, where do you buy your torx # 6 & 8 screws in Australia. Jeff R MansfieldThis. Plus I use torx for these sorts of non structural fasteners that require periodic R&R. Much less chance of slipping/stripping etc.
For me, I like a nice consistent 0.032 or so gap between the fairings and the fuselage skin. Shows attention to detail.
Yes it takes a few goes to get right and yes it requires care to install and remove.
If you’re going to let someone else do maintenance on your plane then it may not be appropriate.
Hi JeffHi Richard, where do you buy your torx # 6 & 8 screws in Australia. Jeff R Mansfield
Microfasteners. They USPS so postage even to here is reasonable.
Al and Art Mooney said, "you're welcome".This has been proven. The "squared-off" intersection is less drag and therefore faster than the "rounded" fairing on RVs.


bwagner
Active Member
I too added a simple pinch welt to the wing root fairings just for a finished consistent look instead of the wavering, metal-to-metal gap otherwise. Unclear why the otherwise complete RV-14 kit did not include this.

As others have already stated, resist the temptation to make a deep fairing at this interface else the resulting interference drag will exact an airspeed penalty.
As others have already stated, resist the temptation to make a deep fairing at this interface else the resulting interference drag will exact an airspeed penalty.
It came off on mine, scared the hell out of me.If fitted correctly, it does not need this and doesn't serve any purpose. Many of RV6/7 drivers that has this, know that the seal has the potential of coming lose in the air and bangs around the fuselage. The noise it makes gets everyone's attention big time.
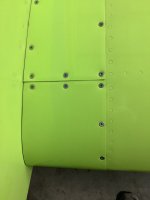
The difference is the non 10 and 14 do not have nut plates along the fuselage trim. (I think) Sure, one can add a pinch welt but that is not per (10 and 14) plans and could come loose or one needs to carve out a hole for the 8-32 screw. Keep it tight but remember paint adds a few thousands both sides. Just be sure to use a flexible shaft screwdriver (with painters' tape around the shaft to protect the fuselage paint). Pic on the right is after 700+ hrs. flight time and 9 times fairing removal.
BTW use Torq screws, make is so much easier. (And a little painter's tape on the fuselage)


to protect the fuselage paint). Pic on the right is after 700+ hrs. flight time and 9 times fairing removal.BTW use Torq screws, make is so much easier. (And a little painter's tape on the fuselage)
Last edited:
I used Beechcraft wing root seal, which fits better and seals nicer than Vans stock wing root seal.

 www.aircraftspruce.com

Beechcraft Wing Root Seal | Aircraft Spruce ®
Beechcraft Wing Root Seal Wing Root Seal: Black and packaged in 12-foot lengths. Adequate for one wing root.
Last edited:
